
:max_bytes(150000):strip_icc()/how-to-watch-the-crow-movies-in-order-742a37ba4e0748e3a691420484c36796.jpg)
"2024 Approved Best 10 Video Card Selections for Peak Streaming Performance"
Best 10 Video Card Selections for Peak Streaming Performance
The Top 10 Capture Cards for YouTube

Richard Bennett
Nov 04, 2022• Proven solutions
If you are like to share gameplay videos, it’s very important that you have a high-quality capture card. With the help of a capture card, you can easily get all of the in-game footage that you need to make amazing videos and grow a healthy YouTube channel . In this article we will break down the top 10 capture cards for gaming YouTubers in 2018:
- Elgato Game Capture HD 60 Pro
- Elgato Game Capture HD 60 S
- Star Tech 4 Port PCI Firewire Adaptor Card with Digital Video Editing
- Hauppage Colossus 2 PCI Express Internal 1080P HD-PVR
- Elgato Game Capture HD
- Imillet HDMI Video Capture with USB 3.0/2.0 Dongle
- HDML Cloner Box Pro
- Pyle PVRC43 Standalone Digital Video Recorder
- HDML Cloner Box Evolve
- AVerMedia AVerCapture HD
Click here for more tips on being a YouTube gamer .
1. Elgato Game Capture HD 60 Pro
Price: $204
Compatibility: Windows, Switch, 360, Xbox One, PS4
Specs: Internal PCI 4k 30fps
Highlights: Made for streaming. Improved benchmark speeds.
This capture card works with an HDMI interface as well as the ability to be plugged into any type of PC game device. The process for setting it up and recording is extremely simple and the casing has been designed for improving the performance of the system and making it easier to integrate with many different devices. With an up to 16 MB per second capture bitrate, this is a pro tool.
2. Elgato Game Capture HD 60 S
Price: $160
Compatibility: Xbox one, switch, ps4
Specs: This device does 1080p at 60 fps
Highlights: This is one of very few game capture devices that come with USB 3.0 compatibility for easy access to almost any type of gaming device.
The card itself is mind-blowingly easy to set up with its external USB. It’s made for live streaming to YouTube, Twitch, and other platforms. There’s very low latency available on this card and it is one of the highest quality tools for console players.
3. Star Tech 4 Port PCI Firewire Adaptor Card with Digital Video Editing
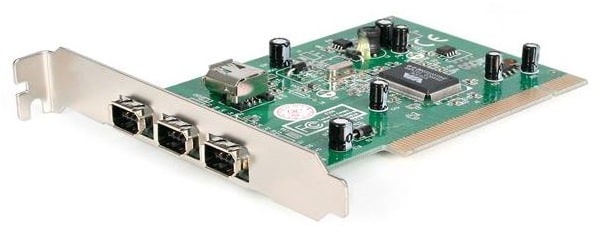
Price: $80
Compatibility: PC, Xbox, PS4
Specs: 1080p, 60 fps
Highlights: This USB 3.0 capture card can be quite easily installed almost anywhere and captures up to 60 frames per second for live streams.
This card comes with a wide range of ports including DVI, Component, HDMI, VGA, and USB. It’s tough to find a capture card that has so many different ports available and this can ensure that it’s possible to capture on almost any type of gaming system or device. A helpful tutorial is also included with this capture card to ensure that you can get the best video format from every console.
4. Hauppauge Colossus 2 PCI Express Internal Card
Price: $135
Compatibility: TV, DVR, Satellite, Xbox, PC, PlayStation
Specs: 1080p, 60 fps
Highlights: This card is an internal PCI card allowing it to remain as a consistent capture device inside a PC.
This card is perfect for recording live programs from a TV to your computer, offloading programs off of your DVR, as well as recording live game footage from PlayStation, Xbox, or your PC. Included alongside this card is the chance to use Stream EEZ for live streaming directly to platforms like Upstream, Twitch, and YouTube.
5. Elgato Game Capture HD
Price: $159
Compatibility: Xbox, PlayStation, Nintendo, PC, Mac
Specs: 1080p at 60fps
Highlights: The game capture HD offers a one-click sharing system to YouTube as well as flashback recording where you can turn back 10 or 15 minutes to record content that just happened.
Overall this is one of the easiest capture cards to set up because it comes with USB 3.0 and HDMI connections. For most modern gaming consoles, it offers the same type of features including the flashback recording solution to record retroactively. The device includes unlimited game capture at a fairly reasonable price and a creation suite so that you can do multitrack recording from your webcam. Editing footage from the card makes it very easy to quickly export clips for all of your content and publish them on social media. This game capture device is also known for its extremely compact design. It is only around the size of a mobile phone, meaning it can be quite easily carried in your pocket.
6. Imillet HDMI Capture Card with USB 3.0 Dongle
Price: $148
Compatibility: Plug and play with no drivers needed. PC, Mac, Linux, any iOS
Specs: 1080p 60 fps
Highlights: Doesn’t require any type of driver installation. This will work on any operating system or computer for quick recording.
The card itself is known for its USB 3.0 support as well as USB 2.0, and for not needing drivers. There is no more compatible card on the market right now. If you have had issues with other cards in the past or you regularly run Linux, you should consider this device to be prepared for all your recording needs. The device will detect the input and adjust output automatically to ensure a crystal-clear picture based on the type of device that you’re recording from. Imillet also offers a great warranty of six months free replacement as well as 12 months free repair on the card for anyone that is ordering it. The software that comes with the card is extremely simple but it does the job quite effectively, allowing for quick recording from multiple devices and simple detection for a video signal and output. Input formats can range from 480p to 1080p and frame rates can go as high as 60 frames per second. The device has great stats for its live capture but many people have experienced problems when trying to record from DVR specifically.
7. HDML Cloner Box Pro
Price: $135
Compatibility: Compatible with game consoles, windows, mac.
Specs: 1080p video at 60fps max
Highlights: The HDML Cloner Box comes with its own remote and the option to record using VGA, AV, YPbPr, and HDMI.
With so many different inputs available on this card it’s possible to record from almost any type of gaming device. With the hardware encoder which is on board, you can save videos as MP4 files and then instantly transfer them over to a flash drive on the device. You can get all of your saved files available without even having access to a PC. The box works as a standalone and it doesn’t have to be plugged into a computer to work. Free editing and converter software are included but with a storage memory card placed in the device and you can record a huge amount of footage and then edit it on your PC later on. With the quick connect feature, it is easy to set up recording and then perform all the functions you need for recording, stopping, and pausing on the remote as you use it. This remains one of the only cards available where it works as a standalone and allows for the chance to save videos to a flash drive or storage device without having to have a computer plugged in. The free converter software and video editing that comes with this device add extra value as well. An optional two-year warranty can make sure that you are ready for anything concerning this card.
8. Pyle PVRC43 Standalone Digital Video Recorder
Price: $80
Compatibility: TV, VCR, DVD, Digital camcorder, Laptop, PC, Mac, Game console
Specs: 480p
Highlights: This works as a standalone recorder with up to 32 GB of onboard memory. There’s no need to plug it into a computer for it to work and with the help of the memory card, you can record a wide range of output videos in AVI.
This card is designed as a standalone option and it’s extremely small with a USB 2.0 interface. Overall the quality of this card is not quite as technically advanced as some of the others on our list but it can record a video that is perfectly appropriate for the web or sharing over platforms like YouTube. The device can be set up quite easily with the help of an RCA connection cable, USB power cable, or other options. Generally, you may need access to an RCA to HDMI adapter if you want to record video off of a more modern laptop or camera. Where this device takes over on its competitors is the idea of just how simple it is to use. It weighs less than a pound and has a ‘one-button operation’ to start and pause recording. As of the completely standalone option, it doesn’t require any type of connection to a computer to record video. If you are looking for one of the simplest capture cards on the market that outputs to AVI in web quality, this is it.
9. HDML Cloner Box Evolve
Price: $121
Compatibility: HDMI input standalone mass compatibility
Specs: 4k video input, 1080p 60fps output
Highlights: This is a standalone USB capture device that comes with its remote. It also features dual HDMI slots allowing for up to two sources of video during recording (so you can also record from a facecam).
The card itself features a stream and capture function so that you can stream gameplay to any type of USB storage device. By plugging in a hard drive you can just press one button to record gaming videos and then handle the process of live streaming, editing, and more. Through two HDMI inputs supported and a very powerful remote control, you record on any device with fantastic image quality and without even having to plug it into any type of computer. While many of these standalone style capture boxes only support the use of minimal storage, this is a device that is capable of getting hooked up to any type of USB external hard drive for a chance to capture nearly unlimited video on your Cloner Box. As a bonus, the MP4 video editing software that is included will make the process of trimming, copying, and converting easier than ever. This has incredible value to the overall product. As an additional bonus, this Cloner Box also features a quick heat dissipation capability which can help to prevent lagging and other common problems that occur with many types of capture boxes when they overheat. A free microphone slot in addition to the HDMI slots makes recording professional voiceovers for any gameplay videos as easy as possible!
10. Avermedia Avercapture HD
Price: $99
Compatibility: Any console, PC, Mac
Specs: This device is capable of capture in full 1080p/60fps as well as the style encoding for quick streaming and easy video capture.
Highlights: The timeshift feature available on this device makes it simple to record retroactively as well as offer ultralow streaming and recording over time. The device makes it easy to capture and stream and it comes with a competitive two-year warranty.
This card works as a USB capture card from most any type of device, it captures through a component input or HDMI input and it has some of the lowest latency for any type of team capture. With one slot for video input as well as an audio input slot, it’s possible to record quick gameplay and voiceovers at any time with very minimal setup. Streaming and recording in full 1080p are done quite easily on this device and it’s designed to use less processing power than some of the competitors to ensure minimal game lag. RECental is included as part of this device so that you can set up live streaming to many of the top platforms available online. The timeshift function comes with a one-hour buffer ensuring if a great gameplay moment happens, you can shift back and begin recording from that time. Commentary and sharing are made easy with the software that’s included with this device. It makes sharing and recording an easy process for any avid video recorder.
Let us know what capture card you use and if you’re happy with it!
Richard Bennett
Richard Bennett is a writer and a lover of all things video.
Follow @Richard Bennett
Richard Bennett
Nov 04, 2022• Proven solutions
If you are like to share gameplay videos, it’s very important that you have a high-quality capture card. With the help of a capture card, you can easily get all of the in-game footage that you need to make amazing videos and grow a healthy YouTube channel . In this article we will break down the top 10 capture cards for gaming YouTubers in 2018:
- Elgato Game Capture HD 60 Pro
- Elgato Game Capture HD 60 S
- Star Tech 4 Port PCI Firewire Adaptor Card with Digital Video Editing
- Hauppage Colossus 2 PCI Express Internal 1080P HD-PVR
- Elgato Game Capture HD
- Imillet HDMI Video Capture with USB 3.0/2.0 Dongle
- HDML Cloner Box Pro
- Pyle PVRC43 Standalone Digital Video Recorder
- HDML Cloner Box Evolve
- AVerMedia AVerCapture HD
Click here for more tips on being a YouTube gamer .
1. Elgato Game Capture HD 60 Pro
Price: $204
Compatibility: Windows, Switch, 360, Xbox One, PS4
Specs: Internal PCI 4k 30fps
Highlights: Made for streaming. Improved benchmark speeds.
This capture card works with an HDMI interface as well as the ability to be plugged into any type of PC game device. The process for setting it up and recording is extremely simple and the casing has been designed for improving the performance of the system and making it easier to integrate with many different devices. With an up to 16 MB per second capture bitrate, this is a pro tool.
2. Elgato Game Capture HD 60 S
Price: $160
Compatibility: Xbox one, switch, ps4
Specs: This device does 1080p at 60 fps
Highlights: This is one of very few game capture devices that come with USB 3.0 compatibility for easy access to almost any type of gaming device.
The card itself is mind-blowingly easy to set up with its external USB. It’s made for live streaming to YouTube, Twitch, and other platforms. There’s very low latency available on this card and it is one of the highest quality tools for console players.
3. Star Tech 4 Port PCI Firewire Adaptor Card with Digital Video Editing
Price: $80
Compatibility: PC, Xbox, PS4
Specs: 1080p, 60 fps
Highlights: This USB 3.0 capture card can be quite easily installed almost anywhere and captures up to 60 frames per second for live streams.
This card comes with a wide range of ports including DVI, Component, HDMI, VGA, and USB. It’s tough to find a capture card that has so many different ports available and this can ensure that it’s possible to capture on almost any type of gaming system or device. A helpful tutorial is also included with this capture card to ensure that you can get the best video format from every console.
4. Hauppauge Colossus 2 PCI Express Internal Card
Price: $135
Compatibility: TV, DVR, Satellite, Xbox, PC, PlayStation
Specs: 1080p, 60 fps
Highlights: This card is an internal PCI card allowing it to remain as a consistent capture device inside a PC.
This card is perfect for recording live programs from a TV to your computer, offloading programs off of your DVR, as well as recording live game footage from PlayStation, Xbox, or your PC. Included alongside this card is the chance to use Stream EEZ for live streaming directly to platforms like Upstream, Twitch, and YouTube.
5. Elgato Game Capture HD
Price: $159
Compatibility: Xbox, PlayStation, Nintendo, PC, Mac
Specs: 1080p at 60fps
Highlights: The game capture HD offers a one-click sharing system to YouTube as well as flashback recording where you can turn back 10 or 15 minutes to record content that just happened.
Overall this is one of the easiest capture cards to set up because it comes with USB 3.0 and HDMI connections. For most modern gaming consoles, it offers the same type of features including the flashback recording solution to record retroactively. The device includes unlimited game capture at a fairly reasonable price and a creation suite so that you can do multitrack recording from your webcam. Editing footage from the card makes it very easy to quickly export clips for all of your content and publish them on social media. This game capture device is also known for its extremely compact design. It is only around the size of a mobile phone, meaning it can be quite easily carried in your pocket.
6. Imillet HDMI Capture Card with USB 3.0 Dongle
Price: $148
Compatibility: Plug and play with no drivers needed. PC, Mac, Linux, any iOS
Specs: 1080p 60 fps
Highlights: Doesn’t require any type of driver installation. This will work on any operating system or computer for quick recording.
The card itself is known for its USB 3.0 support as well as USB 2.0, and for not needing drivers. There is no more compatible card on the market right now. If you have had issues with other cards in the past or you regularly run Linux, you should consider this device to be prepared for all your recording needs. The device will detect the input and adjust output automatically to ensure a crystal-clear picture based on the type of device that you’re recording from. Imillet also offers a great warranty of six months free replacement as well as 12 months free repair on the card for anyone that is ordering it. The software that comes with the card is extremely simple but it does the job quite effectively, allowing for quick recording from multiple devices and simple detection for a video signal and output. Input formats can range from 480p to 1080p and frame rates can go as high as 60 frames per second. The device has great stats for its live capture but many people have experienced problems when trying to record from DVR specifically.
7. HDML Cloner Box Pro
Price: $135
Compatibility: Compatible with game consoles, windows, mac.
Specs: 1080p video at 60fps max
Highlights: The HDML Cloner Box comes with its own remote and the option to record using VGA, AV, YPbPr, and HDMI.
With so many different inputs available on this card it’s possible to record from almost any type of gaming device. With the hardware encoder which is on board, you can save videos as MP4 files and then instantly transfer them over to a flash drive on the device. You can get all of your saved files available without even having access to a PC. The box works as a standalone and it doesn’t have to be plugged into a computer to work. Free editing and converter software are included but with a storage memory card placed in the device and you can record a huge amount of footage and then edit it on your PC later on. With the quick connect feature, it is easy to set up recording and then perform all the functions you need for recording, stopping, and pausing on the remote as you use it. This remains one of the only cards available where it works as a standalone and allows for the chance to save videos to a flash drive or storage device without having to have a computer plugged in. The free converter software and video editing that comes with this device add extra value as well. An optional two-year warranty can make sure that you are ready for anything concerning this card.
8. Pyle PVRC43 Standalone Digital Video Recorder
Price: $80
Compatibility: TV, VCR, DVD, Digital camcorder, Laptop, PC, Mac, Game console
Specs: 480p
Highlights: This works as a standalone recorder with up to 32 GB of onboard memory. There’s no need to plug it into a computer for it to work and with the help of the memory card, you can record a wide range of output videos in AVI.
This card is designed as a standalone option and it’s extremely small with a USB 2.0 interface. Overall the quality of this card is not quite as technically advanced as some of the others on our list but it can record a video that is perfectly appropriate for the web or sharing over platforms like YouTube. The device can be set up quite easily with the help of an RCA connection cable, USB power cable, or other options. Generally, you may need access to an RCA to HDMI adapter if you want to record video off of a more modern laptop or camera. Where this device takes over on its competitors is the idea of just how simple it is to use. It weighs less than a pound and has a ‘one-button operation’ to start and pause recording. As of the completely standalone option, it doesn’t require any type of connection to a computer to record video. If you are looking for one of the simplest capture cards on the market that outputs to AVI in web quality, this is it.
9. HDML Cloner Box Evolve
Price: $121
Compatibility: HDMI input standalone mass compatibility
Specs: 4k video input, 1080p 60fps output
Highlights: This is a standalone USB capture device that comes with its remote. It also features dual HDMI slots allowing for up to two sources of video during recording (so you can also record from a facecam).
The card itself features a stream and capture function so that you can stream gameplay to any type of USB storage device. By plugging in a hard drive you can just press one button to record gaming videos and then handle the process of live streaming, editing, and more. Through two HDMI inputs supported and a very powerful remote control, you record on any device with fantastic image quality and without even having to plug it into any type of computer. While many of these standalone style capture boxes only support the use of minimal storage, this is a device that is capable of getting hooked up to any type of USB external hard drive for a chance to capture nearly unlimited video on your Cloner Box. As a bonus, the MP4 video editing software that is included will make the process of trimming, copying, and converting easier than ever. This has incredible value to the overall product. As an additional bonus, this Cloner Box also features a quick heat dissipation capability which can help to prevent lagging and other common problems that occur with many types of capture boxes when they overheat. A free microphone slot in addition to the HDMI slots makes recording professional voiceovers for any gameplay videos as easy as possible!
10. Avermedia Avercapture HD
Price: $99
Compatibility: Any console, PC, Mac
Specs: This device is capable of capture in full 1080p/60fps as well as the style encoding for quick streaming and easy video capture.
Highlights: The timeshift feature available on this device makes it simple to record retroactively as well as offer ultralow streaming and recording over time. The device makes it easy to capture and stream and it comes with a competitive two-year warranty.
This card works as a USB capture card from most any type of device, it captures through a component input or HDMI input and it has some of the lowest latency for any type of team capture. With one slot for video input as well as an audio input slot, it’s possible to record quick gameplay and voiceovers at any time with very minimal setup. Streaming and recording in full 1080p are done quite easily on this device and it’s designed to use less processing power than some of the competitors to ensure minimal game lag. RECental is included as part of this device so that you can set up live streaming to many of the top platforms available online. The timeshift function comes with a one-hour buffer ensuring if a great gameplay moment happens, you can shift back and begin recording from that time. Commentary and sharing are made easy with the software that’s included with this device. It makes sharing and recording an easy process for any avid video recorder.
Let us know what capture card you use and if you’re happy with it!
Richard Bennett
Richard Bennett is a writer and a lover of all things video.
Follow @Richard Bennett
From Recording to Viewing: A Complete Guide for Sharing Ultra HD on Youtube
Create High-Quality Video - Wondershare Filmora
An easy and powerful YouTube video editor
Numerous video and audio effects to choose from
Detailed tutorials provided by the official channel
Many people have a strong desire to make videos. Whether you make videos for a living or as a pastime, it doesn’t matter. When you make a fantastic film that you’re pleased with, you want to show it off to your friends and family. YouTube, the most popular site for sharing videos on various themes, is one of the most incredible places to start.
YouTube is fantastic for sharing videos, but it can be harsh on artists due to the high bar for content and video quality. If you want to succeed as a YouTuber, you must create videos that are informative and high-resolution. This is critical since your viewers may wish to watch your movies on a computer screen or a 4K smart TV.
If you’ve decided to make videos in 4K resolution, you’ll find information on recommended encoding settings, how to upload a video to YouTube, potential problems, and more below.
In this article
01 What Is The Distinction Between Various Resolutions?
02 Why Would You Want To Upload A 4k Video?
03 What Is The Best Way To Upload A 4k Video To Youtube?
04 Tips On How To Make Sure The Video You’re Uploading Is Of High Quality
What Is The Distinction Between Various Resolutions?
The number of pixels on a screen is referred to as resolution. Low resolution indicates fewer pixels and typically less space, whereas high resolution means more pixels and generally greater space and detail. You probably have a poor resolution if you’re using a standard laptop or an old screen.
When watching a video on a larger screen, the resolution significantly impacts your viewing experience. Whether it’s a live stream or an on-demand movie, the correct resolution is crucial to reaching a wider audience, and this is where iPhones and iPads appear to have an advantage. Let’s take a closer look at each of these resolution types and their associated pixel sizes.
1. SD RESOLUTION (STANDARD DEFINITION)
Previously, resolutions were separated into SD (Standard Definition) and HD (High Definition) categories. SD was defined as a video with a resolution of less than 720p. However, as television and computer monitor display resolutions improved over time, a video was less likely to be shot in Standard Definition.
The following are the most common standard video resolutions:
- 640 × 360 pixels (or 360p)
- 640 × 480 pixels (or 480p)
2. RESOLUTION: 720P HD (HIGH DEFINITION)
The lowest video resolution is 720p, which is commonly referred to as ‘HD.’ 720p (1280 x 720 pixels) is a resolution recognized for modest web content, even though most videos require at least 1080p. Because most computer monitors are now in HD, the recommended practice for web and streaming is to choose a resolution higher than 720p.
The resolution of HD videos is usually: 1280 x 720 pixels (or 720p)
3. 1080P FULL HD RESOLUTION
1080p resolutions, also known as ‘Full HD,’ have become the industry standard for a clear HD video that doesn’t take up a lot of storage space. It’s also worth noting that this is the standard screen resolution for all smartphones.
The resolution of full HD videos is usually: 1920 x 1080 pixels (or 1080p)
4. 2K RESOLUTION WITH QHD (QUAD HIGH DEFINITION)
Quad HD resolution, or QHD for short, is widely found on high-end smartphones and gaming monitors. The resolution of 1440p is four times that of HD Ready (or 720p HD). Many high-end smartphones have a Quad HD+ resolution (296 x 1440 pixels), which is ideal for 1440p. Another common screen resolution is 2K, which allows for larger displays and reframing without sacrificing quality or image editing.
The resolution of QHD and 2K videos is:
- 2560 x 1440 pixels in QHD (or 1440p)
- 2048 x 1080 pixels in 2K (or 1080p)
5. 4K (OR UHD/ULTRA-HIGH-DEFINITION) RESOLUTION
This sort of resolution, often known as 4Kor UHD (Ultra High Definition), has a pixel size of 3840 x 2160 pixels. It has a similar appearance to 2K, but it provides video artists more room to edit and zoom in. For vivid color, graphics, or dramatic viewing, both 2K and 4K resolutions are available. Unless you wish to tweak colors or trim in closer, there aren’t enough visible distinctions between 2K and 4K. So, it matters when you want to change a certain detail, but it doesn’t matter when someone else is looking at it.
The resolution of 4K videos is: 3840 x 2160 (or 2160p / simply 4K) is a resolution of 3840 x 2160 pixels.
Why Would You Want To Upload A 4k Video?
YouTube is the second-largest social media site, with approximately 1.9 billion monthly active users. YouTube is where you want to be to access this large audience and promote your brand, with one billion hours of video watched every day on the platform.
However, for your target audience to watch your videos, you must ensure excellent video quality. Poorly shot or edited films may alienate your viewers, especially when there are billions of other videos to choose from on the site.
- 4k is the most satisfactory resolution for uploading to YouTube. Although not every viewer can watch videos in 4k, it ensures that your visitors get the best possible experience.
- Traditional Full HD (1920 x 1080) TVs feature four times as many pixels as 4K TVs. Because of the higher pixel density, the picture quality of 4K TVs is more colorful and detailed, even on TV displays of the same size. This distinction is most noticeable on large-screen televisions.
- Even if you recorded in 1080p and upscaled to 4K, you should post in 4K to YouTube for the finest image quality. Recording in 1080p, editing in 1080p, exporting in 4k, and YouTube viewing is sharper in 1080p.
- With 4K, you get stunning visuals with a resolution of 38402160, which is four times that of Full-HD. That’s why visuals appear crisp and lifelike, even on large-screen TVs rather than pixelated. Down-converted 4K to Full-HD photographs have superior quality and resolution than images shot in Full-HD from the start.
What Is The Best Way To Upload A 4k Video To Youtube?
The YouTube upload process is not complicated, but it does need several steps. You can finally post your video once it has been prepared and converted to MP4 format.
Follow the steps below to post your video to YouTube:
1. Go to YouTube.com in your browser.
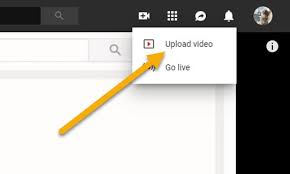
2. Log in to your account and click the “Create” symbol, which looks like a camera with a plus sign, in the right corner of the menu bar.
3. Select “Upload video” from the drop-down menu.
4. Drag and drop your video file into the upload box, or select your file from the “Select File” menu and click “Open.”
5. Make a note of the title and description while YouTube is processing your video.

6. Select a video thumbnail from the options or upload your own and select your “Audience” from the drop-down menu. To manage age restriction settings.
7. Select “More Options” to add searchable keywords to your video, manage subtitles and comments, and more.
8. Select if you want to add promotions to your video by clicking “Next.”
9. Finally, click “Next” and wait for the video to be processed entirely before publishing it.
10. You can also automatically set it to publish at a later date.
Tips On How To Make Sure The Video You’re Uploading Is Of High Quality
The following are five tips for amateur and top newbie YouTubers who want to improve their videos.
1. Cut Your Video Into Clips And Organize It
While it may appear to be the simplest solution to perform an entire video at once, this might make the process tedious or even damage your video if you are interrupted or make a speech error. Smaller video segments are easier to edit and blend into a single, well-formatted video.
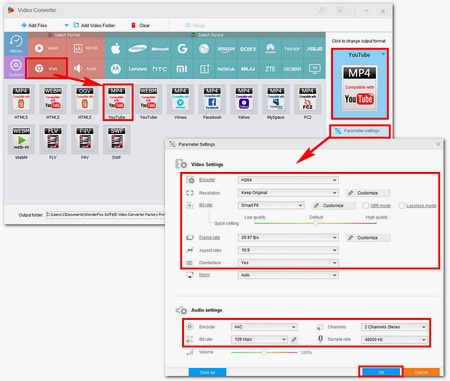
2. Youtube Video Export
You can also modify your videos in various formats to your heart’s content before exporting them to YouTube and publishing them. Although uploading and exporting may take some time, the quality of your video will significantly increase, and the time and work you put in will be evident.
3. Change Up Your Shots
Rather than keeping your camera fixed, try varied angles while shooting. This may not work for all of your videos, but it is critical to keep your viewers engaged while they watch them, especially if you want them to stay until the finish and come back for more. Unless you’re talking about anything incredibly essential, sitting and listening to someone talk for more than 10 minutes without the camera moving will quickly become dull or old.
4. Transitions And Effects
When editing a video with numerous parts, the use of effects and transitions can considerably impact the overall quality of the video. Filmora is far more sophisticated than Windows Movie Maker and iMovie on Mac. It also allows you to create a professional-looking YouTube video with hundreds of presets such as filters, overlays, components, transitions, and blending several layers of effects and audio to enhance your YouTube tale.
Wondershare Filmii is one of the greatest choices for Windows for beginners who wish to create video footage with templates automatically. Smart video templates, trendy filters and overlays, fun stickers and motion components, and, most importantly, advanced editing capabilities are all available.
For Win 7 or later (64-bit)
For macOS 10.12 or later
Conclusion
● This is pretty much everything we’ve gathered to assist you in uploading 4K videos to YouTube. Do not become worried. Your 4K video will be in low resolution when you first publish it. This is due to YouTube’s high-resolution processing requiring time. It could take a few hours for your video to be available in 4K mode.
● The duration, format, frame rate, and resolution of your video all affect the processing time for high-definition videos. If you don’t want your video to be seen unless it has a high-quality option, upload it as unlisted and then publish it once 4K resolution is available.
Many people have a strong desire to make videos. Whether you make videos for a living or as a pastime, it doesn’t matter. When you make a fantastic film that you’re pleased with, you want to show it off to your friends and family. YouTube, the most popular site for sharing videos on various themes, is one of the most incredible places to start.
YouTube is fantastic for sharing videos, but it can be harsh on artists due to the high bar for content and video quality. If you want to succeed as a YouTuber, you must create videos that are informative and high-resolution. This is critical since your viewers may wish to watch your movies on a computer screen or a 4K smart TV.
If you’ve decided to make videos in 4K resolution, you’ll find information on recommended encoding settings, how to upload a video to YouTube, potential problems, and more below.
In this article
01 What Is The Distinction Between Various Resolutions?
02 Why Would You Want To Upload A 4k Video?
03 What Is The Best Way To Upload A 4k Video To Youtube?
04 Tips On How To Make Sure The Video You’re Uploading Is Of High Quality
What Is The Distinction Between Various Resolutions?
The number of pixels on a screen is referred to as resolution. Low resolution indicates fewer pixels and typically less space, whereas high resolution means more pixels and generally greater space and detail. You probably have a poor resolution if you’re using a standard laptop or an old screen.
When watching a video on a larger screen, the resolution significantly impacts your viewing experience. Whether it’s a live stream or an on-demand movie, the correct resolution is crucial to reaching a wider audience, and this is where iPhones and iPads appear to have an advantage. Let’s take a closer look at each of these resolution types and their associated pixel sizes.
1. SD RESOLUTION (STANDARD DEFINITION)
Previously, resolutions were separated into SD (Standard Definition) and HD (High Definition) categories. SD was defined as a video with a resolution of less than 720p. However, as television and computer monitor display resolutions improved over time, a video was less likely to be shot in Standard Definition.
The following are the most common standard video resolutions:
- 640 × 360 pixels (or 360p)
- 640 × 480 pixels (or 480p)
2. RESOLUTION: 720P HD (HIGH DEFINITION)
The lowest video resolution is 720p, which is commonly referred to as ‘HD.’ 720p (1280 x 720 pixels) is a resolution recognized for modest web content, even though most videos require at least 1080p. Because most computer monitors are now in HD, the recommended practice for web and streaming is to choose a resolution higher than 720p.
The resolution of HD videos is usually: 1280 x 720 pixels (or 720p)
3. 1080P FULL HD RESOLUTION
1080p resolutions, also known as ‘Full HD,’ have become the industry standard for a clear HD video that doesn’t take up a lot of storage space. It’s also worth noting that this is the standard screen resolution for all smartphones.
The resolution of full HD videos is usually: 1920 x 1080 pixels (or 1080p)
4. 2K RESOLUTION WITH QHD (QUAD HIGH DEFINITION)
Quad HD resolution, or QHD for short, is widely found on high-end smartphones and gaming monitors. The resolution of 1440p is four times that of HD Ready (or 720p HD). Many high-end smartphones have a Quad HD+ resolution (296 x 1440 pixels), which is ideal for 1440p. Another common screen resolution is 2K, which allows for larger displays and reframing without sacrificing quality or image editing.
The resolution of QHD and 2K videos is:
- 2560 x 1440 pixels in QHD (or 1440p)
- 2048 x 1080 pixels in 2K (or 1080p)
5. 4K (OR UHD/ULTRA-HIGH-DEFINITION) RESOLUTION
This sort of resolution, often known as 4Kor UHD (Ultra High Definition), has a pixel size of 3840 x 2160 pixels. It has a similar appearance to 2K, but it provides video artists more room to edit and zoom in. For vivid color, graphics, or dramatic viewing, both 2K and 4K resolutions are available. Unless you wish to tweak colors or trim in closer, there aren’t enough visible distinctions between 2K and 4K. So, it matters when you want to change a certain detail, but it doesn’t matter when someone else is looking at it.
The resolution of 4K videos is: 3840 x 2160 (or 2160p / simply 4K) is a resolution of 3840 x 2160 pixels.
Why Would You Want To Upload A 4k Video?
YouTube is the second-largest social media site, with approximately 1.9 billion monthly active users. YouTube is where you want to be to access this large audience and promote your brand, with one billion hours of video watched every day on the platform.
However, for your target audience to watch your videos, you must ensure excellent video quality. Poorly shot or edited films may alienate your viewers, especially when there are billions of other videos to choose from on the site.
- 4k is the most satisfactory resolution for uploading to YouTube. Although not every viewer can watch videos in 4k, it ensures that your visitors get the best possible experience.
- Traditional Full HD (1920 x 1080) TVs feature four times as many pixels as 4K TVs. Because of the higher pixel density, the picture quality of 4K TVs is more colorful and detailed, even on TV displays of the same size. This distinction is most noticeable on large-screen televisions.
- Even if you recorded in 1080p and upscaled to 4K, you should post in 4K to YouTube for the finest image quality. Recording in 1080p, editing in 1080p, exporting in 4k, and YouTube viewing is sharper in 1080p.
- With 4K, you get stunning visuals with a resolution of 38402160, which is four times that of Full-HD. That’s why visuals appear crisp and lifelike, even on large-screen TVs rather than pixelated. Down-converted 4K to Full-HD photographs have superior quality and resolution than images shot in Full-HD from the start.
What Is The Best Way To Upload A 4k Video To Youtube?
The YouTube upload process is not complicated, but it does need several steps. You can finally post your video once it has been prepared and converted to MP4 format.
Follow the steps below to post your video to YouTube:
1. Go to YouTube.com in your browser.
2. Log in to your account and click the “Create” symbol, which looks like a camera with a plus sign, in the right corner of the menu bar.
3. Select “Upload video” from the drop-down menu.
4. Drag and drop your video file into the upload box, or select your file from the “Select File” menu and click “Open.”
5. Make a note of the title and description while YouTube is processing your video.
6. Select a video thumbnail from the options or upload your own and select your “Audience” from the drop-down menu. To manage age restriction settings.
7. Select “More Options” to add searchable keywords to your video, manage subtitles and comments, and more.
8. Select if you want to add promotions to your video by clicking “Next.”
9. Finally, click “Next” and wait for the video to be processed entirely before publishing it.
10. You can also automatically set it to publish at a later date.
Tips On How To Make Sure The Video You’re Uploading Is Of High Quality
The following are five tips for amateur and top newbie YouTubers who want to improve their videos.
1. Cut Your Video Into Clips And Organize It
While it may appear to be the simplest solution to perform an entire video at once, this might make the process tedious or even damage your video if you are interrupted or make a speech error. Smaller video segments are easier to edit and blend into a single, well-formatted video.
2. Youtube Video Export
You can also modify your videos in various formats to your heart’s content before exporting them to YouTube and publishing them. Although uploading and exporting may take some time, the quality of your video will significantly increase, and the time and work you put in will be evident.
3. Change Up Your Shots
Rather than keeping your camera fixed, try varied angles while shooting. This may not work for all of your videos, but it is critical to keep your viewers engaged while they watch them, especially if you want them to stay until the finish and come back for more. Unless you’re talking about anything incredibly essential, sitting and listening to someone talk for more than 10 minutes without the camera moving will quickly become dull or old.
4. Transitions And Effects
When editing a video with numerous parts, the use of effects and transitions can considerably impact the overall quality of the video. Filmora is far more sophisticated than Windows Movie Maker and iMovie on Mac. It also allows you to create a professional-looking YouTube video with hundreds of presets such as filters, overlays, components, transitions, and blending several layers of effects and audio to enhance your YouTube tale.
Wondershare Filmii is one of the greatest choices for Windows for beginners who wish to create video footage with templates automatically. Smart video templates, trendy filters and overlays, fun stickers and motion components, and, most importantly, advanced editing capabilities are all available.
For Win 7 or later (64-bit)
For macOS 10.12 or later
Conclusion
● This is pretty much everything we’ve gathered to assist you in uploading 4K videos to YouTube. Do not become worried. Your 4K video will be in low resolution when you first publish it. This is due to YouTube’s high-resolution processing requiring time. It could take a few hours for your video to be available in 4K mode.
● The duration, format, frame rate, and resolution of your video all affect the processing time for high-definition videos. If you don’t want your video to be seen unless it has a high-quality option, upload it as unlisted and then publish it once 4K resolution is available.
Also read:
- Break Through the Crowd - Your Guide to Choosing Free Intro Masters for 2024
- Finding Legal Music A Producer's Manual
- A Comprehensive Guide to Maximizing Channels' Earnings Through Trailers
- Chart-Topping Content YouTube's Top 5
- 2024 Approved 5 Frosty Yet Inviting Backdrops for Your Vids
- Building a Diverse Content Portfolio on YouTube Shorts
- [New] Avoiding the Crowd Stand Out with Unique YouTube Persona
- Leverage These Top 12 Tactics to Surge Your YouTube Views
- [New] Best ASMR Series on YouTube Platform
- [New] Create Professional Movies on YouTube Quickly
- Resolved No Display for YouTube Shorts
- Step-by-Step Success on Youtube with Spectacision Music Videos
- The Satirist's Handbook Video Creation for Comedy
- Best of Both Worlds YouTube’s VR Gems for 2024
- Crafting Dynamic YouTube Content as Animated GIFs Without Downloads
- [New] Elevate Views, Not Video Length Expert Guide to YT Desc Templates
- In 2024, Discover the Top Free Tools for YouTube Image Downloads
- [New] Decoding the Visual Language of YouTube Thumbnails
- In 2024, Elevate Your Channel's Reach Proven Techniques for Multistreaming on YouTube and Twitch
- 2024 Approved Cutting Edge Creativity - Top 10 Online Trimmer Apps Reviewed
- [Updated] Charting the Course From AdSense Income to Savings
- Ultimate Hocus Pocus Editor's Best Tricks
- Unleash Your Potential Skyrocketing Numbers of YouTubers' Subscribers
- [New] Achieving Affiliate Success with Online Videos
- World's Hottest YouTube Personalities by Subscribers
- [Updated] Cultivate Creativity Best Video Concepts for Viewers
- Accelerate Mac Youtube Video Matching Aspect Ratio for 2024
- Navigating Videos Sequentially for Free - YouTube Guide
- How to Stop Life360 from Tracking You On Oppo Reno 8T? | Dr.fone
- [Updated] 2024 Approved Mastering Instagram Narratives Through Captioning
- [New] In 2024, Your Companion Guide Navigating the World of Mobizen Recorders
- Harvest Hits Roundup Next-Gen Farming Game Picks
- Two Ways to Track My Boyfriends Lava Blaze 2 Pro without Him Knowing | Dr.fone
- In 2024, How To Change Your Apple ID on iPhone 13 Pro With or Without Password
- Best Pokemons for PVP Matches in Pokemon Go For Infinix Note 30 5G | Dr.fone
- Does Airplane Mode Turn off GPS Location On Oppo Reno 10 Pro 5G? | Dr.fone
- Decoding Quantum HDR for Creative Success
- 7 Solutions to Fix Error Code 963 on Google Play Of Realme 11 Pro+ | Dr.fone
- Title: "2024 Approved Best 10 Video Card Selections for Peak Streaming Performance"
- Author: Kevin
- Created at : 2024-05-25 14:19:05
- Updated at : 2024-05-26 14:19:05
- Link: https://youtube-videos.techidaily.com/2024-approved-best-10-video-card-selections-for-peak-streaming-performance/
- License: This work is licensed under CC BY-NC-SA 4.0.
