
:max_bytes(150000):strip_icc()/Headshot3Stephanie-9863b086590245458d3751b89cac98f4.jpeg)
"2024 Approved Beauty Breakdown Mastering Makeup and Hauls Online"
Beauty Breakdown: Mastering Makeup and Hauls Online
Ultimate Guide to Beauty on YouTube - Gear, Makeup Tutorials, and More

Richard Bennett
Oct 26, 2023• Proven solutions
Beauty and lifestyle are two of the most popular categories on YouTube, and they might also be the categories most associated with brand deals. Whether you’re hoping to earn revenue as a beauty influencer, or just want to post some fun makeup tutorials, this guide is for you!
We’ll walk you through deciding on a theme for your channel, setting up your equipment, and give you tips for actually recording your videos.
1. **[Finding Your Niche in Beauty or Lifestyle](#niche)**
- Types of Beauty Videos – Your Content Strategy
- How to Get Products to Review
- Simple Camera Setup for Beauty Vloggers
- Lighting for Beauty
- Top Ring Lights for YouTube
- Build Your Own Diva Ring Light
- How to Make a Makeup Tutorial – Before You Start
- How to Make a Makeup Tutorial – Recording
- How to Make a Makeup Tutorial – After Shooting
Best YouTube Video Editor- Wondershare Filmora
Wondershare Filmora is specifically made keeping quality on priority and to make sure all the videos are edited well with the highest accuracy. You can trim, merge, crop, add background music, rotate videos as well as add motion elements, animated texts, overlays, and filters, etc. to your makeup video, and the video can also be uploaded to YouTube or burned to DVD directly.


Finding Your Niche in Beauty or Lifestyle
As a new makeup, beauty, or lifestyle YouTuber you’ll be jumping into a category that’s already packed with thousands of channels. In order to gain any momentum, you’ll have to decide on a particular thing you want to be known for. That’s your niche.
People looking for beauty tutorials are often looking for someone who has something in particular in common with them. Hairstyling for a specific ethnicity, for example, is a potential niche because people want to learn how to style their own hair, not a hair in general.
Another way you could find a niche is by taking on a specific area of interest, like a skincare channel with a focus on coping with acne or a makeup channel with a focus on natural products.
SunKissAlba has a lifestyle channel that focuses on a ‘natural’ niche. She posts videos about every aspect of her lifestyle from putting on makeup to cooking, but natural/non-toxic products are a constant theme through everything she does. By niching her channel she hasn’t limited what kinds of videos she can do at all - she posts a huge variety of different types of videos. What she has done is to make her channel particularly valuable to audiences interested in things that are natural or organic.
Types of Beauty Videos – Your Content Strategy
It’s a lot easier to come up with weekly video ideas when you have an overarching strategy.
The easiest way to figure out what kinds of videos you should make (and this can also help determine your niche!) is to think about what you already do and enjoy. If skincare is particularly important to you, for example, then you could build a content strategy that includes things like your favorite sunscreen, what different ingredients in skincare products are for, or even how to make a DIY face mask.
The same thing goes if you love doing big glamourous makeups for going out. Think about what you like, and that will determine what you should talk about in your videos.
Instead of buying new products to use in videos, try to use and showcase what you already have.
Here are some common types of beauty and lifestyle videos:
Get Ready With Me: a video where you put your makeup on which helps your audience get to know you better.
Monthly Favorites: showcases your favorite products from the last month.
Makeup Collection: viewers will want to see what you have.
DIY: create something, like a homemade moisturizer, and show your viewers how to make their own.
Makeup Hauls: show off what you’ve bought recently.
Lookbooks: put together a few looks based on a theme, like a specific color or event.
First Impressions: show yourself using a new product for the first time.
Makeup Tutorials: teach your viewers how to achieve a particular look, like a smokey eye.
What’s In My Bag: empty your handbag to show viewers what you carry around with you, particularly your most essential makeup.
My Routine: show viewers your morning skincare routine, or how you usually take your makeup off before bed. Any of your beauty-related routines will be interesting to your followers.
You should also be ready to jump on trends as they jump up. You can get a bump in viewership from people searching for a particular trend. Here are a couple of examples of past trends:
- Boyfriend Does My Makeup
- Kid’s Makeup Challenge
- No Mirror Makeup Challenge
How to Get Products to Review
You probably already know that a lot of the products popular beauty YouTubers review in their videos were sent to them for free. Brands want to get their products into the hands of creators who have ‘influence’ both in the hopes that their audiences will decide to buy them and as part of generating buzz – getting more people talking about their products so more people become interested.
In order for a brand to consider sending you a free product to review or feature in a video, you will first have to have a large enough following.
What is ‘large enough’? There’s no magic number of YouTube subscribers or Instagram followers. How large your following needs to be will depend on what brands you want to work with, as well as whether your channel has a specific niche.
Large brands will want to work with larger creators. Smaller brands that are still trying to build notoriety may be more open to working with creators whose followings are not as large.
If you have a very specific niche then that could create more opportunities for you as a mid-sized YouTuber. If you specialize in styling curly black hair, and a brand is marketing a product made specifically for styling curly black hair, then your smaller following will be more valuable to that brand than the larger audience of a more general channel.
Here are 4 tips for getting free products for review:
- Follow your favorite brands on Instagram and subscribe to their YouTube channels. Make sure to take them when you feature their products in your posts or videos.
- Focus on growing your community/audience. As you start getting more subscribers and building up momentum for your channel, brands might start reaching out to you. We’ve got some tips on growing your YouTube channel here .
- Make a pitch to a brand. The first step in this is figuring out who to pitch to. You can send smaller brands DMs via Instagram or Twitter and politely ask for contact info for a PR person. Never ask for free product or sponsorship at this point, just information you can use to contact PR.
- Send an email with your pitch to the brand’s PR person. Your email should introduce yourself, describe your content, and talk about what type of audience you have (how many subscribers, where are they located, how old are they, etc. This information is all available in your Creator Studio analytics).
Make sure to link to your channel so they can verify what you say (do not hide your subscriber count).
Emphasize what value you could provide the brand with (i.e. ‘I’ve had a lot of success with videos on managing acne and I’m sure my subscribers would love to see a review of your cream’) and outline what kind of video you’d like to make (i.e. a five-minute review focusing on the product, or a short feature in a longer makeup tutorial).
Simple Camera Setup for Beauty Vloggers
There are a lot of different ways to set up your camera for a ‘talking head’ video (anything that is primarily you talking to the camera). Keep reading to learn about a popular ring-light setup for beauty videos, or click here to learn 4 different camera setups .
In an ideal situation, this is what you’ll build your setup out of:
- Camera with a flip-out screen
- Ring light
- Camera-mounted shotgun mic
- Tripod (unless you can mount your camera inside your ring light)
If you don’t have access to all of the equipment above, try some of these:
- Smartphone camera
- DIY ring light
- Smartphone shotgun mic or LAV
Step 1: Set your camera and ring light (your camera should be sitting directly behind your ring light, or mounted inside of it) up about 3 feet away from your subject (yourself).
You might want to experiment with sitting at different distances to see how the lighting looks on your face.
Step 2: Set your camera up a bit higher than your face and tilt it down towards yourself (shooting from slightly above is always more flattering). It should be set up at about a 15° angle to you.
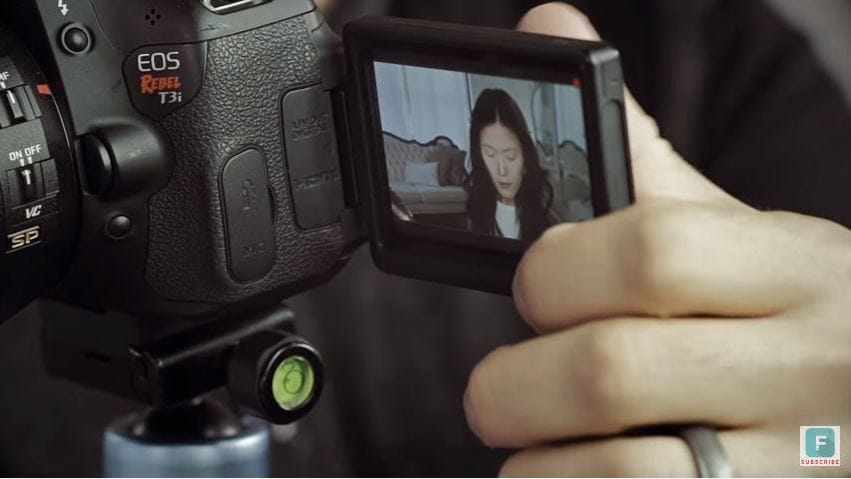
Step 3: Check your frame (this is easiest if your camera has a screen that flips out) to make sure there’s not too much empty space in your shot.
Step 4: Adjust your camera’s focus so your picture is clear. You may need to set up a lamp, chair, or stuffed animal as a stand-in for yourself while you stand behind the camera adjusting the focus.
Turn off autofocus and adjust your focus manually by turning the focus ring on your lens, if you’re using a DSLR or mirrorless camera.
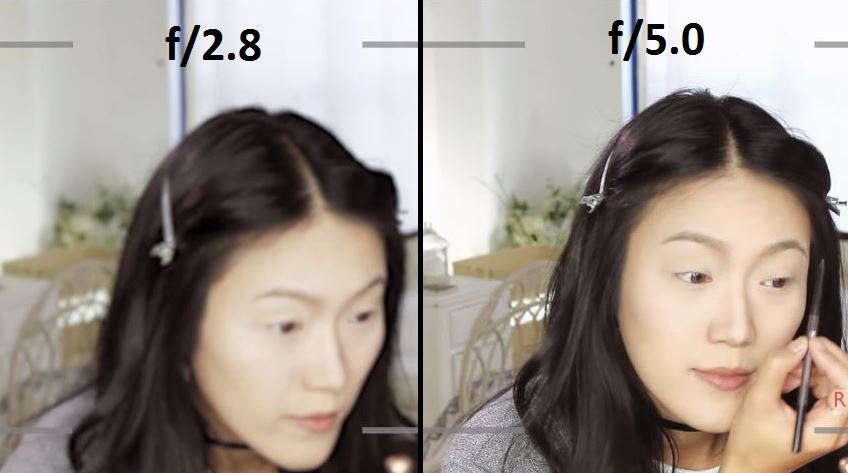
Step 5: Set your f-stop (aperture) so that your depth of field is deep enough for you to lean forwards or backward without becoming blurry.
An aperture of f/5.0 is good if you’re going to be moving around a lot, but if you’re not going to be moving much and want a blurry background you might want to go with f/2.8 or lower.
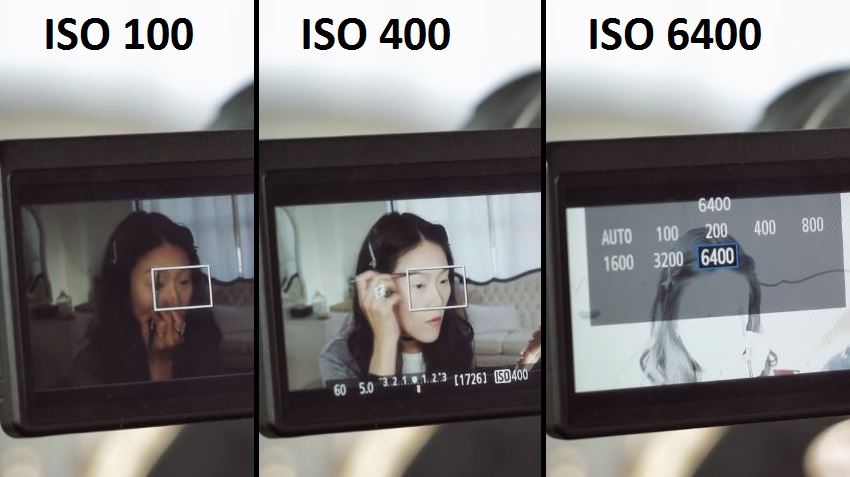
Step 6: Set your ISO (film speed). A lower ISO will give you a darker, but higher quality, image. A higher ISO will lower your quality and give you a brighter image.
ISO 400 should be a happy medium for shooting inside with your ring light, but you may need to try out a couple of settings to find one perfect for your situation.
For more info on camera settings for beauty videos, click here .
Lighting for Beauty
The key to achieving a high-quality picture for your beauty video is having a lot of light.
A ring light (whether it’s one you purchase or one you make) will give you even light over your whole face, and that may be enough. Ring lights are considered one of the biggest ‘secrets’ to beauty on YouTube (as explained in this Racked article ).
There are, however, some reasons you might want additional light:
To Light your Background/Space
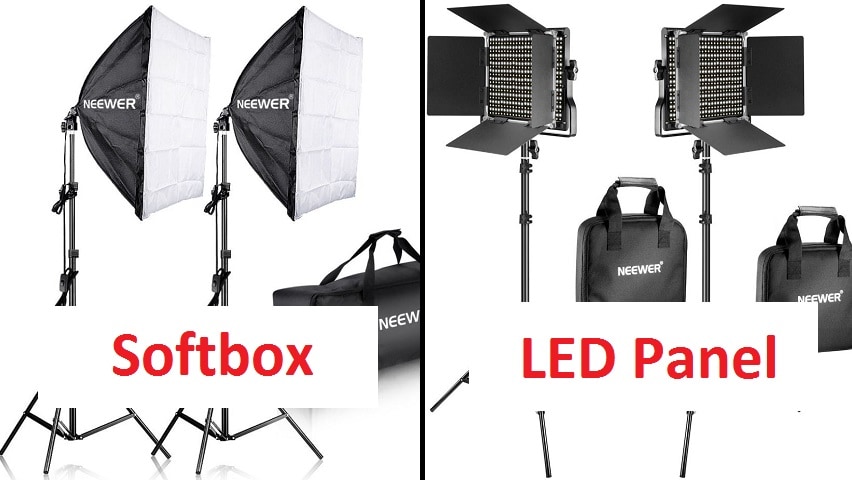
If you only have a ring light/front light then you may end up looking like you’re surrounded by shadows. If you want more light for your space you can use windows, household lamps, or professional video lights like softboxes or LED panels.
To Stand Out Against your Background (‘Backlighting’)
A front light that’s lighting you evenly is also lighting whatever’s behind you evenly, which can make your overall picture look flat.
Setting up a light to shine up at you from behind will help you pop out from your background by creating a silhouette.
You can use an LED panel or a household lamp as a backlight.
To Add Dimension to Your Face (Side Lights/ Fill Lights)
Setting up lights to hit you from the sides will help you look more three dimensional. It can also give your video a general quality boost because the picture quality is always better when there’s tons of light.
You can use softboxes, LED panels, clamp lights, household lamps, or any other light source you can think of.
Lighting Tips!
* **_Use ‘daylight’ bulbs in any household lighting/clamp lights you use._ This way, your light will all be the same color and you won’t have to do a lot of color correction (the more yellow-colored light most indoor lights give off will make you look orange).**
You can buy daylight-colored bulbs for about $5.
- Clamp lights ($10 each) and paper lanterns ($10 each) provide great lighting and are much more affordable than professional lighting kits. The paper lanterns will provide even, diffused, light and the clamp lights will be easy to set up wherever you need them.
- Check out these DIY tips for creating your own reflectors and diffusers .
Top Ring Lights for YouTube
1. Neewer Dimmable Fluorescent Ring Light - $110
One cool feature of the Neewer Ring Light is that you can choose between daylight and a more orange-tinted light depending on which of the included filters you use. In almost all situations you’ll want to use white light/daylight because the orange light will make you look orange, but if you ever wanted to create a warmer image to achieve a particular effect you’d have that option with this light.
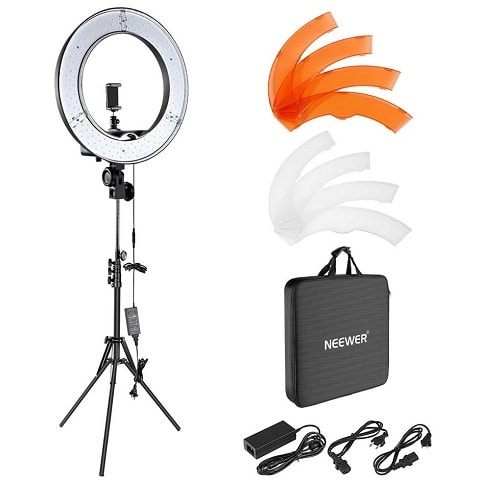
This light is dimmable and can be adjusted to the angle that suits your shot. That’s true of our number 2 pick too, and the second place light actually has a slight edge over the Neewer light because its color temperature is 5400K which is slightly closer to daylight than Neewer’s 5500K, but that’s honestly not super important for YouTube. They’re close enough that you won’t be able to tell the difference, and this light is over $100 more affordable.
2. Prismatic Halo Ring Light - $260
This lightweight ring light is easy to transport, set up, and mount your phone or camera to. It’s a fluorescent ‘daylight’ (5400K) light, so the colors in your videos will look natural.
This light is dimmable, so you can turn it down if it’s too bright, and the Prismatic Light Stand will allow you to tilt your light to the perfect angle. This will be handy if you’re mounting your camera inside the ring but want to place it slightly above your face instead of having it look at you head on.
Build Your Own Diva Ring Light
A ring light is an important tool for a lot of beauty YouTubers, but it doesn’t fit into everyone’s budget. Here’s one popular way to create your own ring light for about $20.
A lot of people have done this DIY, but we’re using Kevin’s video because we love how he added the stand.
What you need:
- A wire wreath frame
- Zip ties
- LED rope light (16 ft, daylight)
- Tinfoil
- Metal paper towel stand
- Scissors
Step 1: Wrap your wreath frame in tinfoil. Make sure the tinfoil is shaped to the wreath so that there is a curve on the inside where your rope light can sit.
Step 2: Place your rope light inside the curve of your frame. Wind it around for 3 loops so you have 2 rows of lighting tube sitting next to each other.
Step 3: Use the zip ties to fasten in the rope light. Wrap them tightly around your frame and lights in several (6-8) places.
Step 4: Cut off the tails of the zip ties.
This is your ring light. Continue to step 5 if you want it to have a stand (you might just want to clip it up somewhere).
Step 5: Fasten your ring light tightly to your paper towel stand securely with several zip ties. Make sure to fasten it at the bottom (where the excess rope light is coming out of your ring light). Cut off the tails of the zip ties.
How to Make a Makeup Tutorial – Before You Start
Before you start recording your makeup tutorial there are a few things you should do.
- Write an outline. You might even want to write yourself a transcript. Having a concrete plan before you start recording will help ensure your tutorial is useful for viewers. You’ll realize where you might need to slow down and show a particular step in more detail, or where your viewers might find a particular step tricky, in a way you want if you just jump into a makeup routine you know perfectly.
- Layout your supplies. Make sure everything you need for your tutorial is laid out neatly in front of you so you can access it all easily. Try to use clean brushes – it just looks nicer.
- Tidy up. If you want your viewers to trust you when it comes to aesthetics, it’s important that your studio area is clean and tidy. You may even want to use a backdrop.
- Do a video test. Before you start your video for real, start recording and shoot some test footage. Watch that back to make sure you like the look of your frame, your face is never blurry, and you’re happy with the overall look of things.
- Do an audio test. If you’re going to be talking in your video instead of recording a voiceover after, do an audio test to make sure your audience will be able to hear you clearly.
How to Make a Makeup Tutorial – Recording
Here are some things to keep in mind while you record your makeup tutorial:
- Show what you’re using. When you use a product, brush, or any other beauty supply make sure to let your audience know what you’re using and why you chose it. This isn’t about promoting brands, it’s about making it easy for viewers to duplicate your results.
If you’re using autofocus, you can hold products up to the screen and wait for it to kick in. If you’re not using autofocus, just hold them up next to you for a moment. You can also shoot separate closeups of each product and cut them into your main tutorial video. - Highlight small details. Describe what you’re doing in a lot of detail and don’t gloss over anything. Assume the person watching your tutorial doesn’t know anything about putting on makeup.
- Take stills for your thumbnail. Remember to take some still photos of your finished makeup to use in your YouTube thumbnail.
How to Make a Makeup Tutorial – After Shooting
Once you’ve finished recording and put away all your camera gear, there’s still work to do. You still need to edit your video and post it on YouTube. Here are some tips for that:
- Add transitions and effects. If you have several clips or even just distinct sections of your main clip, then adding transitions can be a great way to hold your viewers’ attention.
If you spend a lot of time on a repetitive step, you may want to speed that part up and make it a time-lapse. - Add your intro. Having a short (usually around 5 seconds) intro sequence is a great way to strengthen your personal lifestyle brand. You can download free intros right here on filmora.io .
- Title your video. Make sure your most important keyword – the type of look you’re creating, or a product you’re reviewing – is near the beginning of your video’s title. Searching for the topic of your video and writing a title similar to the highest-ranking results is a good way to start.
Remember to include what type of video you made, i.e. ‘tutorial’, ‘review’, or ‘get ready with me’, in your title. People might include these kinds of words in their search queries and, even if they find your video another way, they’ll probably want to know what they’re clicking on before they click. - Customize your thumbnail. Again, search for your video’s topic and see what comes up. You want your thumbnail to look related to the top results, but you also want it to jump out at potential viewers. There may be something you can add to the thumbnail photos you took that will help you stand out, like a bright border, an emoji, or a closeup of a product you feature in the video.
- Write a detailed description. Putting the products you use in your video description will help your viewers, and it’s a great place to include affiliate links if you ever join an affiliate program (like Amazon’s) to generate some revenue.
Are you already making beauty videos? If so, let us know if you have any of your own tips!
Richard Bennett
Richard Bennett is a writer and a lover of all things video.
Follow @Richard Bennett
Richard Bennett
Oct 26, 2023• Proven solutions
Beauty and lifestyle are two of the most popular categories on YouTube, and they might also be the categories most associated with brand deals. Whether you’re hoping to earn revenue as a beauty influencer, or just want to post some fun makeup tutorials, this guide is for you!
We’ll walk you through deciding on a theme for your channel, setting up your equipment, and give you tips for actually recording your videos.
1. **[Finding Your Niche in Beauty or Lifestyle](#niche)**
- Types of Beauty Videos – Your Content Strategy
- How to Get Products to Review
- Simple Camera Setup for Beauty Vloggers
- Lighting for Beauty
- Top Ring Lights for YouTube
- Build Your Own Diva Ring Light
- How to Make a Makeup Tutorial – Before You Start
- How to Make a Makeup Tutorial – Recording
- How to Make a Makeup Tutorial – After Shooting
Best YouTube Video Editor- Wondershare Filmora
Wondershare Filmora is specifically made keeping quality on priority and to make sure all the videos are edited well with the highest accuracy. You can trim, merge, crop, add background music, rotate videos as well as add motion elements, animated texts, overlays, and filters, etc. to your makeup video, and the video can also be uploaded to YouTube or burned to DVD directly.
Finding Your Niche in Beauty or Lifestyle
As a new makeup, beauty, or lifestyle YouTuber you’ll be jumping into a category that’s already packed with thousands of channels. In order to gain any momentum, you’ll have to decide on a particular thing you want to be known for. That’s your niche.
People looking for beauty tutorials are often looking for someone who has something in particular in common with them. Hairstyling for a specific ethnicity, for example, is a potential niche because people want to learn how to style their own hair, not a hair in general.
Another way you could find a niche is by taking on a specific area of interest, like a skincare channel with a focus on coping with acne or a makeup channel with a focus on natural products.
SunKissAlba has a lifestyle channel that focuses on a ‘natural’ niche. She posts videos about every aspect of her lifestyle from putting on makeup to cooking, but natural/non-toxic products are a constant theme through everything she does. By niching her channel she hasn’t limited what kinds of videos she can do at all - she posts a huge variety of different types of videos. What she has done is to make her channel particularly valuable to audiences interested in things that are natural or organic.
Types of Beauty Videos – Your Content Strategy
It’s a lot easier to come up with weekly video ideas when you have an overarching strategy.
The easiest way to figure out what kinds of videos you should make (and this can also help determine your niche!) is to think about what you already do and enjoy. If skincare is particularly important to you, for example, then you could build a content strategy that includes things like your favorite sunscreen, what different ingredients in skincare products are for, or even how to make a DIY face mask.
The same thing goes if you love doing big glamourous makeups for going out. Think about what you like, and that will determine what you should talk about in your videos.
Instead of buying new products to use in videos, try to use and showcase what you already have.
Here are some common types of beauty and lifestyle videos:
Get Ready With Me: a video where you put your makeup on which helps your audience get to know you better.
Monthly Favorites: showcases your favorite products from the last month.
Makeup Collection: viewers will want to see what you have.
DIY: create something, like a homemade moisturizer, and show your viewers how to make their own.
Makeup Hauls: show off what you’ve bought recently.
Lookbooks: put together a few looks based on a theme, like a specific color or event.
First Impressions: show yourself using a new product for the first time.
Makeup Tutorials: teach your viewers how to achieve a particular look, like a smokey eye.
What’s In My Bag: empty your handbag to show viewers what you carry around with you, particularly your most essential makeup.
My Routine: show viewers your morning skincare routine, or how you usually take your makeup off before bed. Any of your beauty-related routines will be interesting to your followers.
You should also be ready to jump on trends as they jump up. You can get a bump in viewership from people searching for a particular trend. Here are a couple of examples of past trends:
- Boyfriend Does My Makeup
- Kid’s Makeup Challenge
- No Mirror Makeup Challenge
How to Get Products to Review
You probably already know that a lot of the products popular beauty YouTubers review in their videos were sent to them for free. Brands want to get their products into the hands of creators who have ‘influence’ both in the hopes that their audiences will decide to buy them and as part of generating buzz – getting more people talking about their products so more people become interested.
In order for a brand to consider sending you a free product to review or feature in a video, you will first have to have a large enough following.
What is ‘large enough’? There’s no magic number of YouTube subscribers or Instagram followers. How large your following needs to be will depend on what brands you want to work with, as well as whether your channel has a specific niche.
Large brands will want to work with larger creators. Smaller brands that are still trying to build notoriety may be more open to working with creators whose followings are not as large.
If you have a very specific niche then that could create more opportunities for you as a mid-sized YouTuber. If you specialize in styling curly black hair, and a brand is marketing a product made specifically for styling curly black hair, then your smaller following will be more valuable to that brand than the larger audience of a more general channel.
Here are 4 tips for getting free products for review:
- Follow your favorite brands on Instagram and subscribe to their YouTube channels. Make sure to take them when you feature their products in your posts or videos.
- Focus on growing your community/audience. As you start getting more subscribers and building up momentum for your channel, brands might start reaching out to you. We’ve got some tips on growing your YouTube channel here .
- Make a pitch to a brand. The first step in this is figuring out who to pitch to. You can send smaller brands DMs via Instagram or Twitter and politely ask for contact info for a PR person. Never ask for free product or sponsorship at this point, just information you can use to contact PR.
- Send an email with your pitch to the brand’s PR person. Your email should introduce yourself, describe your content, and talk about what type of audience you have (how many subscribers, where are they located, how old are they, etc. This information is all available in your Creator Studio analytics).
Make sure to link to your channel so they can verify what you say (do not hide your subscriber count).
Emphasize what value you could provide the brand with (i.e. ‘I’ve had a lot of success with videos on managing acne and I’m sure my subscribers would love to see a review of your cream’) and outline what kind of video you’d like to make (i.e. a five-minute review focusing on the product, or a short feature in a longer makeup tutorial).
Simple Camera Setup for Beauty Vloggers
There are a lot of different ways to set up your camera for a ‘talking head’ video (anything that is primarily you talking to the camera). Keep reading to learn about a popular ring-light setup for beauty videos, or click here to learn 4 different camera setups .
In an ideal situation, this is what you’ll build your setup out of:
- Camera with a flip-out screen
- Ring light
- Camera-mounted shotgun mic
- Tripod (unless you can mount your camera inside your ring light)
If you don’t have access to all of the equipment above, try some of these:
- Smartphone camera
- DIY ring light
- Smartphone shotgun mic or LAV
Step 1: Set your camera and ring light (your camera should be sitting directly behind your ring light, or mounted inside of it) up about 3 feet away from your subject (yourself).
You might want to experiment with sitting at different distances to see how the lighting looks on your face.
Step 2: Set your camera up a bit higher than your face and tilt it down towards yourself (shooting from slightly above is always more flattering). It should be set up at about a 15° angle to you.
Step 3: Check your frame (this is easiest if your camera has a screen that flips out) to make sure there’s not too much empty space in your shot.
Step 4: Adjust your camera’s focus so your picture is clear. You may need to set up a lamp, chair, or stuffed animal as a stand-in for yourself while you stand behind the camera adjusting the focus.
Turn off autofocus and adjust your focus manually by turning the focus ring on your lens, if you’re using a DSLR or mirrorless camera.
Step 5: Set your f-stop (aperture) so that your depth of field is deep enough for you to lean forwards or backward without becoming blurry.
An aperture of f/5.0 is good if you’re going to be moving around a lot, but if you’re not going to be moving much and want a blurry background you might want to go with f/2.8 or lower.
Step 6: Set your ISO (film speed). A lower ISO will give you a darker, but higher quality, image. A higher ISO will lower your quality and give you a brighter image.
ISO 400 should be a happy medium for shooting inside with your ring light, but you may need to try out a couple of settings to find one perfect for your situation.
For more info on camera settings for beauty videos, click here .
Lighting for Beauty
The key to achieving a high-quality picture for your beauty video is having a lot of light.
A ring light (whether it’s one you purchase or one you make) will give you even light over your whole face, and that may be enough. Ring lights are considered one of the biggest ‘secrets’ to beauty on YouTube (as explained in this Racked article ).
There are, however, some reasons you might want additional light:
To Light your Background/Space
If you only have a ring light/front light then you may end up looking like you’re surrounded by shadows. If you want more light for your space you can use windows, household lamps, or professional video lights like softboxes or LED panels.
To Stand Out Against your Background (‘Backlighting’)
A front light that’s lighting you evenly is also lighting whatever’s behind you evenly, which can make your overall picture look flat.
Setting up a light to shine up at you from behind will help you pop out from your background by creating a silhouette.
You can use an LED panel or a household lamp as a backlight.
To Add Dimension to Your Face (Side Lights/ Fill Lights)
Setting up lights to hit you from the sides will help you look more three dimensional. It can also give your video a general quality boost because the picture quality is always better when there’s tons of light.
You can use softboxes, LED panels, clamp lights, household lamps, or any other light source you can think of.
Lighting Tips!
* **_Use ‘daylight’ bulbs in any household lighting/clamp lights you use._ This way, your light will all be the same color and you won’t have to do a lot of color correction (the more yellow-colored light most indoor lights give off will make you look orange).**
You can buy daylight-colored bulbs for about $5.
- Clamp lights ($10 each) and paper lanterns ($10 each) provide great lighting and are much more affordable than professional lighting kits. The paper lanterns will provide even, diffused, light and the clamp lights will be easy to set up wherever you need them.
- Check out these DIY tips for creating your own reflectors and diffusers .
Top Ring Lights for YouTube
1. Neewer Dimmable Fluorescent Ring Light - $110
One cool feature of the Neewer Ring Light is that you can choose between daylight and a more orange-tinted light depending on which of the included filters you use. In almost all situations you’ll want to use white light/daylight because the orange light will make you look orange, but if you ever wanted to create a warmer image to achieve a particular effect you’d have that option with this light.
This light is dimmable and can be adjusted to the angle that suits your shot. That’s true of our number 2 pick too, and the second place light actually has a slight edge over the Neewer light because its color temperature is 5400K which is slightly closer to daylight than Neewer’s 5500K, but that’s honestly not super important for YouTube. They’re close enough that you won’t be able to tell the difference, and this light is over $100 more affordable.
2. Prismatic Halo Ring Light - $260
This lightweight ring light is easy to transport, set up, and mount your phone or camera to. It’s a fluorescent ‘daylight’ (5400K) light, so the colors in your videos will look natural.
This light is dimmable, so you can turn it down if it’s too bright, and the Prismatic Light Stand will allow you to tilt your light to the perfect angle. This will be handy if you’re mounting your camera inside the ring but want to place it slightly above your face instead of having it look at you head on.
Build Your Own Diva Ring Light
A ring light is an important tool for a lot of beauty YouTubers, but it doesn’t fit into everyone’s budget. Here’s one popular way to create your own ring light for about $20.
A lot of people have done this DIY, but we’re using Kevin’s video because we love how he added the stand.
What you need:
- A wire wreath frame
- Zip ties
- LED rope light (16 ft, daylight)
- Tinfoil
- Metal paper towel stand
- Scissors
Step 1: Wrap your wreath frame in tinfoil. Make sure the tinfoil is shaped to the wreath so that there is a curve on the inside where your rope light can sit.
Step 2: Place your rope light inside the curve of your frame. Wind it around for 3 loops so you have 2 rows of lighting tube sitting next to each other.
Step 3: Use the zip ties to fasten in the rope light. Wrap them tightly around your frame and lights in several (6-8) places.
Step 4: Cut off the tails of the zip ties.
This is your ring light. Continue to step 5 if you want it to have a stand (you might just want to clip it up somewhere).
Step 5: Fasten your ring light tightly to your paper towel stand securely with several zip ties. Make sure to fasten it at the bottom (where the excess rope light is coming out of your ring light). Cut off the tails of the zip ties.
How to Make a Makeup Tutorial – Before You Start
Before you start recording your makeup tutorial there are a few things you should do.
- Write an outline. You might even want to write yourself a transcript. Having a concrete plan before you start recording will help ensure your tutorial is useful for viewers. You’ll realize where you might need to slow down and show a particular step in more detail, or where your viewers might find a particular step tricky, in a way you want if you just jump into a makeup routine you know perfectly.
- Layout your supplies. Make sure everything you need for your tutorial is laid out neatly in front of you so you can access it all easily. Try to use clean brushes – it just looks nicer.
- Tidy up. If you want your viewers to trust you when it comes to aesthetics, it’s important that your studio area is clean and tidy. You may even want to use a backdrop.
- Do a video test. Before you start your video for real, start recording and shoot some test footage. Watch that back to make sure you like the look of your frame, your face is never blurry, and you’re happy with the overall look of things.
- Do an audio test. If you’re going to be talking in your video instead of recording a voiceover after, do an audio test to make sure your audience will be able to hear you clearly.
How to Make a Makeup Tutorial – Recording
Here are some things to keep in mind while you record your makeup tutorial:
- Show what you’re using. When you use a product, brush, or any other beauty supply make sure to let your audience know what you’re using and why you chose it. This isn’t about promoting brands, it’s about making it easy for viewers to duplicate your results.
If you’re using autofocus, you can hold products up to the screen and wait for it to kick in. If you’re not using autofocus, just hold them up next to you for a moment. You can also shoot separate closeups of each product and cut them into your main tutorial video. - Highlight small details. Describe what you’re doing in a lot of detail and don’t gloss over anything. Assume the person watching your tutorial doesn’t know anything about putting on makeup.
- Take stills for your thumbnail. Remember to take some still photos of your finished makeup to use in your YouTube thumbnail.
How to Make a Makeup Tutorial – After Shooting
Once you’ve finished recording and put away all your camera gear, there’s still work to do. You still need to edit your video and post it on YouTube. Here are some tips for that:
- Add transitions and effects. If you have several clips or even just distinct sections of your main clip, then adding transitions can be a great way to hold your viewers’ attention.
If you spend a lot of time on a repetitive step, you may want to speed that part up and make it a time-lapse. - Add your intro. Having a short (usually around 5 seconds) intro sequence is a great way to strengthen your personal lifestyle brand. You can download free intros right here on filmora.io .
- Title your video. Make sure your most important keyword – the type of look you’re creating, or a product you’re reviewing – is near the beginning of your video’s title. Searching for the topic of your video and writing a title similar to the highest-ranking results is a good way to start.
Remember to include what type of video you made, i.e. ‘tutorial’, ‘review’, or ‘get ready with me’, in your title. People might include these kinds of words in their search queries and, even if they find your video another way, they’ll probably want to know what they’re clicking on before they click. - Customize your thumbnail. Again, search for your video’s topic and see what comes up. You want your thumbnail to look related to the top results, but you also want it to jump out at potential viewers. There may be something you can add to the thumbnail photos you took that will help you stand out, like a bright border, an emoji, or a closeup of a product you feature in the video.
- Write a detailed description. Putting the products you use in your video description will help your viewers, and it’s a great place to include affiliate links if you ever join an affiliate program (like Amazon’s) to generate some revenue.
Are you already making beauty videos? If so, let us know if you have any of your own tips!
Richard Bennett
Richard Bennett is a writer and a lover of all things video.
Follow @Richard Bennett
Navigate YouTube Success: A Compreehensive Guide to Analytics
How to Use YouTube Analytics to Grow Your Channel?
Richard Bennett
Oct 26, 2023• Proven solutions
As a YouTuber, you know those famous metrics: Views, Subscribers, and Watch Time. Those YouTube analytics are easy to understand. But YouTube offers much more data.
YouTube data is valuable because it can show you why you aren’t getting more subscribers and why certain videos aren’t getting the views you expected. Data can also identify all the positive results and give you insights into what worked.
In this article, I’m going to show you how to use YouTube Analytics to gain knowledge, take action, and grow your channel.
YouTube Analytics:
- Overview
- Realtime
- Revenue
- Ad Rates
- Watch Time
- Audience Retention
- Demographics
- Playback Locations
- Traffic Sources
- Devices
- Translations
- Subscribers
- Likes and Dislikes
- Videos in Playlists
- Comments
- Sharing
- Annotations
- Cards
- End Screens
When you enter your YouTube Creator Studio, you will find the Analytics Tab on the left-hand-side menu. Click into it and you will see a whole list of features, each linking to its own dashboard.

But with all this information, it can get a little overwhelming for new YouTubers. Don’t sweat. Let’s walk through each section to identify:
- What information it is displaying
- What issues it addresses
- What you can do to improve the results
1. Overview
Use Overview Report for Quick Analysis
The Overview report is the first page you land on when you click into Analytics, and it’s what you want to see when you are checking in.
The Overview dashboard breaks down all your key stats. If you want a deeper dive, you can click into each of the section headers and it will give you an in-depth look at the analytics of that specific category.
Personalize Your Overview
By default, the dashboard will show you the stats from the last 28 days, but you can personalize the time frame to see the data of that specific period.

If you only want to focus on the performance of your channel on a specific region, you can customize that as well:

Note: You will be able to change the time frame and region for all the data within YouTube Analytics.
See Your Top Performing Videos In Overview
The Overview dashboard highlights your Top 10 videos. Right away you can see the Watch Time, Views, and Estimated Revenue of those high performing videos.
Get Insights On Your Audience In Overview
In Overview you can see where the majority of your audience is from, what gender they are, how they are discovering your videos in Traffic Source, and where they are watching your video in Playback Locations:
How to Use the Overview Dashboard
The Overview dashboard is your mission control. I recommend popping in weekly to get a top view of your channel’s performance.
If you notice anything unusual or surprising, such as a spike in Shares, you can then dig into the individual data and identify the cause.
2. Realtime
See The Performance of Your Channel
The Realtime report is a fantastic tool for seeing the immediate performance of your channel, which automatically updates every 10 seconds. There are two main views: The last 48 hours and the Last 60 Minutes.
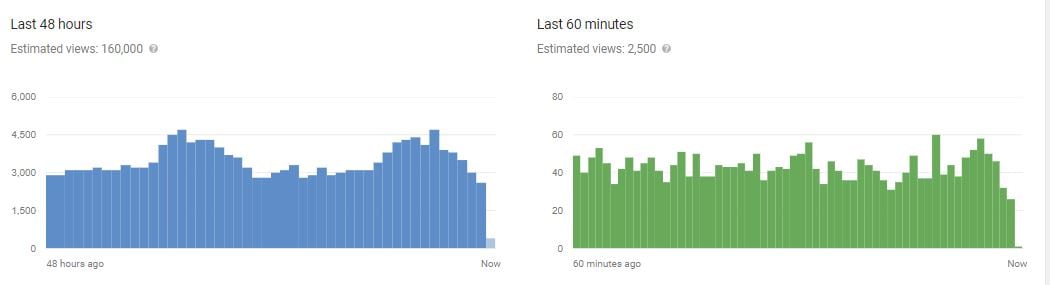
See Performance of Your 25 Most Recently Published Videos
In the Realtime dashboard, you will see the last 48 hours and last 60-minute performance of your 25 most recently published videos.
If you have recently shared a new video, you should log into the Realtime dashboard to get a quick glance at the performance.
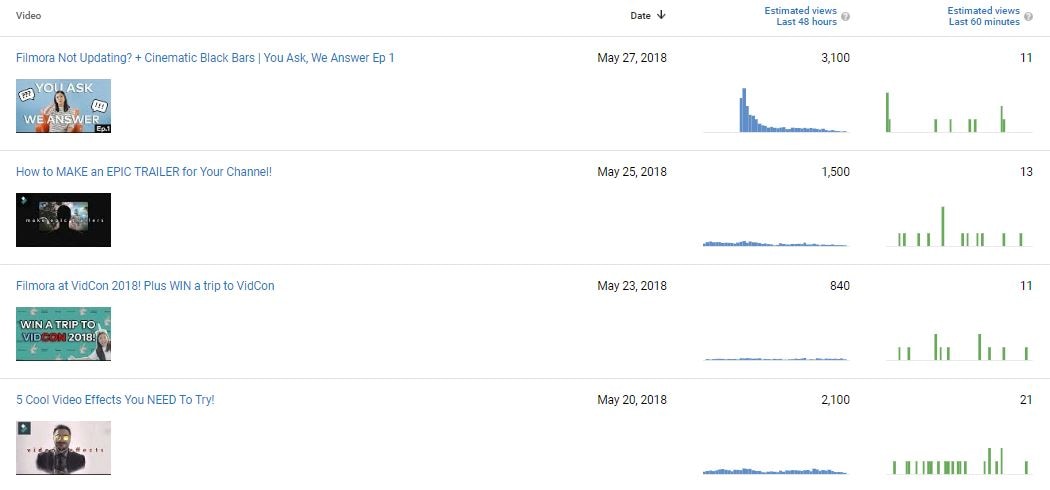
See How and Where Your Videos Are Being Viewed At the Moment
If you want to find out how many people have viewed your videos from a mobile device or how big your audience currently is, you can do that in the Realtime report.
- Select Device to see if you have more viewers on Desktop, Mobile, or Tablet.
- Select Operating System to find out if you have more Android viewers or iOS viewers in the past two days.
- Select Geography to see which region you are getting the most views and when viewerships are dropping because most likely people in that area are sleeping.
If you notice that you are getting a lot of views from the US, but also notice that people are about to go to sleep and the trend shows that it drops at that point in the past 24 hours, you can decide whether to schedule the post for the next morning or you can see if a boost at this point can keep the audience awake.
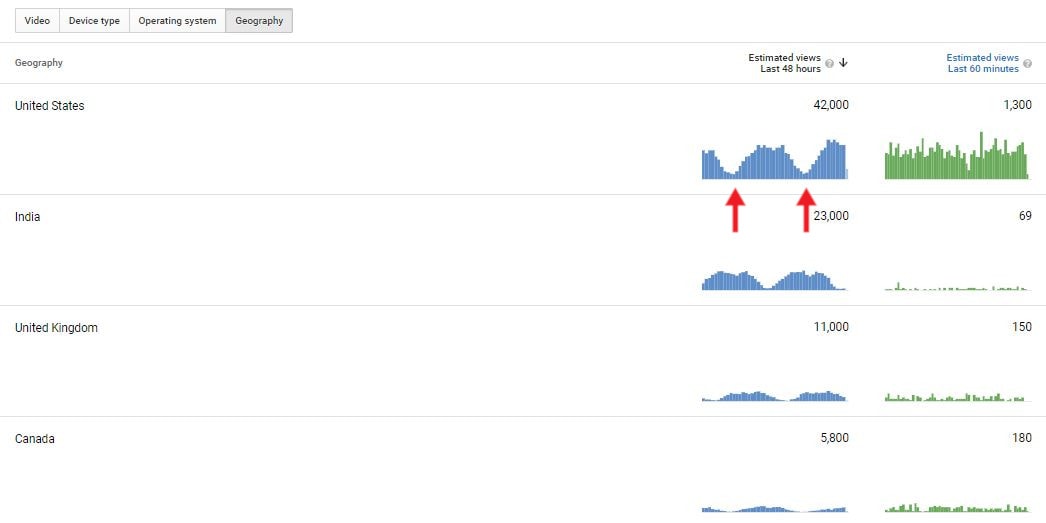
How to Use the Realtime Dashboard
If YouTube sees that your recently published video is performing well right off the bat, then it will give your video a better chance of trending, ranking higher in search, and reaching more viewers.
Getting early insights on a recently published video may help you adjust your promotion strategy as needed.
For example, if you published a video this morning and shared it on your Facebook page, and you checked in this morning and saw that there was only a small amount of views, you may want to share it on a different platform so that it can get more exposure.
3. Revenue
See How Much Money Your Channel Has Made
Select a specific timeline and see how much your channel has made from ads and YouTube Red viewers during that duration.
There are 3 ways to change the timeline:
- Dropdown menu
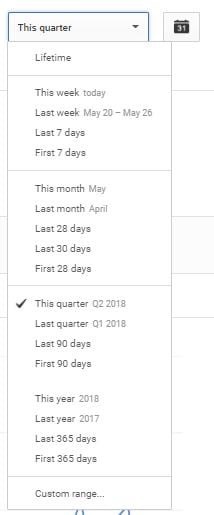
- Calendar
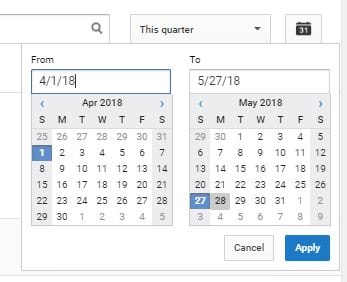
- Slide Bar
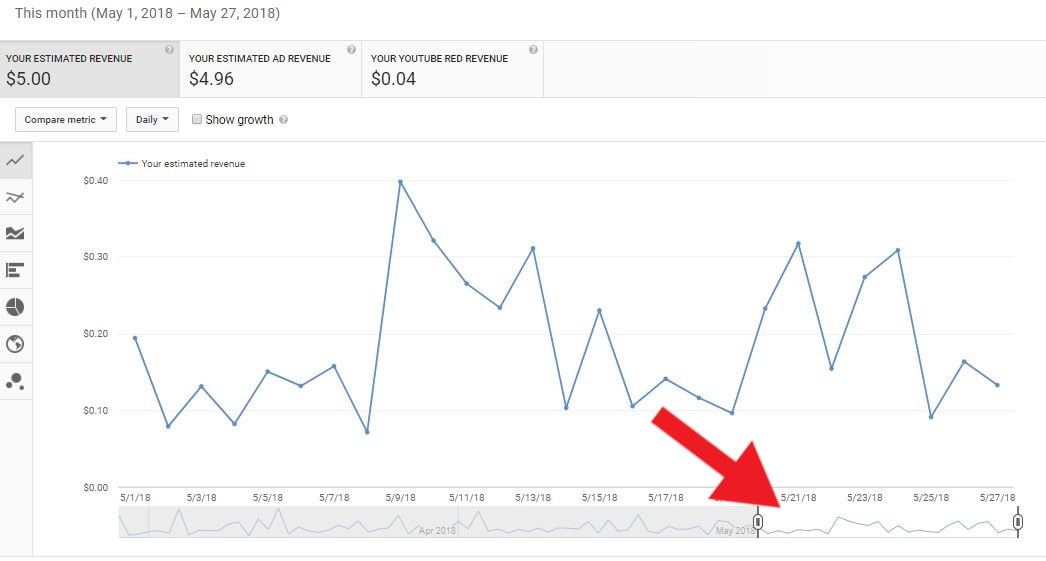
You can also change how you view your data, whether Daily, Weekly, Monthly, etc. This way you can see exactly how much you made each day, week, or month, and determine if you can correlate a particular dip or spike to an event that occurred.
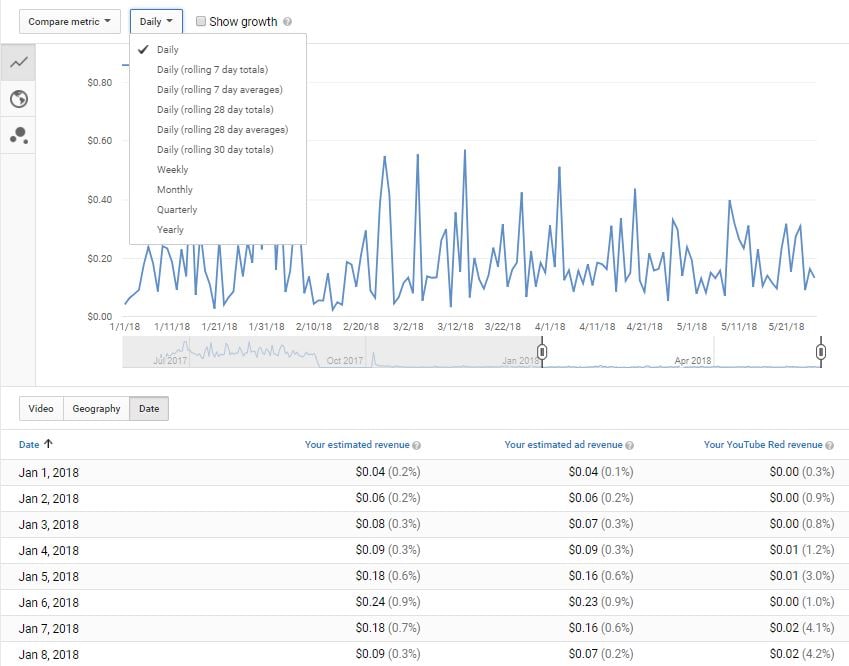
Identify Your Highest Earning Videos
In the Revenue report, you can see which videos are earning you the most. Consider how these videos are successful:
- Was the content great?
- Was it the perfect length?
- Was it a well-structured video?
- Was the video’s pacing fast?
Once you’ve done a full evaluation, see if you can apply it to your other videos.
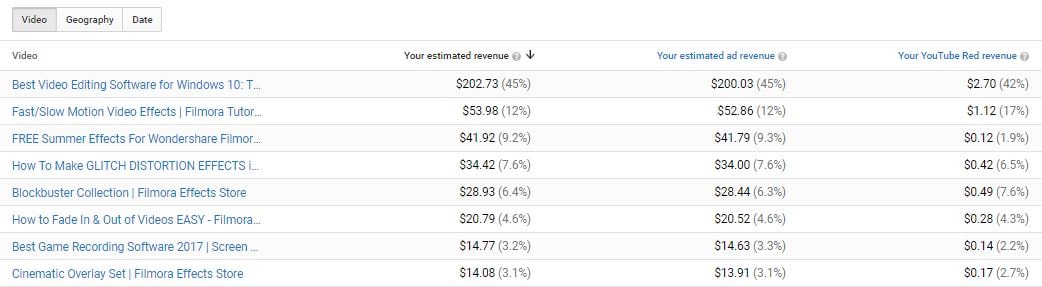
Which Country Is Earning You the Most Money
Different countries have different rates for how much creators can make off Adsense. Click into Geography and see how much you are making in different countries and consider which audience is best to focus your attention on with the intention of increasing revenue.
Compare Estimated Revenue Earning to Other Metrics
Know more about how your data are related by comparing to see if Revenue is affected by the performance of metrics in other categories such as Views. Does a rise in view change your revenue?
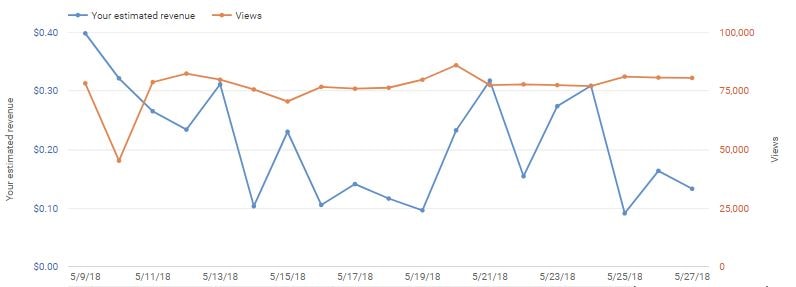
How to Use the Revenue Dashboard
Figuring how to make money on YouTube is tricky and any insight you can get can give you an advantage, steer you in the right direction, and help you focus on what matters.
As you can see in the example in the graph from the section above, the View count has been fairly consistent, however, the Revenue is sporadic.
This tells you that while Views may be an important metric, it won’t affect your revenue. This can mean that you haven’t been reaching the audience that will engage with the ads, consider a slight content shift.
4. Ad Rates
Understanding the Ad Rates Report

YouTube Ad Revenue: This is the estimated gross total of all the money you made from ads sold via Google and Google partners.
Estimated Monetized Playbacks: This is the number of times your audience is shown an ad.
Playback-based CPM: This is an estimation from YouTube on how much money you can make if you had 1,000 views from a monetized video. This is based on the parameters of the advertisers, your current number of views, and where your viewers are from.
CPM: This is the estimated amount you will earn for 1,000 ad impressions.
See Which Monetized Videos Are Earning Your Ad Revenue
Unlike the Revenue dashboard, the Ad Rates report dives deeper into the performance of individual monetized videos.
This allows you to not only see the estimated earnings but also how many times the ad was shown. On top of that, the CPM gives you an idea of what YouTube deems to be more valuable content for advertisers, which gives you a better idea about the capabilities of the video and offers insight into the type of videos you make in the future.
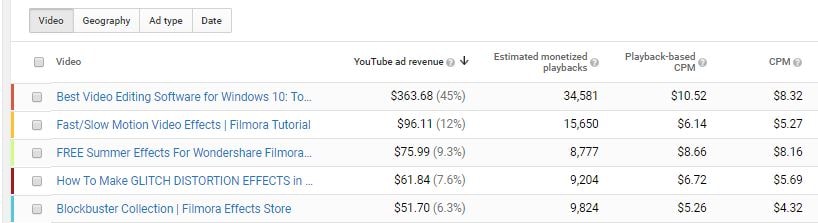
See How Each Ad Type Is Performing Within Individual Video
Click into Ad Type and you will be able to see the performance of different types of Ads (skippable video ads, display ads, bumper ads, and non-skippable video ads.)
You can see these details from the channel level or from an individual video level.
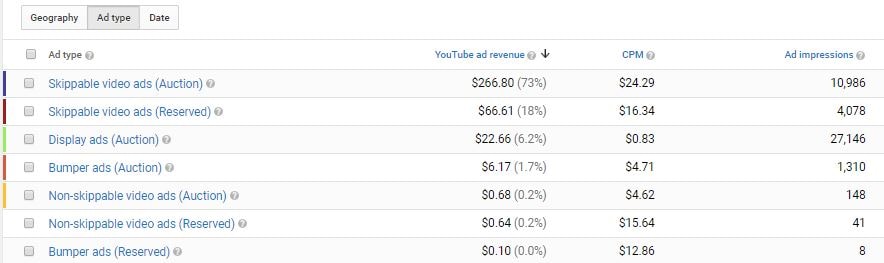
How to Use Ad Rates Report
Ad performance might not be something you think about at the early stages. You want to make videos, and not worry too much about ads, after all.
But as you accumulate more and more monetized videos, and you will start seeing which videos are stronger in getting you ad engagements and which aren’t. The result might surprise you and help inform your next phase of videos.
5. Watch Time
See The Aggregated Time Your Viewers Spent Watching Your Videos
YouTube puts a lot of weight on this metric because they know that the more time people spend watching your original content, the more time they will have to show ads to your audience. Overall, you’ll want to see a steady rise for your Watch Time as it will indicate that you have a growing dedicated viewership.
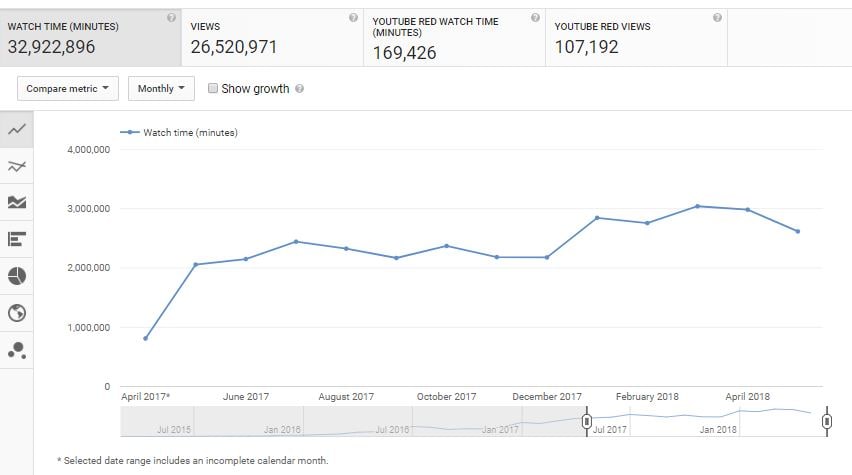
In the graph, you will also be able to see the combined Views of all your videos, as well as the segmented performance of YouTube Red viewers.
YouTube Red is YouTube’s subscription plan. It is currently only available in Australia, Korea, Mexico, New Zealand, and the United States.
YouTube Red offers ad-free content that can be enjoyed offline. Since the viewers with YouTube Red won’t see ads, YouTube will give you partial revenue from Red viewers.
Compare Performance of Videos in the Graph
Put your videos side by side to compare the performance over the course of a time period.
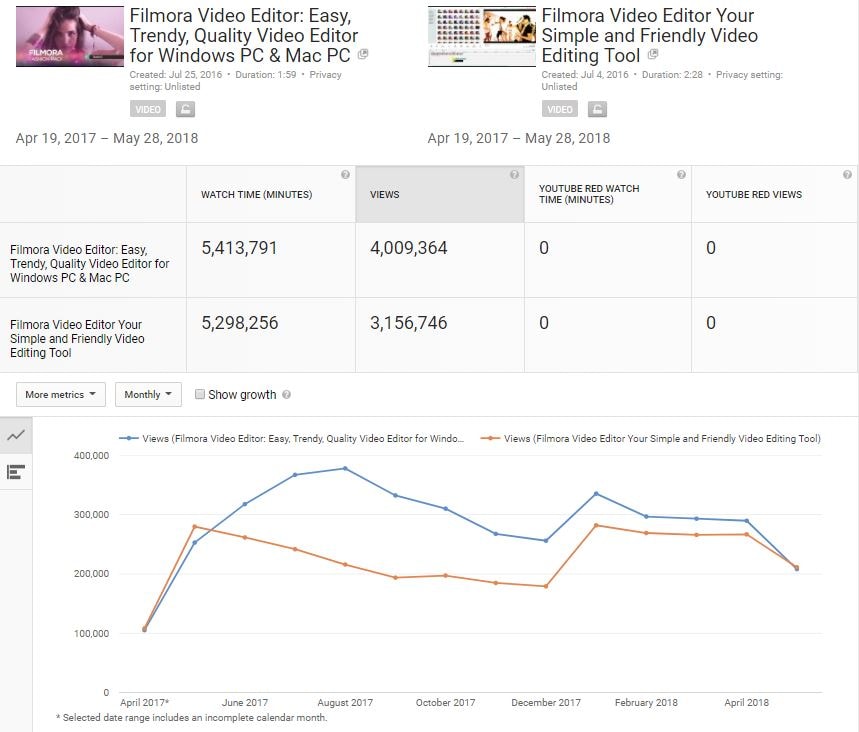
How to Use Watch Time Report
If you want to be in YouTube’s algorithm’s good books, then you will need to put some attention on your channel’s Watch Time. Always consider ways in which you can improve this metric.
Some strategies include:
- Add videos to optimized playlists
- Improving titles and thumbnails
- Increase YouTube subscribers
- Add annotations to your videos
- Add end cards to your videos
6. Audience Retention
See How Long Your Viewers Spend Watching Your Videos
Like Watch Time, Audience Retention is a metric YouTube uses to determine how valuable your video is and how worthy it is in being discovered by your audience. It’s important to learn where in your video you are losing viewers.
In Audience Retention, there are two main categories you can see.
- Average View Duration shows how much time all your viewers from a certain time frame spend watching your video.
- Average Percentage Viewed shows how much the average person watched from your videos.
In this example, we see that the average length of a video watched is 1:14 and the average viewer will watch 53% of the video.
While you should aim to have 100% audience retention, if you can get an average above 50%, you are doing something right. Anything under, you may want to consider changing up your strategy (content, structure, pacing, etc.).
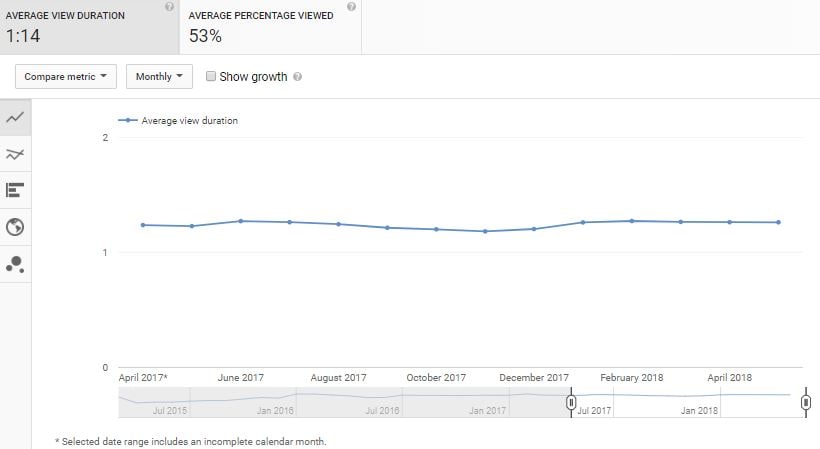
See Audience Retention of Individual Videos
Absolute Audience Retention: This report shows you the number of views at every point in the video as a percentage. This will let you know which part of the video is most popular, which part is causing a big drop off, and which part viewers are skipping to or rewatching.
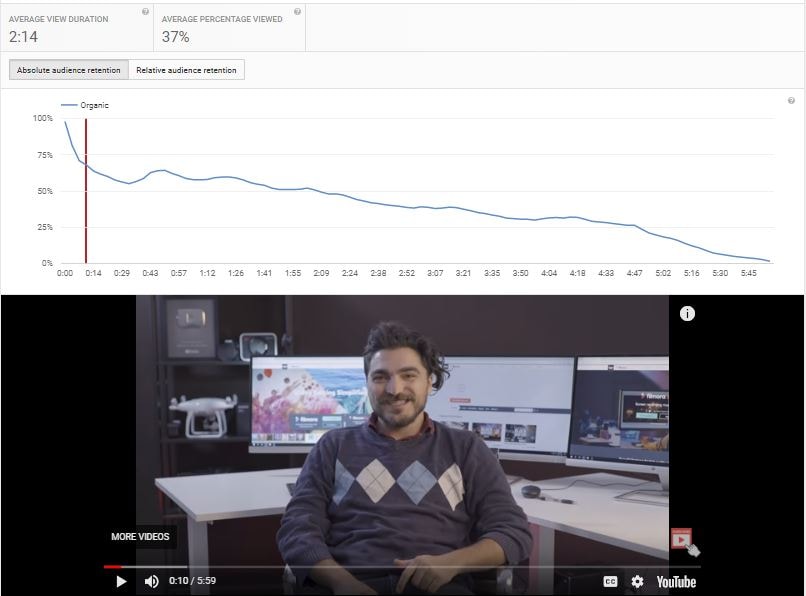
Relative Audience Retention: This report gives you a visualization of how your video’s audience retention performance compares to all YouTube videos of a similar length.
If the line indicates that you are above average at a certain point, that is where your video is doing a better job holding the viewer’s attention at that point compared to most other videos.
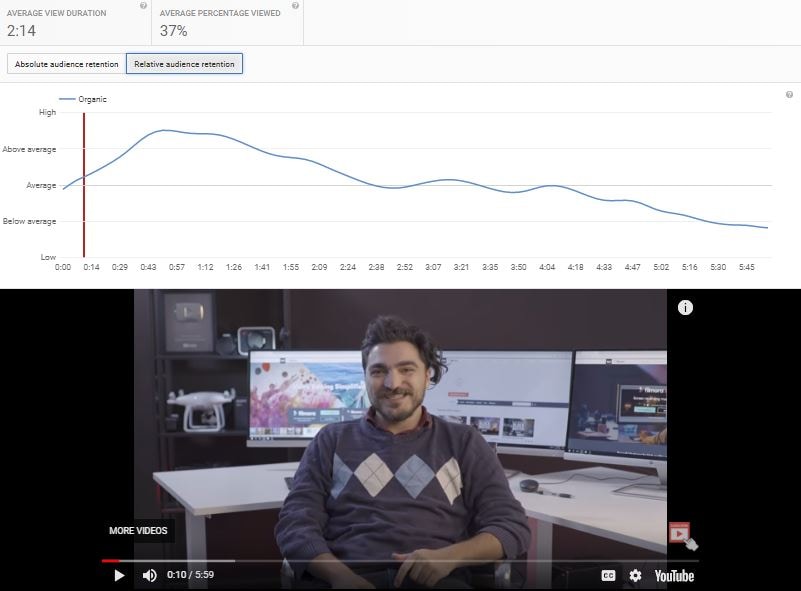
How to Use Audience Retention
Audience retention can give you a lot of insights on how you should be structuring your videos. If you notice a steep drop in viewership, you can assume that what the viewer is watching is not that interesting.
However, if you notice a sudden peak in the middle of your video, you can assume that a) viewers are skipping to it or b) viewers are rewatching that section.
In the example below, we see that there is a peak at the point in this video where a specific part of a tutorial is shown. Viewers were most likely rewatching to confirm they understand the information, so they can apply it themselves.
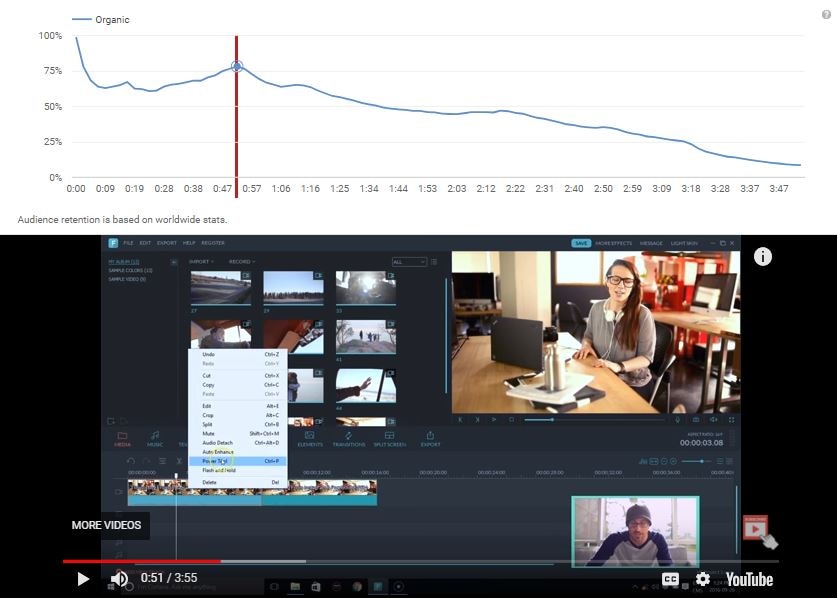
Knowing this, for the next video you make, you can better anticipate where your viewers are going to need more time on a specific part or whether you should skip ahead to something more interesting.
7. Demographics
Understand the Average Age and Gender of Your Audience
The first thing you’ll see when you enter the Demographic dashboard is the segmentation of your audience by age and gender. This gives you a good indication of who your overall channel is currently attracting.

See Most Popular Videos Viewed By A Specific Demographic
Learn about the videos that are most popular within that demographic to get better insights to what is most appealing for that group.
You will also see the Watch Time percentage that each video gets in comparison with all the videos in your channel.
Data Split by Age:
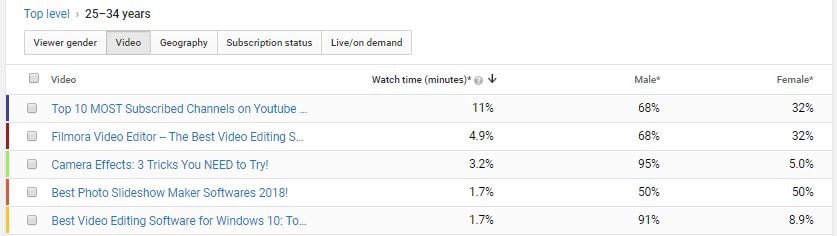
Data Split by Gender:
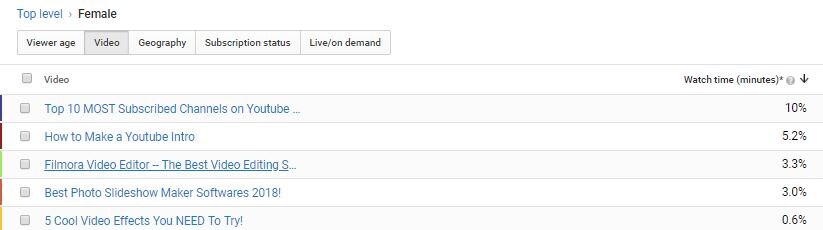
See Geographic Distribution of Different Demographics
Not only will you be able to see which region the majority of your viewerships are from, but you can also segment and compare by demographics. This will give you a more insightful view of how your channel is performing across the world for different people.
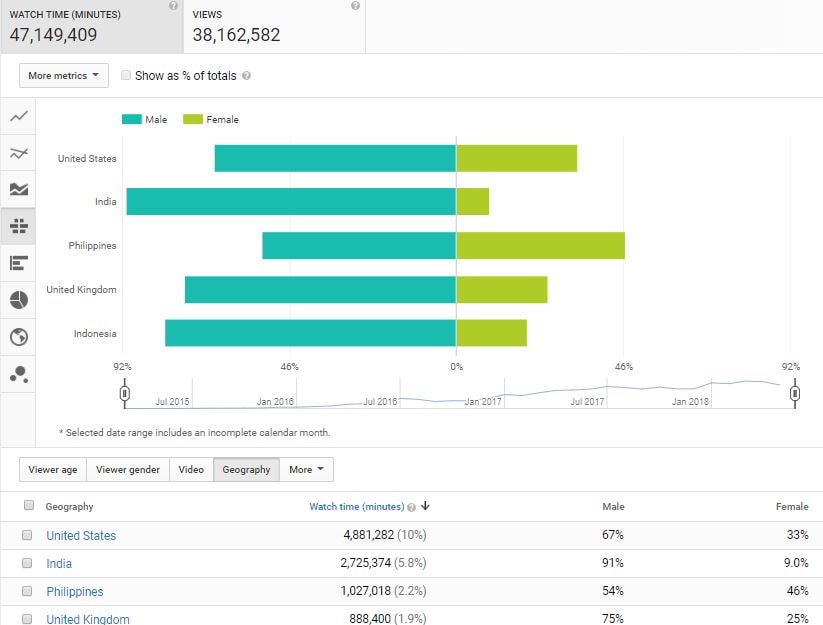
Additionally, you can click into specific videos on your channel and see how it is performing in different regions.
How to Use Demographics Report
Understanding which group makes up the majority of your viewership will help you decide how to strategize the next phase of content. Will you keep growing that audience or will you want to grow in another demographic?
If you noticed that you have an underperforming female demographic in India, you can plan out some content that focus on that community. Without this report, you cannot see where you are missing opportunities.
8. Playback Locations
Find Out Where People Are Watching Your Videos
There are a number of ways people can watch your YouTube video:
- YouTube Watch Page
- YouTube Channel Page
- Embedded Video Player (Website or App)
- Other
If your video is only promoted organically your views will likely be coming from the YouTube Watch Page, but if other media publications embedded your video, and it’s getting a lot of views, you can see it here.
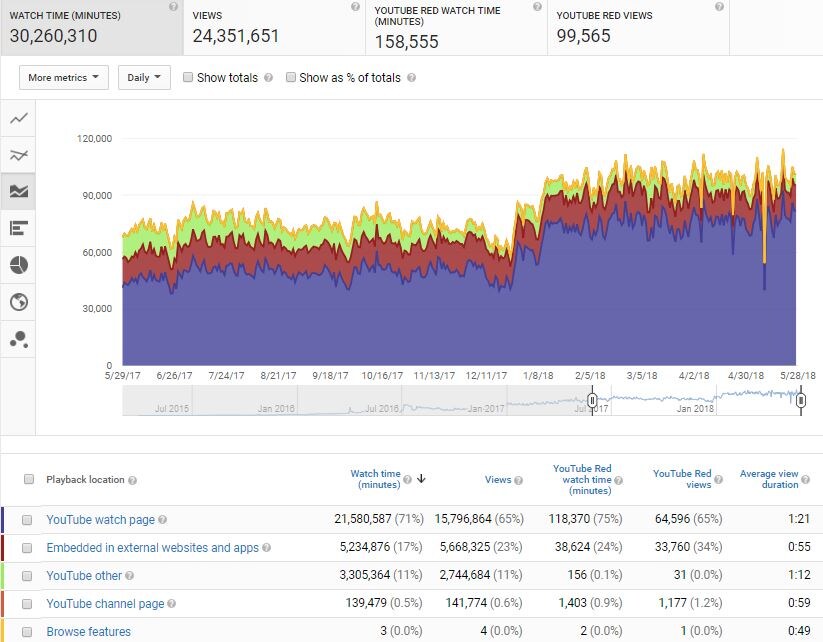
Which External Source Are Your Videos Being Watched
By clicking into the Embedded in External Websites and Apps report, you’ll be able to see all the different websites and apps that your video is featured on. This will give you a good indication of which sites and apps are driving the most views.
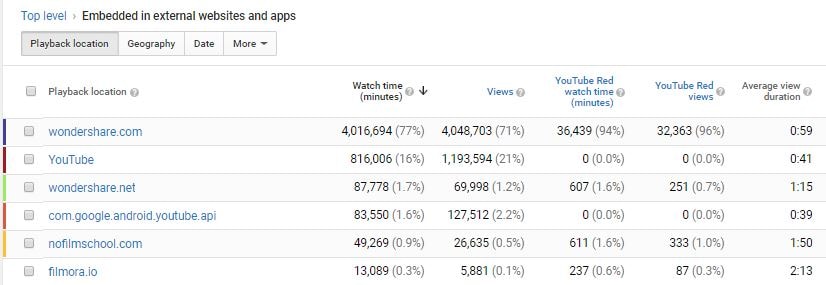
How to Use Playback Locations Report
Knowing where your videos are being played back is important, especially if you are getting a lot of views from an external source.
You can reach out to the website that has embedded your video and thank them for sharing your content, and maybe they will be happy to share more. This way you create a relationship with them, which can increase your network and also improve the chances of your videos being discovered.
9. Traffic Sources
Find Out How People Are Discovering Your Videos
In the Traffic Sources report, you can see what is the most popular way your video is being discovered.
This can include advertisements that you pay for, external referrals such as links from other websites, suggested videos, and searches on YouTube to name a few.
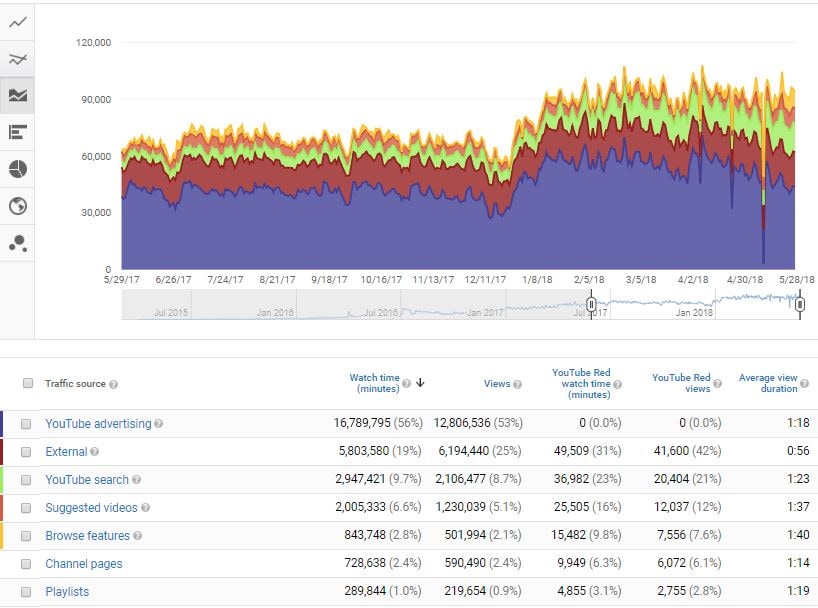
See Which Videos Are Suggesting Yours To Viewers
If you see that you are getting a lot of viewers coming from Suggested Videos, go to that report and see which external video was directing viewers to yours. These suggested videos can be your own or it can be from another YouTube creator.
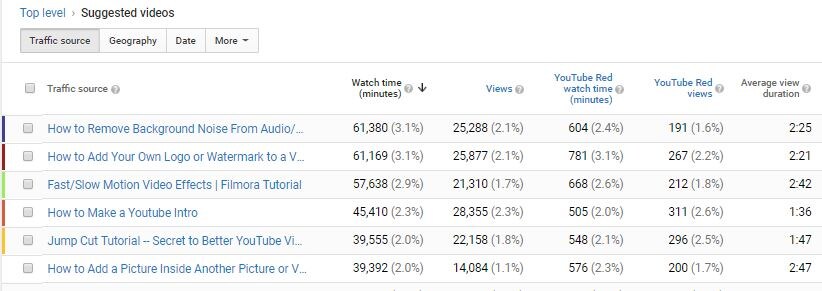
See What People Search For To Discover Your Video
By clicking into the YouTube search, you can see what viewers searched in order to find your video. This can be useful in understanding your viewers’ mindset: were they trying to solve a problem or answer a question?
Knowing this, you can improve your keyword research.

How to Use Traffic Sources Report
Because there are so many ways for a viewer to discover your videos, it’s important for you to know what is most effective.
If you have a new video coming out and you want to promote it, understanding where your previous videos are being discovered will help you strategize, giving it the best opportunity immediately.
10. Devices
Know What Devices Your Viewers Are Watching From
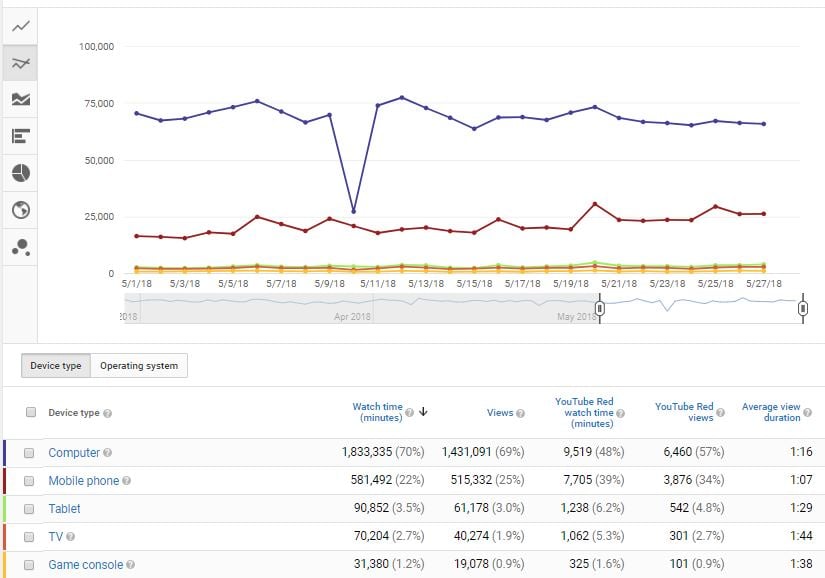
The way viewers watch content on their mobile phones is very different from the way they watch on television. By understanding how the majority of your viewers are watching your content, you can better design and structure your video.
For example, if you see that you have a large following that watches your content on mobile, then it might not be a good idea to load your video with too much text, as it’ll be hard for them to read.
You cannot control how people watch your content, but by better understanding their preferences, you can design your content to make it the best for their ideal situation.
11. Translations
See If You Need to Include Multi-Languages or Translation to Your Videos
The Translations report is where you can see how your viewers are watching your videos in terms of using translations and subtitles.
If you are creating content that targets international viewers, it’s good to know if they are engaging with your translation assets, including subtitles.
For example, if you see an increase in viewers from Brazil, do a quick translation of your transcript and upload the Portuguese subtitles and see if it increases viewers.
12. Subscribers
Find Out Where People Clicked Subscribe
In the Subscribers report, you can see where most of your subscribers came from and where people unsubscribe.
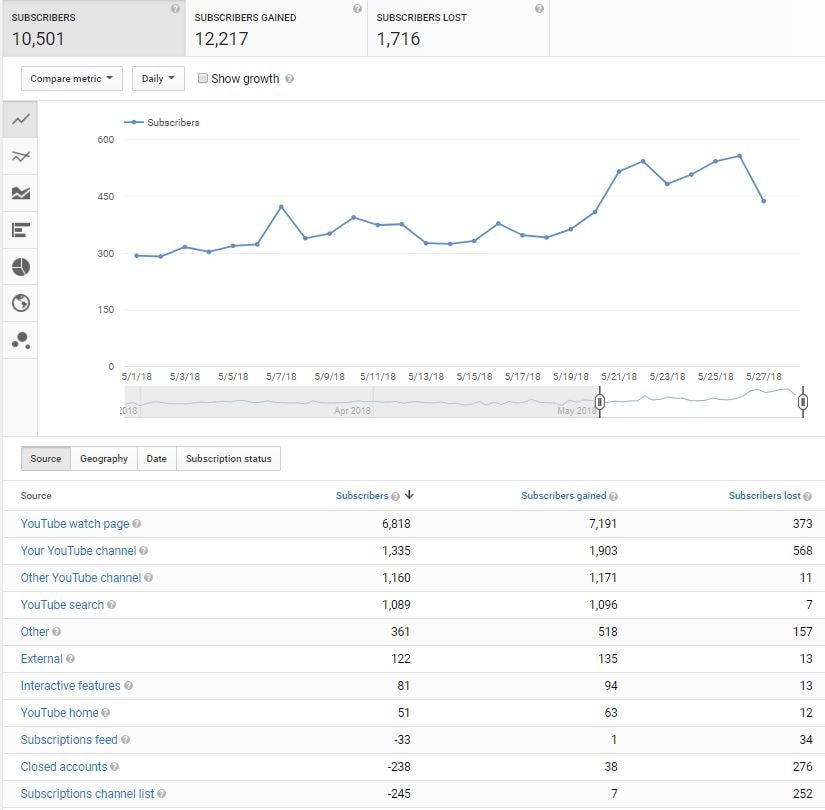
If you see that you are getting a lot of conversions from the YouTube Watch Page, you can dig in and see which video specifically you should give credit to for earning your subscribers — and which ones are causing people to unsubscribe.
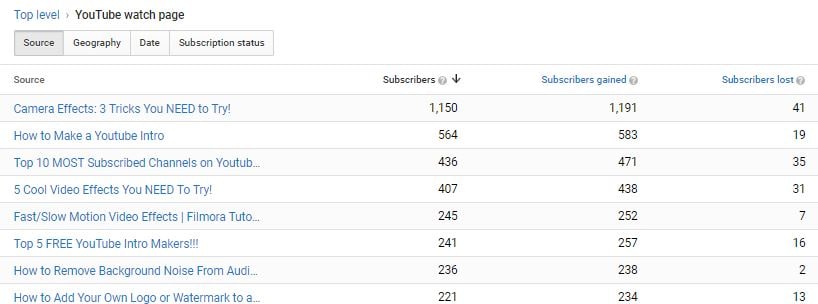
Find Out Which YouTube Keywords Are Leading to Subscriptions
Click into YouTube search to see the most popular search terms that have lead to people subscribing to your channel.
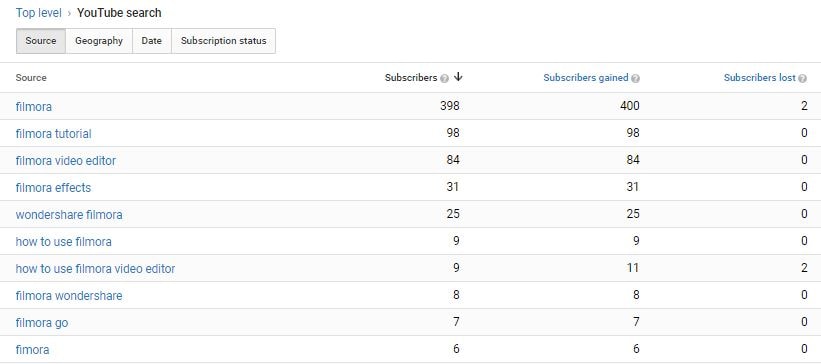
See Which Date You Got The Most Subscribers
Click into Date and find out if there was something significant that happened that day that made people subscribe to your channel more than others?

How to Use the Subscriber Report
Understanding which video drives viewers to become subscribers and which videos turn people off so that they unsubscribe will tell you a lot about the content you should be creating.
If you see a video is earning you a lot of subscribers, it might be a good idea to give it a boost and make sure more people discover it. However, if you see a video is causing people to click unsubscribe, even though it might be a video you love, consider removing it from your channel as it might be doing more harm than good for your channel growth.
13. Likes and Dislikes
See the Likes and Dislikes of Individual Videos
In addition to seeing the total Likes and Dislikes your channel received, in this report, you can see the Likes and Dislikes of individual videos. This gives you a quick glance at how your viewers are enjoying your channel and videos.
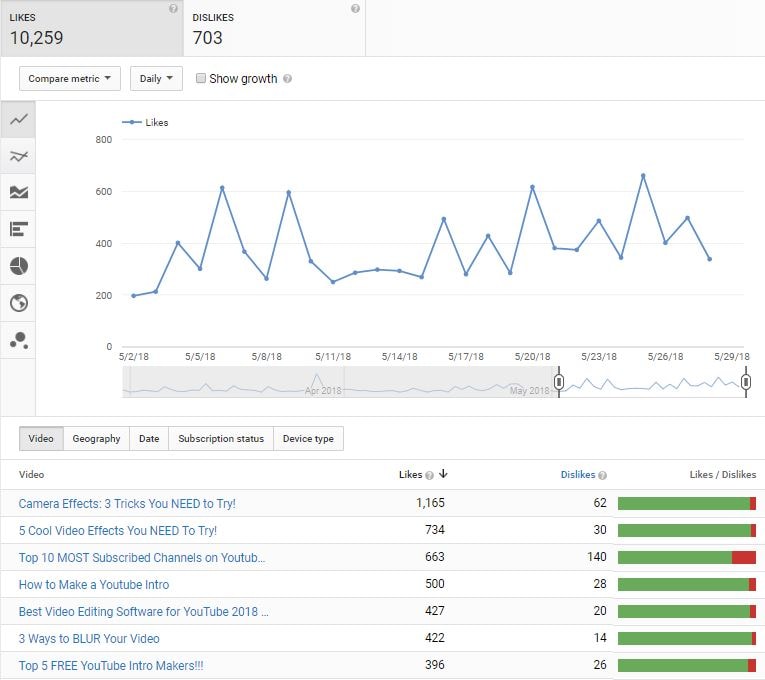
Compare Likes and Dislikes with Other Metrics
See if there is a correlation between the channel’s performance and how viewers give Likes and Dislikes. Does increasing views get you more likes? Did a dip in views cause people to stop liking your videos?
Getting more of these data will help you plan new tactics to increase engagements.
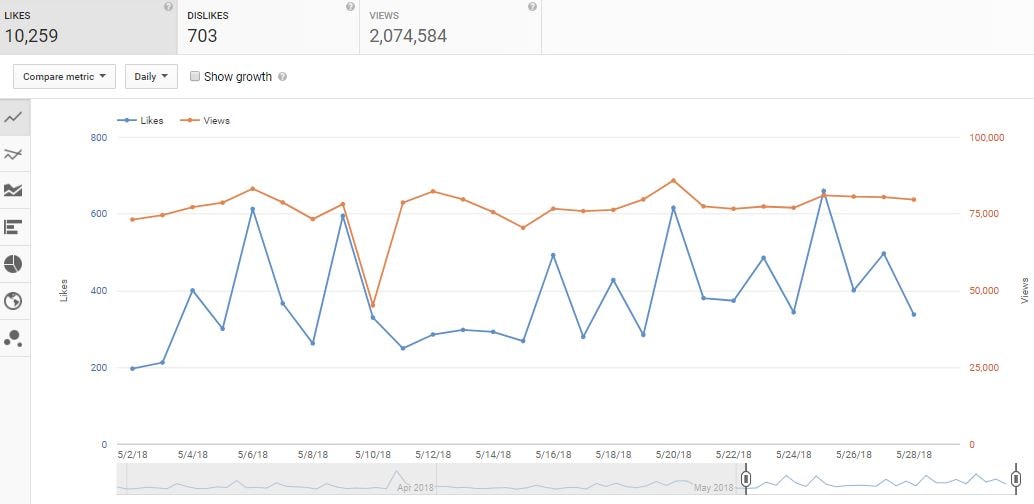
See Which Date You Got the Most Likes and Dislikes
Identify the days you got a lot of Likes or Dislikes, and ask, was there something particular that happened that led to the high numbers?
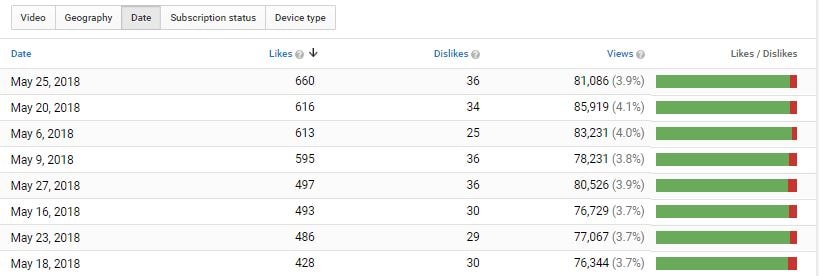
Compare Subscriber vs Non-Subscriber Likes and Dislikes
Knowing how your subscribers and non-subscribers are responding to your content will give you a good idea at how effective your video is at delighting those that know your content well, and those that are newer to your videos.

How to Use the Likes and Dislikes Report
As a creator, you always want to know how your videos are received. Knowing how your audience feels about your content, even if it’s just a Like or Dislike click, is a good indication of whether the public found your work: educational, inspirational, or entertaining.
14. Videos in Playlists
Find Out How Many Videos Are In Playlists
When a video is added to a playlist, it means someone thought it was relevant or they enjoyed it so much they added it to their Favorite list.
Having videos added to playlists is a good thing because it increases the chances of being discovered as people looking for a bunch of content within a category can watch it all linearly.
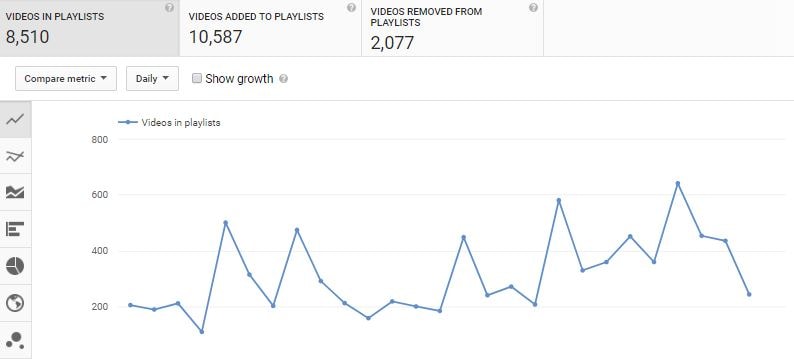
See Which Video Is In The Most Playlists
By having a report to see which videos have been added to the playlist, you can see that there is an interest in this type of content. With this knowledge, you can decide that perhaps the audience may be interested in a series around this topic.

See If There Is a Correlation Between Videos in Playlists and Watch Time
Identify if there are any direct or indirect effects of having videos in the playlist by comparing it to important metrics such as Watch Time. If you see that there is a boost for days when more videos are added to the playlist, you can start planning more strategies to get video features along with other related content.

How to Use Videos in Playlist
The Videos in the Playlist report give you another perspective on the popularity of videos. Unlike Views or Watch Time, adding a video to a playlist means that the audience will likely watch it again, as they are saving it amongst related content or as a favorite video.
15. Comments
See How Many People Have Commented On Channel Or Specific Videos
Select a time period and see how many comments your channel and videos got at that point. Knowing which video gets you the most comments and when it happens, gives you a good idea what type of conversations your audience is interested in having.
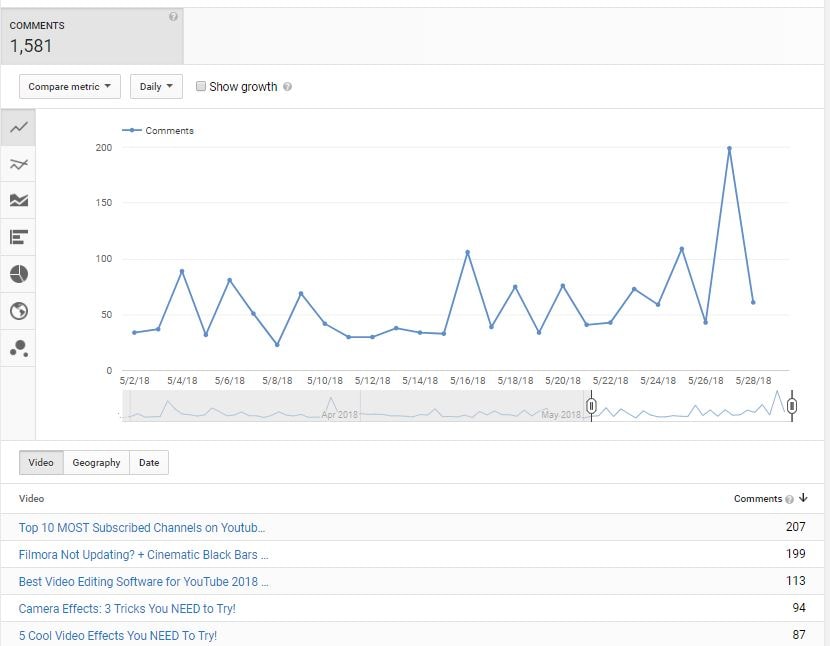
Compare Different Videos and Time Period to See How Your Videos Are Engaging Audience
Evaluate how your videos are performing by comparing them, and identifying what makes a more engaging video for your audience.
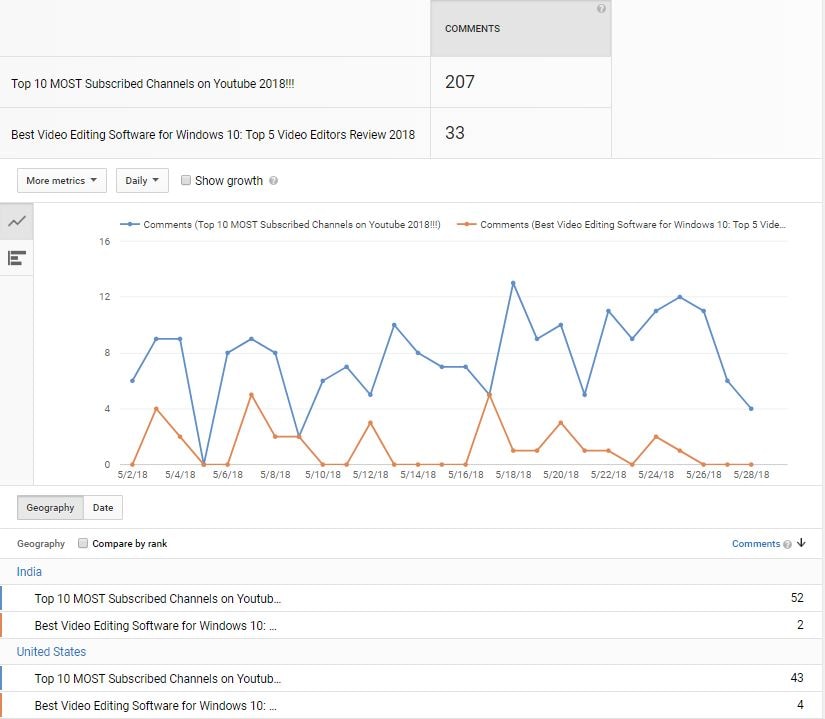
How to Use Comments Report
If there is a video that triggered a debate within your community or if a video led to a lot of questions, this may inspire you to create more content around that topic.
However, there are also benefits of using an external analytics tool like Sotrender . You can adjust the amount of time you want to analyze, visualize the metrics in different ways, and even customize what you want to show in the graphs. What’s more, Sotrender has it’s own metric called the Activity Index, which indicates to what extent your audience is engaging with your videos. You can use this metric in combination with others to see what content your audience is really invested in.
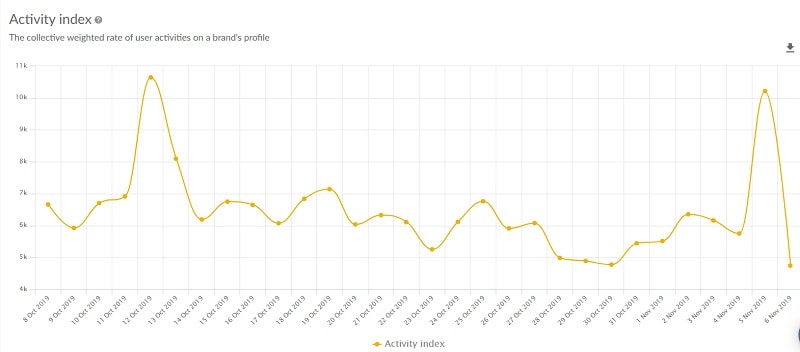
16. Sharing
See How Many Times Your Videos Have Been Shared
This report shows you how frequently your audience is sharing your videos to their networks. In addition to Views and Watch Time, knowing the shareability of your content helps guide your videos in achieving viral status.
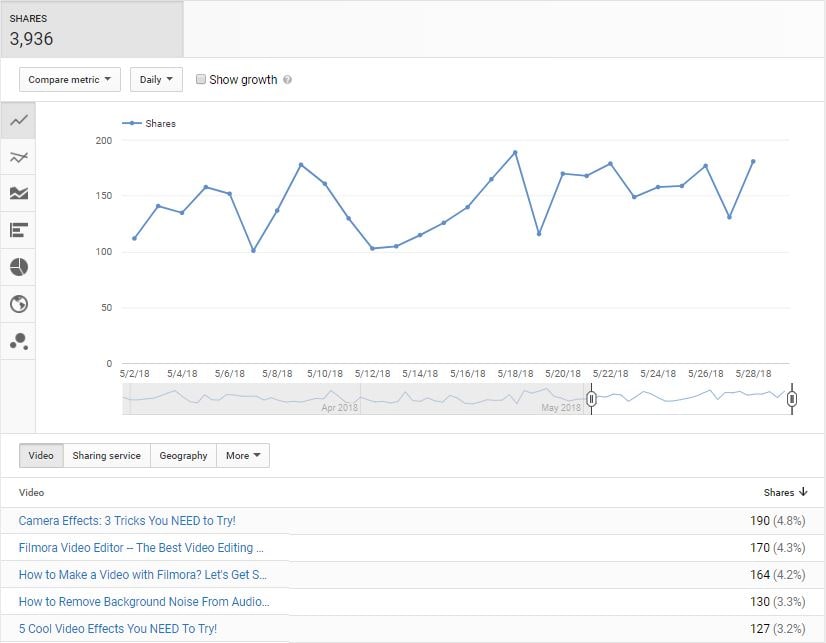
See Which Sharing Service Is Most Popular For Your Channel
Know which platform your audience is most active on. Understanding this can help you tailor your content to be more shareable on those channels or you can discover your audience’s account on those services and thank them personality.
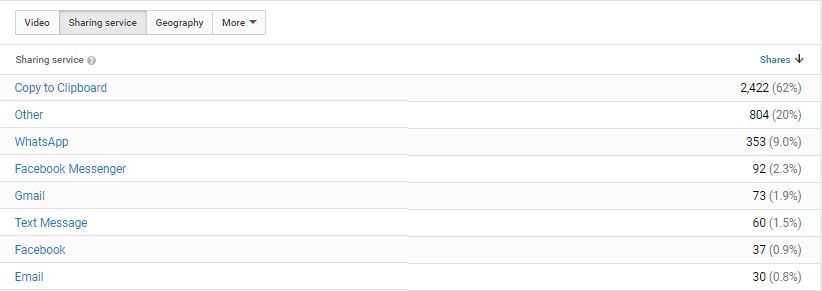
See How Frequently a Video is Getting Shared
Understand how your videos are getting shared by your viewers. Do you see a spike in shares the first few days after publishing and then it becomes forgotten or is it an evergreen video that keeps getting consistent shares through its lifetime?
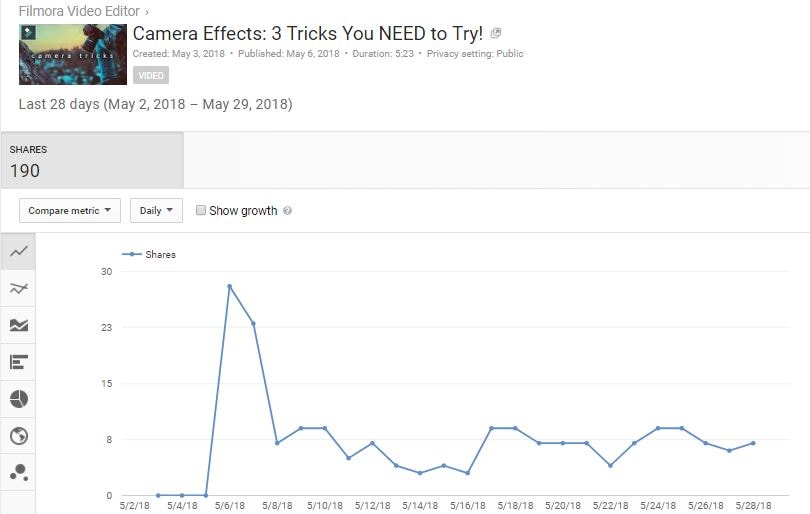
Compare Sharing to Views
By comparing Shares to other metrics such as Views and Watch Time, you can see if there is a correlation to performance and the amount the video is shared.
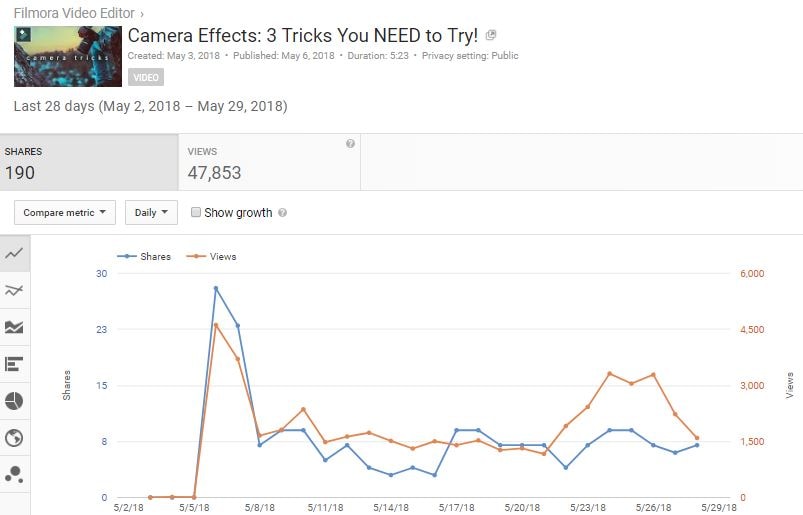
How to Use Sharing Report
Understand what videos you create are more likely to get shares. If you are making a lot of how-to videos, a lot of people might be searching for the content, but unless it is highly relevant, it won’t get shared. The type of content that gets shared are the ones that have an interesting story and delights people.
If you find that a lot of people are sharing your content on a specific service, you may consider that as the platform to best expand your channel on.
17. Annotations
Find Out How Many Annotations Were Click Within a Period
When you add annotations to your videos, you would want to know if your audience is actually engaging with it. This report gives you an overview of how frequently your viewers are clicking on the links.
This report also shows you how often viewers choose to close your Annotation completely, giving you an indication that they have no interest in the link.
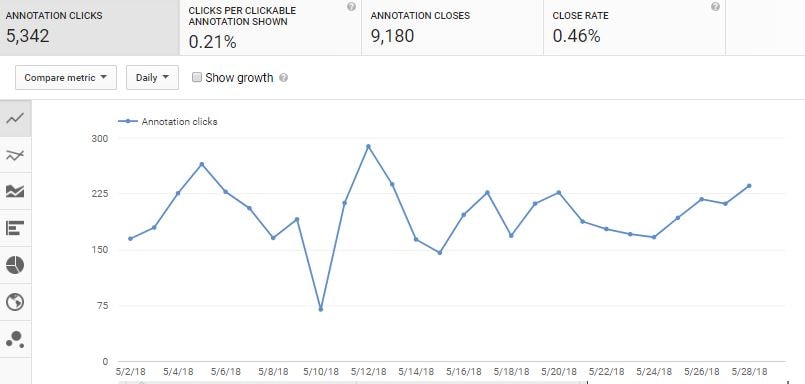
Compare Performance of Different Annotations
This report allows you to see which type of annotations are performing the best for your audience.

See Annotation Performance of a Specific Video
Click into a specific video to see which type of annotations are getting engagement and at what time it is happening. If you see that many annotation clicks are happening at a certain point in your video, going forward with your new videos that is where you can insert it.
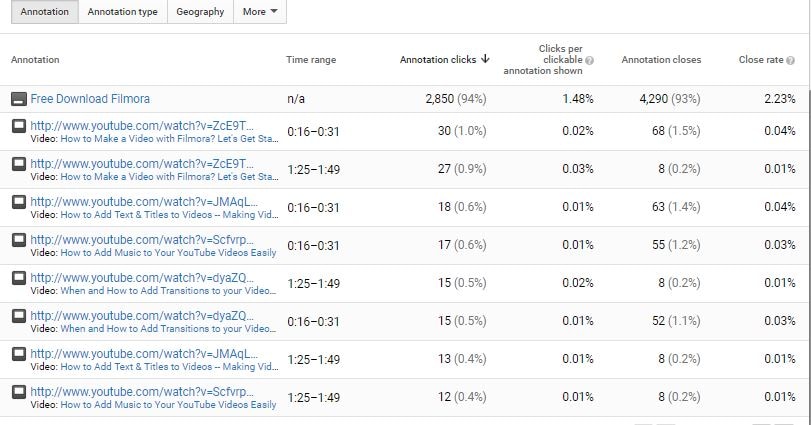
How to Use Annotations
By finding out when in the video your audience engages with annotations and what type of annotations performs the best, you will have more insights on designing your videos and where to position the annotations to get the optimal results.
18. Cards
See Which Card Teasers and Cards Are Getting Clicked
Find out which videos are driving the most Card clicks and which type of Cards your audience is most interested in.
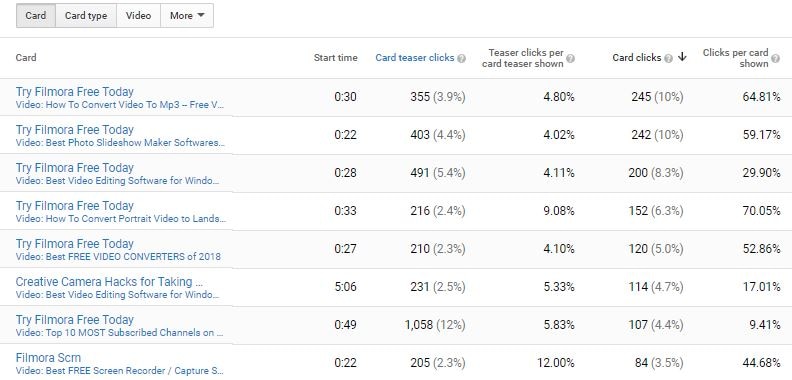
Are viewers more interested in watching more videos or are they wanting to read a post from your blog (associated website)? This report is where you can find out by clicking into Card Type.
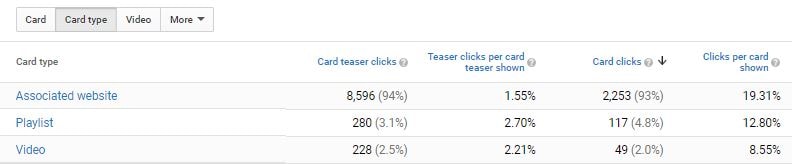
Find Correlation Between On-Screen Content and Click-worthy Link
See what is happening on screen that is making the card more click-worthy, this can help you plan out your next video so that you direct your viewers’ attention to the clickable card teaser so they see it.
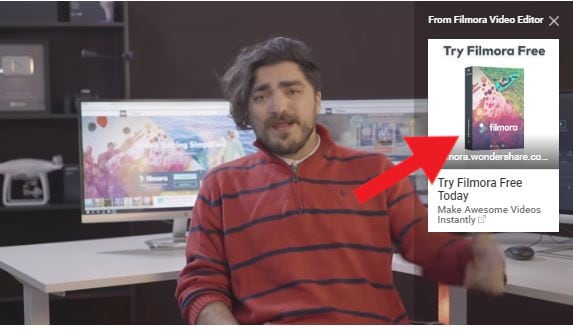
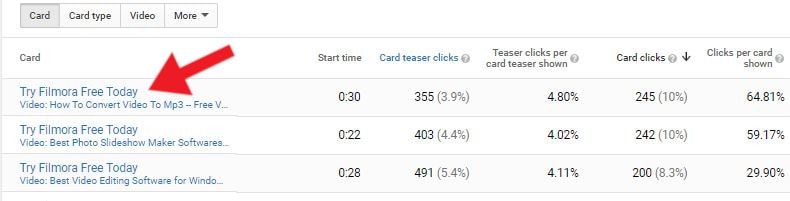
How to Use Cards Report
This report helps you understand the different cards and how they are performing within your videos so that you can better plan your content to increase the chances of your audience engaging with your cards.
19. End Screens
See How Often The End Screen Is Shown And Clicked
By seeing how many times the End Screen is shown, you can have an idea of how often viewers reach the end of your videos.
Then it’s good to see what percentage of them actually click to engage with your channel and content more.
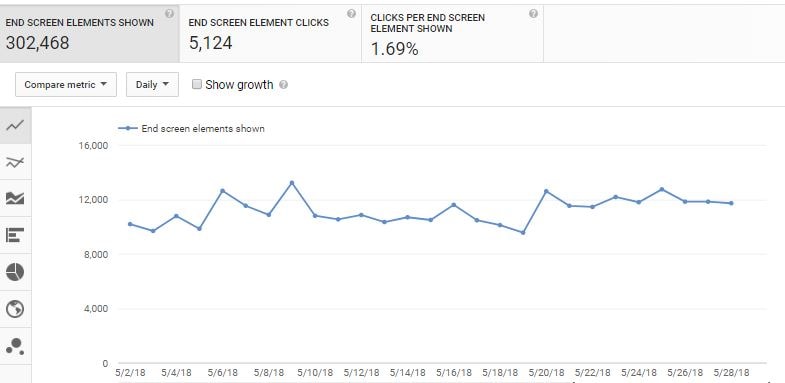
See Performance of Each End Screen Elements
In this report, you can see which End Screen Element is driving the most clicks and better understand the viewer’s motivation at the end of your videos.
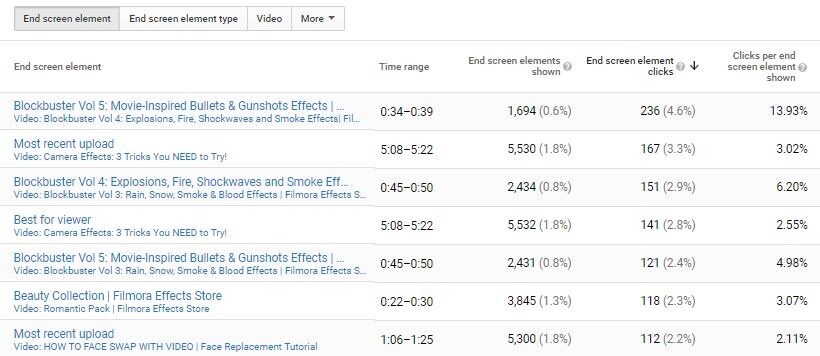
See Which End Screen Element Is Most Popular Within The Same Video
Because you can have multiple elements in the End Screen, you would want to see which one is performing the best.

See Which Videos YouTube Chooses As Best For Viewers
In this report, you can also see the performance of different End Screen Element Types.
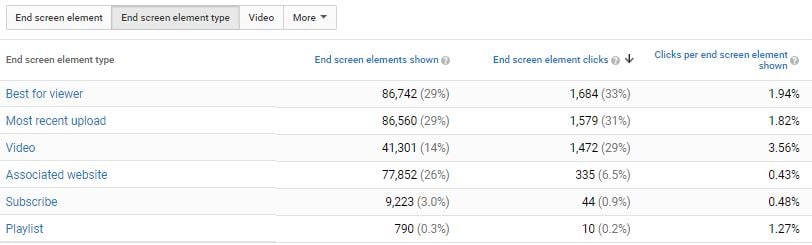
One of these elements is the Best for Viewer, which allows YouTube to determine which of your video is best to present to the viewer in relation to their browsing history and interests.
By clicking into the Best for Viewer section you can see the top-performing videos that YouTube suggested to your viewers. Does it align with what you think is your best video?
How to Use The End Screens Report
The End Screens report is great for letting you know which of your existing content the audience is interested in seeing after they finished watching one of your videos. As you learn more about your viewers and accumulate more videos, with the help of the End Screens report, you can determine which videos to use to increase Views and Watch Time.
Conclusion
Television producers pay hundreds of thousands of dollars to data companies to get the same set of analytics that YouTube offers its creators for free.
Learning how to use analytics is not always a skill YouTubers think about when they are making videos, but it plays such an instrumental part throughout the whole stage of creation, from ideation to distribution.
Understanding how your videos are performing shines a light on your process, helps you evaluate what is working and what isn’t, and empower you to think beyond the lens and create videos that really resonates with your growing audience.
If you want to find a video editing solution that empowers your imagination and creativity yet takes less effort, please try this robust and user-friendly video editing software Filmora, which is equipped with its own footage stock Wondershare Filmstock and will definitely enhance your productivity and helps you to make money by making videos much easier.
Richard Bennett
Richard Bennett is a writer and a lover of all things video.
Follow @Richard Bennett
Richard Bennett
Oct 26, 2023• Proven solutions
As a YouTuber, you know those famous metrics: Views, Subscribers, and Watch Time. Those YouTube analytics are easy to understand. But YouTube offers much more data.
YouTube data is valuable because it can show you why you aren’t getting more subscribers and why certain videos aren’t getting the views you expected. Data can also identify all the positive results and give you insights into what worked.
In this article, I’m going to show you how to use YouTube Analytics to gain knowledge, take action, and grow your channel.
YouTube Analytics:
- Overview
- Realtime
- Revenue
- Ad Rates
- Watch Time
- Audience Retention
- Demographics
- Playback Locations
- Traffic Sources
- Devices
- Translations
- Subscribers
- Likes and Dislikes
- Videos in Playlists
- Comments
- Sharing
- Annotations
- Cards
- End Screens
When you enter your YouTube Creator Studio, you will find the Analytics Tab on the left-hand-side menu. Click into it and you will see a whole list of features, each linking to its own dashboard.
But with all this information, it can get a little overwhelming for new YouTubers. Don’t sweat. Let’s walk through each section to identify:
- What information it is displaying
- What issues it addresses
- What you can do to improve the results
1. Overview
Use Overview Report for Quick Analysis
The Overview report is the first page you land on when you click into Analytics, and it’s what you want to see when you are checking in.
The Overview dashboard breaks down all your key stats. If you want a deeper dive, you can click into each of the section headers and it will give you an in-depth look at the analytics of that specific category.
Personalize Your Overview
By default, the dashboard will show you the stats from the last 28 days, but you can personalize the time frame to see the data of that specific period.
If you only want to focus on the performance of your channel on a specific region, you can customize that as well:
Note: You will be able to change the time frame and region for all the data within YouTube Analytics.
See Your Top Performing Videos In Overview
The Overview dashboard highlights your Top 10 videos. Right away you can see the Watch Time, Views, and Estimated Revenue of those high performing videos.
Get Insights On Your Audience In Overview
In Overview you can see where the majority of your audience is from, what gender they are, how they are discovering your videos in Traffic Source, and where they are watching your video in Playback Locations:
How to Use the Overview Dashboard
The Overview dashboard is your mission control. I recommend popping in weekly to get a top view of your channel’s performance.
If you notice anything unusual or surprising, such as a spike in Shares, you can then dig into the individual data and identify the cause.
2. Realtime
See The Performance of Your Channel
The Realtime report is a fantastic tool for seeing the immediate performance of your channel, which automatically updates every 10 seconds. There are two main views: The last 48 hours and the Last 60 Minutes.
See Performance of Your 25 Most Recently Published Videos
In the Realtime dashboard, you will see the last 48 hours and last 60-minute performance of your 25 most recently published videos.
If you have recently shared a new video, you should log into the Realtime dashboard to get a quick glance at the performance.
See How and Where Your Videos Are Being Viewed At the Moment
If you want to find out how many people have viewed your videos from a mobile device or how big your audience currently is, you can do that in the Realtime report.
- Select Device to see if you have more viewers on Desktop, Mobile, or Tablet.
- Select Operating System to find out if you have more Android viewers or iOS viewers in the past two days.
- Select Geography to see which region you are getting the most views and when viewerships are dropping because most likely people in that area are sleeping.
If you notice that you are getting a lot of views from the US, but also notice that people are about to go to sleep and the trend shows that it drops at that point in the past 24 hours, you can decide whether to schedule the post for the next morning or you can see if a boost at this point can keep the audience awake.
How to Use the Realtime Dashboard
If YouTube sees that your recently published video is performing well right off the bat, then it will give your video a better chance of trending, ranking higher in search, and reaching more viewers.
Getting early insights on a recently published video may help you adjust your promotion strategy as needed.
For example, if you published a video this morning and shared it on your Facebook page, and you checked in this morning and saw that there was only a small amount of views, you may want to share it on a different platform so that it can get more exposure.
3. Revenue
See How Much Money Your Channel Has Made
Select a specific timeline and see how much your channel has made from ads and YouTube Red viewers during that duration.
There are 3 ways to change the timeline:
- Dropdown menu
- Calendar
- Slide Bar
You can also change how you view your data, whether Daily, Weekly, Monthly, etc. This way you can see exactly how much you made each day, week, or month, and determine if you can correlate a particular dip or spike to an event that occurred.
Identify Your Highest Earning Videos
In the Revenue report, you can see which videos are earning you the most. Consider how these videos are successful:
- Was the content great?
- Was it the perfect length?
- Was it a well-structured video?
- Was the video’s pacing fast?
Once you’ve done a full evaluation, see if you can apply it to your other videos.
Which Country Is Earning You the Most Money
Different countries have different rates for how much creators can make off Adsense. Click into Geography and see how much you are making in different countries and consider which audience is best to focus your attention on with the intention of increasing revenue.
Compare Estimated Revenue Earning to Other Metrics
Know more about how your data are related by comparing to see if Revenue is affected by the performance of metrics in other categories such as Views. Does a rise in view change your revenue?
How to Use the Revenue Dashboard
Figuring how to make money on YouTube is tricky and any insight you can get can give you an advantage, steer you in the right direction, and help you focus on what matters.
As you can see in the example in the graph from the section above, the View count has been fairly consistent, however, the Revenue is sporadic.
This tells you that while Views may be an important metric, it won’t affect your revenue. This can mean that you haven’t been reaching the audience that will engage with the ads, consider a slight content shift.
4. Ad Rates
Understanding the Ad Rates Report
YouTube Ad Revenue: This is the estimated gross total of all the money you made from ads sold via Google and Google partners.
Estimated Monetized Playbacks: This is the number of times your audience is shown an ad.
Playback-based CPM: This is an estimation from YouTube on how much money you can make if you had 1,000 views from a monetized video. This is based on the parameters of the advertisers, your current number of views, and where your viewers are from.
CPM: This is the estimated amount you will earn for 1,000 ad impressions.
See Which Monetized Videos Are Earning Your Ad Revenue
Unlike the Revenue dashboard, the Ad Rates report dives deeper into the performance of individual monetized videos.
This allows you to not only see the estimated earnings but also how many times the ad was shown. On top of that, the CPM gives you an idea of what YouTube deems to be more valuable content for advertisers, which gives you a better idea about the capabilities of the video and offers insight into the type of videos you make in the future.
See How Each Ad Type Is Performing Within Individual Video
Click into Ad Type and you will be able to see the performance of different types of Ads (skippable video ads, display ads, bumper ads, and non-skippable video ads.)
You can see these details from the channel level or from an individual video level.
How to Use Ad Rates Report
Ad performance might not be something you think about at the early stages. You want to make videos, and not worry too much about ads, after all.
But as you accumulate more and more monetized videos, and you will start seeing which videos are stronger in getting you ad engagements and which aren’t. The result might surprise you and help inform your next phase of videos.
5. Watch Time
See The Aggregated Time Your Viewers Spent Watching Your Videos
YouTube puts a lot of weight on this metric because they know that the more time people spend watching your original content, the more time they will have to show ads to your audience. Overall, you’ll want to see a steady rise for your Watch Time as it will indicate that you have a growing dedicated viewership.
In the graph, you will also be able to see the combined Views of all your videos, as well as the segmented performance of YouTube Red viewers.
YouTube Red is YouTube’s subscription plan. It is currently only available in Australia, Korea, Mexico, New Zealand, and the United States.
YouTube Red offers ad-free content that can be enjoyed offline. Since the viewers with YouTube Red won’t see ads, YouTube will give you partial revenue from Red viewers.
Compare Performance of Videos in the Graph
Put your videos side by side to compare the performance over the course of a time period.
How to Use Watch Time Report
If you want to be in YouTube’s algorithm’s good books, then you will need to put some attention on your channel’s Watch Time. Always consider ways in which you can improve this metric.
Some strategies include:
- Add videos to optimized playlists
- Improving titles and thumbnails
- Increase YouTube subscribers
- Add annotations to your videos
- Add end cards to your videos
6. Audience Retention
See How Long Your Viewers Spend Watching Your Videos
Like Watch Time, Audience Retention is a metric YouTube uses to determine how valuable your video is and how worthy it is in being discovered by your audience. It’s important to learn where in your video you are losing viewers.
In Audience Retention, there are two main categories you can see.
- Average View Duration shows how much time all your viewers from a certain time frame spend watching your video.
- Average Percentage Viewed shows how much the average person watched from your videos.
In this example, we see that the average length of a video watched is 1:14 and the average viewer will watch 53% of the video.
While you should aim to have 100% audience retention, if you can get an average above 50%, you are doing something right. Anything under, you may want to consider changing up your strategy (content, structure, pacing, etc.).
See Audience Retention of Individual Videos
Absolute Audience Retention: This report shows you the number of views at every point in the video as a percentage. This will let you know which part of the video is most popular, which part is causing a big drop off, and which part viewers are skipping to or rewatching.
Relative Audience Retention: This report gives you a visualization of how your video’s audience retention performance compares to all YouTube videos of a similar length.
If the line indicates that you are above average at a certain point, that is where your video is doing a better job holding the viewer’s attention at that point compared to most other videos.
How to Use Audience Retention
Audience retention can give you a lot of insights on how you should be structuring your videos. If you notice a steep drop in viewership, you can assume that what the viewer is watching is not that interesting.
However, if you notice a sudden peak in the middle of your video, you can assume that a) viewers are skipping to it or b) viewers are rewatching that section.
In the example below, we see that there is a peak at the point in this video where a specific part of a tutorial is shown. Viewers were most likely rewatching to confirm they understand the information, so they can apply it themselves.
Knowing this, for the next video you make, you can better anticipate where your viewers are going to need more time on a specific part or whether you should skip ahead to something more interesting.
7. Demographics
Understand the Average Age and Gender of Your Audience
The first thing you’ll see when you enter the Demographic dashboard is the segmentation of your audience by age and gender. This gives you a good indication of who your overall channel is currently attracting.
See Most Popular Videos Viewed By A Specific Demographic
Learn about the videos that are most popular within that demographic to get better insights to what is most appealing for that group.
You will also see the Watch Time percentage that each video gets in comparison with all the videos in your channel.
Data Split by Age:
Data Split by Gender:
See Geographic Distribution of Different Demographics
Not only will you be able to see which region the majority of your viewerships are from, but you can also segment and compare by demographics. This will give you a more insightful view of how your channel is performing across the world for different people.
Additionally, you can click into specific videos on your channel and see how it is performing in different regions.
How to Use Demographics Report
Understanding which group makes up the majority of your viewership will help you decide how to strategize the next phase of content. Will you keep growing that audience or will you want to grow in another demographic?
If you noticed that you have an underperforming female demographic in India, you can plan out some content that focus on that community. Without this report, you cannot see where you are missing opportunities.
8. Playback Locations
Find Out Where People Are Watching Your Videos
There are a number of ways people can watch your YouTube video:
- YouTube Watch Page
- YouTube Channel Page
- Embedded Video Player (Website or App)
- Other
If your video is only promoted organically your views will likely be coming from the YouTube Watch Page, but if other media publications embedded your video, and it’s getting a lot of views, you can see it here.
Which External Source Are Your Videos Being Watched
By clicking into the Embedded in External Websites and Apps report, you’ll be able to see all the different websites and apps that your video is featured on. This will give you a good indication of which sites and apps are driving the most views.
How to Use Playback Locations Report
Knowing where your videos are being played back is important, especially if you are getting a lot of views from an external source.
You can reach out to the website that has embedded your video and thank them for sharing your content, and maybe they will be happy to share more. This way you create a relationship with them, which can increase your network and also improve the chances of your videos being discovered.
9. Traffic Sources
Find Out How People Are Discovering Your Videos
In the Traffic Sources report, you can see what is the most popular way your video is being discovered.
This can include advertisements that you pay for, external referrals such as links from other websites, suggested videos, and searches on YouTube to name a few.
See Which Videos Are Suggesting Yours To Viewers
If you see that you are getting a lot of viewers coming from Suggested Videos, go to that report and see which external video was directing viewers to yours. These suggested videos can be your own or it can be from another YouTube creator.
See What People Search For To Discover Your Video
By clicking into the YouTube search, you can see what viewers searched in order to find your video. This can be useful in understanding your viewers’ mindset: were they trying to solve a problem or answer a question?
Knowing this, you can improve your keyword research.
How to Use Traffic Sources Report
Because there are so many ways for a viewer to discover your videos, it’s important for you to know what is most effective.
If you have a new video coming out and you want to promote it, understanding where your previous videos are being discovered will help you strategize, giving it the best opportunity immediately.
10. Devices
Know What Devices Your Viewers Are Watching From
The way viewers watch content on their mobile phones is very different from the way they watch on television. By understanding how the majority of your viewers are watching your content, you can better design and structure your video.
For example, if you see that you have a large following that watches your content on mobile, then it might not be a good idea to load your video with too much text, as it’ll be hard for them to read.
You cannot control how people watch your content, but by better understanding their preferences, you can design your content to make it the best for their ideal situation.
11. Translations
See If You Need to Include Multi-Languages or Translation to Your Videos
The Translations report is where you can see how your viewers are watching your videos in terms of using translations and subtitles.
If you are creating content that targets international viewers, it’s good to know if they are engaging with your translation assets, including subtitles.
For example, if you see an increase in viewers from Brazil, do a quick translation of your transcript and upload the Portuguese subtitles and see if it increases viewers.
12. Subscribers
Find Out Where People Clicked Subscribe
In the Subscribers report, you can see where most of your subscribers came from and where people unsubscribe.
If you see that you are getting a lot of conversions from the YouTube Watch Page, you can dig in and see which video specifically you should give credit to for earning your subscribers — and which ones are causing people to unsubscribe.
Find Out Which YouTube Keywords Are Leading to Subscriptions
Click into YouTube search to see the most popular search terms that have lead to people subscribing to your channel.
See Which Date You Got The Most Subscribers
Click into Date and find out if there was something significant that happened that day that made people subscribe to your channel more than others?
How to Use the Subscriber Report
Understanding which video drives viewers to become subscribers and which videos turn people off so that they unsubscribe will tell you a lot about the content you should be creating.
If you see a video is earning you a lot of subscribers, it might be a good idea to give it a boost and make sure more people discover it. However, if you see a video is causing people to click unsubscribe, even though it might be a video you love, consider removing it from your channel as it might be doing more harm than good for your channel growth.
13. Likes and Dislikes
See the Likes and Dislikes of Individual Videos
In addition to seeing the total Likes and Dislikes your channel received, in this report, you can see the Likes and Dislikes of individual videos. This gives you a quick glance at how your viewers are enjoying your channel and videos.
Compare Likes and Dislikes with Other Metrics
See if there is a correlation between the channel’s performance and how viewers give Likes and Dislikes. Does increasing views get you more likes? Did a dip in views cause people to stop liking your videos?
Getting more of these data will help you plan new tactics to increase engagements.
See Which Date You Got the Most Likes and Dislikes
Identify the days you got a lot of Likes or Dislikes, and ask, was there something particular that happened that led to the high numbers?
Compare Subscriber vs Non-Subscriber Likes and Dislikes
Knowing how your subscribers and non-subscribers are responding to your content will give you a good idea at how effective your video is at delighting those that know your content well, and those that are newer to your videos.
How to Use the Likes and Dislikes Report
As a creator, you always want to know how your videos are received. Knowing how your audience feels about your content, even if it’s just a Like or Dislike click, is a good indication of whether the public found your work: educational, inspirational, or entertaining.
14. Videos in Playlists
Find Out How Many Videos Are In Playlists
When a video is added to a playlist, it means someone thought it was relevant or they enjoyed it so much they added it to their Favorite list.
Having videos added to playlists is a good thing because it increases the chances of being discovered as people looking for a bunch of content within a category can watch it all linearly.
See Which Video Is In The Most Playlists
By having a report to see which videos have been added to the playlist, you can see that there is an interest in this type of content. With this knowledge, you can decide that perhaps the audience may be interested in a series around this topic.
See If There Is a Correlation Between Videos in Playlists and Watch Time
Identify if there are any direct or indirect effects of having videos in the playlist by comparing it to important metrics such as Watch Time. If you see that there is a boost for days when more videos are added to the playlist, you can start planning more strategies to get video features along with other related content.
How to Use Videos in Playlist
The Videos in the Playlist report give you another perspective on the popularity of videos. Unlike Views or Watch Time, adding a video to a playlist means that the audience will likely watch it again, as they are saving it amongst related content or as a favorite video.
15. Comments
See How Many People Have Commented On Channel Or Specific Videos
Select a time period and see how many comments your channel and videos got at that point. Knowing which video gets you the most comments and when it happens, gives you a good idea what type of conversations your audience is interested in having.
Compare Different Videos and Time Period to See How Your Videos Are Engaging Audience
Evaluate how your videos are performing by comparing them, and identifying what makes a more engaging video for your audience.
How to Use Comments Report
If there is a video that triggered a debate within your community or if a video led to a lot of questions, this may inspire you to create more content around that topic.
However, there are also benefits of using an external analytics tool like Sotrender . You can adjust the amount of time you want to analyze, visualize the metrics in different ways, and even customize what you want to show in the graphs. What’s more, Sotrender has it’s own metric called the Activity Index, which indicates to what extent your audience is engaging with your videos. You can use this metric in combination with others to see what content your audience is really invested in.
16. Sharing
See How Many Times Your Videos Have Been Shared
This report shows you how frequently your audience is sharing your videos to their networks. In addition to Views and Watch Time, knowing the shareability of your content helps guide your videos in achieving viral status.
See Which Sharing Service Is Most Popular For Your Channel
Know which platform your audience is most active on. Understanding this can help you tailor your content to be more shareable on those channels or you can discover your audience’s account on those services and thank them personality.
See How Frequently a Video is Getting Shared
Understand how your videos are getting shared by your viewers. Do you see a spike in shares the first few days after publishing and then it becomes forgotten or is it an evergreen video that keeps getting consistent shares through its lifetime?
Compare Sharing to Views
By comparing Shares to other metrics such as Views and Watch Time, you can see if there is a correlation to performance and the amount the video is shared.
How to Use Sharing Report
Understand what videos you create are more likely to get shares. If you are making a lot of how-to videos, a lot of people might be searching for the content, but unless it is highly relevant, it won’t get shared. The type of content that gets shared are the ones that have an interesting story and delights people.
If you find that a lot of people are sharing your content on a specific service, you may consider that as the platform to best expand your channel on.
17. Annotations
Find Out How Many Annotations Were Click Within a Period
When you add annotations to your videos, you would want to know if your audience is actually engaging with it. This report gives you an overview of how frequently your viewers are clicking on the links.
This report also shows you how often viewers choose to close your Annotation completely, giving you an indication that they have no interest in the link.
Compare Performance of Different Annotations
This report allows you to see which type of annotations are performing the best for your audience.
See Annotation Performance of a Specific Video
Click into a specific video to see which type of annotations are getting engagement and at what time it is happening. If you see that many annotation clicks are happening at a certain point in your video, going forward with your new videos that is where you can insert it.
How to Use Annotations
By finding out when in the video your audience engages with annotations and what type of annotations performs the best, you will have more insights on designing your videos and where to position the annotations to get the optimal results.
18. Cards
See Which Card Teasers and Cards Are Getting Clicked
Find out which videos are driving the most Card clicks and which type of Cards your audience is most interested in.
Are viewers more interested in watching more videos or are they wanting to read a post from your blog (associated website)? This report is where you can find out by clicking into Card Type.
Find Correlation Between On-Screen Content and Click-worthy Link
See what is happening on screen that is making the card more click-worthy, this can help you plan out your next video so that you direct your viewers’ attention to the clickable card teaser so they see it.
How to Use Cards Report
This report helps you understand the different cards and how they are performing within your videos so that you can better plan your content to increase the chances of your audience engaging with your cards.
19. End Screens
See How Often The End Screen Is Shown And Clicked
By seeing how many times the End Screen is shown, you can have an idea of how often viewers reach the end of your videos.
Then it’s good to see what percentage of them actually click to engage with your channel and content more.
See Performance of Each End Screen Elements
In this report, you can see which End Screen Element is driving the most clicks and better understand the viewer’s motivation at the end of your videos.
See Which End Screen Element Is Most Popular Within The Same Video
Because you can have multiple elements in the End Screen, you would want to see which one is performing the best.
See Which Videos YouTube Chooses As Best For Viewers
In this report, you can also see the performance of different End Screen Element Types.
One of these elements is the Best for Viewer, which allows YouTube to determine which of your video is best to present to the viewer in relation to their browsing history and interests.
By clicking into the Best for Viewer section you can see the top-performing videos that YouTube suggested to your viewers. Does it align with what you think is your best video?
How to Use The End Screens Report
The End Screens report is great for letting you know which of your existing content the audience is interested in seeing after they finished watching one of your videos. As you learn more about your viewers and accumulate more videos, with the help of the End Screens report, you can determine which videos to use to increase Views and Watch Time.
Conclusion
Television producers pay hundreds of thousands of dollars to data companies to get the same set of analytics that YouTube offers its creators for free.
Learning how to use analytics is not always a skill YouTubers think about when they are making videos, but it plays such an instrumental part throughout the whole stage of creation, from ideation to distribution.
Understanding how your videos are performing shines a light on your process, helps you evaluate what is working and what isn’t, and empower you to think beyond the lens and create videos that really resonates with your growing audience.
If you want to find a video editing solution that empowers your imagination and creativity yet takes less effort, please try this robust and user-friendly video editing software Filmora, which is equipped with its own footage stock Wondershare Filmstock and will definitely enhance your productivity and helps you to make money by making videos much easier.
Richard Bennett
Richard Bennett is a writer and a lover of all things video.
Follow @Richard Bennett
Also read:
- Crafting a Signature Look Starting with Self-Reflection
- Filmora's Blueprint for Stellar YouTube Trailers
- Channel Name Inspiration Strategies for Success
- Inside the Virtual Idol Ecosystem A Detailed Study
- Discover 12 Cutting-Edge Flip-Screen Cams for Video Content
- 2024 Approved Creative Freedom on a Budget Essential Green Screen Effects From Top 4 Tutorial Sources
- [New] DIY Photography Support Systems
- In 2024, Diverse Video Realms Sites Outshining Youtube
- 8 Best Mirrorless Cameras Vloggers Should Know
- 2024 Approved Cutting-Edge Strategies for YouTube Split-Screen Videos
- In 2024, Cutting-Edge Camera & Recording Apps for Smartphones' Most Reliable Sources
- Flash Clip Content Wizard
- Mastering the Download of Your YouTube Playlist Today!
- Top 15 YouTube Template Download Sites
- In 2024, Demystifying Creator Studio A Practical Handbook
- Essential Tips for Locating YouTube's Content Creation Hub for 2024
- Quick Alteration YouTube Vids Fit Mac Displays
- [Updated] 1 Key YouTube Tactics for Effective Brand Promotion
- In 2024, Elevate Your Content Game Tactics for Optimal YouTube Featured Channels
- [Updated] Elevating Your Vlog Through Proper Lighting
- [Updated] Essential Guide to Uploading High-Res Videos on Youtube
- In 2024, Elite Visionaries Video Realm
- [New] Customize Video Speed to Match Your Desired Watch Time
- Elevating Your YouTube Presence with Strategic Post-Publish Video Updates
- Discovering Video Opportunities with Google Trend Analysis
- [New] Boost Viewers Interaction via YouTube Cards
- Demystifying Creator Studio A Practical Handbook for 2024
- In 2024, Elevating Visual Experience YouTube's Quality Boosting Guide
- Expert Advice on Selecting The Best Lenses For Filmmaking
- [New] Elevate Your Content's Reach in YouTube Shorts Formats
- In 2024, Achieving ASMR Bliss Selecting the Right Mic
- 2024 Approved Ensure Flawless Playback How to Set YouTube Video Size Right
- In 2024, Enhance Privacy & Speed The Best 7 Android AdBlocks
- 2024 Approved Breakthrough Tools An Analysis of the Top 10 Cost-Effective Video Design Schools on YouTube
- [Updated] Add Visual Appeal with These Methods for YT Video Inclusion in PPT
- 2024 Approved Enhancing Video Visibility with Optimal Thumbnails
- [Updated] Classic Cinema Revisited Step-by-Step Video Guide
- In 2024, Content Creation & Currency Maximizing YouTube Wealth
- [Updated] Confirming Correct YouTube Ad Revenue Allocation
- 10 Viral Exercise Routines to Keep Your Channel Thriving
- In 2024, Beyond YouTube Ranking Your Top Picks for Streaming Video Content
- [Updated] Audience Appreciation Assessment Self and Seekers Vs. Rival Repertoires
- Masterclass YouTube Music Arrangement
- Narrative Mastery Essential Tactics for YouTube Success
- Earnings Expansion on Glamour Channels for 2024
- Mastering Cross-Platform Video Sharing From YouTube to TikTok
- Shine On Top 17 Studio Lights for YouTube
- How to Make Killer YouTube Channel Art
- Maximize Your YouTube Viewing Download Icons via Online & OS-Specific Methods
- Why is iPogo not working On Honor 90 Lite? Fixed | Dr.fone
- New The Art of Cartoonization Converting Digital Videos Into Animated Masterpieces for 2024
- [Updated] 2024 Approved Seamlessly Backup Your Camera Roll Exporting to Snapchat Made Easy
- In 2024, How to Unlock Vivo Y27 4G Phone without PIN
- The Best Android SIM Unlock Code Generators Unlock Your Samsung Galaxy F14 5G Phone Hassle-Free
- [New] Easy Audio Capturing on Non-Rooted Android Devices for 2024
- In 2024, Ultimate List of Websites Offering Authentic Nature Sound Archives
- In 2024, 5 Easy Ways to Copy Contacts from Itel A60 to iPhone 14 and 15 | Dr.fone
- [Updated] Streamlining Connections Spotify Meets Discord for 2024
- How To Unlink Your iPhone 14 Pro From Your Apple ID
- 2024 Approved The Ultimate Guide to DJI Drone Video Livestreams on FB
- Easy steps to recover deleted messages from Realme Narzo 60 Pro 5G
- [New] Inside Stardust An Extensive Exploration of Stardew Valley with a Focus on Its Enigmatic Island - Ginger Isle for 2024
- Updated In 2024, WhatsApp Status Masterclass Best Apps for Video and Photo Editing
- [Updated] 2024 Approved Top Windows Simulations for PlayStation 3 Games (5)
- Android Call History Recovery - recover deleted call logs from Vivo Y36
- In 2024, 3 Effective Methods to Fake GPS location on Android For your Vivo V29 Pro | Dr.fone
- 2024 Approved Industry Standards The Top 5 Online Video Devices
- 2024 Approved The Best of the Best 10 Animated Text Generators You Cant Miss
- [Updated] Starting Simple How to Create Your Own Twitter for 2024
- Getting Started in Google Meet on Computers/Phone for 2024
- [Updated] Infinite Jest Joyride - Top Kids' Game Lineup
- [Updated] 2024 Approved Free Screen Recording Software [Windows & Mac]
- [Updated] In 2024, Speedy Retrieval for Elusive Snaps
- Play Store Stuck on Downloading Of Xiaomi Redmi A2? 7 Ways to Resolve | Dr.fone
- [New] In 2024, Uncover the Art of Participating in TikTok Live Shows
- New In 2024, Discover the Perfect Video Editor Minitool Movie Maker Review and Alternatives
- In 2024, How to Transfer Music from Realme GT Neo 5 SE to iPod | Dr.fone
- 2024 Approved Top 10 Smartphones with OIS for Shooting Smooth Videos
- New From SD to HD A Beginners Guide to Upgrading Your Video Quality
- [New] Guide to Saving Instagram Videos with Maximum Convenience
- 2024 Approved Discovering Authentic Canine Vocalizations in Sound Libraries
- [Updated] Stepwise Blend Integrating OBS and Zoom
- Masterclass Guide 15 Tripods Perfect for GoPro
- [New] 2024 Approved Click-Worthy Chronicles Shaping Successful Meme Videos for Insta/FB
- In 2024, 3 Ways to Unlock iPhone X without Passcode or Face ID | Dr.fone
- How to Simulate GPS Movement in AR games On Vivo Y100i? | Dr.fone
- In 2024, Communicating Confidently on Google Meet
- Title: "2024 Approved Beauty Breakdown Mastering Makeup and Hauls Online"
- Author: Kevin
- Created at : 2024-05-25 14:18:43
- Updated at : 2024-05-26 14:18:43
- Link: https://youtube-videos.techidaily.com/2024-approved-beauty-breakdown-mastering-makeup-and-hauls-online/
- License: This work is licensed under CC BY-NC-SA 4.0.
