

"2024 Approved Adding Visual Time Indicators to Your YouTube Links"
Adding Visual Time Indicators to Your YouTube Links
How to Add Timestamps on YouTube Video Link?

Richard Bennett
Mar 27, 2024• Proven solutions
It is a well-known fact that internet users have a short interest span, about just eight seconds. This attention span applies to all internet platforms including YouTube. YouTube is the second largest and most visited search engine after Google. It provides users with information through engaging and eye-catchy videos. However, certain videos are longer where only a particular section of the video holds the important information. Viewers tend to skip the long videos and if you do not want this to happen to you, you can link to that specific part on your video adding value for your channel viewers with a link known as the YouTube Timestamp link.
When you have a Timestamp link on your video, you can help your viewers directly reach the specific time in the video. This helps avoid the viewers from losing interest or to search for the key part in your video themselves.
Here in this article, we will explain Timestamp links, how to add Timestamp to YouTube video links, and what are the benefits of Timestamp.
- Part 1: YouTube Timestamp Links Introduction
- Part 2: Adding a Timestamp to YouTube Video Link on Desktop
- Part 3: How to Share Specific Parts of YouTube Video
- part 4: Getting YouTube Timestamp Link on Mobile
- Part 5: FAQ About YouTube Timestamps
Part 1: What is YouTube Timestamp Links
In this fast-paced world where viewers have limited time at hand, YouTube Timestamp links are extremely helpful. These links are anchor text or video hyperlinks found either in the description beneath the video or at the video link end.

The Timestamps links allow you to put a link to a key moment in your YouTube video allowing the viewers and subscribers to view the video at the precise time specified. Your YouTube video maybe half an hour long or maybe your users do not have the time now or forget to later watch your video, but when you add Timestamp to the YouTube link, you provide them ways to get to the content quickly enhancing the user experience.
In addition to this, you can even provide a reference in minutes and hours where necessary. The YouTube Timestamp link acts as a guide that directs viewers to the part of the video, which is most relevant to them without having to watch the entire video.
Part 2: How to Add a Timestamp to YouTube Video Link on Desktop?
In the following section, I will show you how to add timestamp to YouTube video link in several ways.
Use YouTube’s Share Feature
Using YouTube’s share feature is the simplest way to add Timestamp to YouTube videos. Here are easy steps to follow to do this.
- Open the YouTube video on your desktop that you want to share.
- Play the video or navigate the timeline and stop at the key moment you wish to apply the timestamp to.
- Now click on the Share button, a pop-up will appear. Under the URL, you will see a small box indicating Start at. The Timestamp is generated automatically, but you can adjust it.

- Copy the updated URL with Timestamp to share the video or click on the social sharing icons to do so.
- When your viewers click on this URL, the video will begin at the specified Timestamp.
Use the Browser URL to add Timestamp manually
You can add Timestamp manually as well. Follow the step-by-step guide below to add a Timestamp manually.
- Open your YouTube video in a browser on your desktop and then find the URL in the browser’s address bar.
- Enter the specific time you want the viewers to watch the video from at the end of the video URL.
You can add time manually in two ways depending on the URL.
?t=As or
&t=As
“youtu.be/” Format
If your YouTube video link is a youtu.be format, then just add ?t=As at the end of the video link. The A denotes the seconds at which you want the viewer to watch your video. The time can also be specified in minutes and seconds and when you want to do that just add ?t=AmBs. For instance, ?t=2m40s.
“youtube.com/” Format
When your YouTube video link has a youtube.com format, the adjustment starts with an ampersand. &t=As or &t=AmBs is what you can use. If you are looking to add the Timestamp at 2m40s, just add “&t=2m40s at the end of the video URL.
Whenever anybody uses the URL with Timestamp, the video will start from the specified time.
However, when adding a Timestamp manually, always leave include whole numbers. For example, if the time starts at 4m, use 4 and not 04.
Copy video URL at current time
You can use YouTube’s built-in feature to share the key parts of your YouTube video. Follow the steps here.
- Visit YouTube and open the video you want to add Timestamp link to.
- Play the video or navigate the timeline to reach the specific part you like to use in Timestamp.
- Now either press Ctrl + click or right-click anywhere on the video. A pop-up opens where you can see various texts, click on the Copy video URL at current time and share the link.

- Anyone who clicks on this link will be instantly transported to the exact segment of your YouTube video.
Part 3: How to Share Specific Parts of Videos with Vibby and Get YouTube Link with Timestamp
The above-mentioned methods to add and send YouTube link with timestamp are quick and easy, but they have a few limitations. If you need more control and share highlighted parts of YouTube video without cutting the video, you need to use a third-party tool known as Vibby.
Vibby allows you to not only share specific parts of videos from YouTube but other platforms as well like Vimeo and Twitch. With the tool, you can clip multiple sections of the video and share them with others.
- To get started, signup either with mail, Google, Twitter, Facebook, or Twitch account.
- Once signed in, go to Create vib at the top left corner and then paste the URL of the YouTube video you would like to share and then click on the Start button.

- Your video will load in the Vibby editor, now click on Highlight the parts to share.
- Here you will see the Start highlight button, jump 5-sec option, option to switch between HD and SD video quality, and volume control button. Navigate to the part you want to share and click on Start highlight.

- When you reach the end of the part, click on Finish highlight. Repeat the process to highlight multiple parts of the video. All the highlighted parts will appear in a list on the right side of the screen.
- Add a description to each part and format it, you have the option to preview before hitting the Save vib button.
- Name the vib and assign a category and then publish it to Vibby or make it a private vib.
- You get a dedicated link to your vib with the ability to embed it on your website or blog.
In this way, you can share the highlights of the YouTube video or Vimeo video easily.
Part 4: How to Get YouTube Timestamp Link on iPhone and Android?
Linking to specific YouTube Timestamp Link is straightforward on both iPhone and Android.
- Go to YouTube and select the video you want to share.
- Move through the progress bar of the video to reach the key part and click on the Share button.
- A pop-up menu appears, highlight the URL and click on the Copy button.
- Paste the URL and manually add the Timestamp using the steps mentioned in add a Timestamp manually.
Part 5: Is Timestamp Beneficial for your Video?
Timestamping your YouTube videos may decrease the watch time, but it enhances the user experience, and they want to see more of your videos. Apart from this, adding Timestamps to your videos make your videos discoverable through Google search. YouTube and Google will reward you for the videos in form of a high search engine ranking.
Bonus: How to Add YouTube Timestamp Link in YouTube Video Description
Adding a YouTube Timestamp link in your video description is easy. Here are the steps to do so.
- Go to your YouTube channel and select the video you want to add Timestamp to and then navigate to the description below it.
- Edit the description by clicking on the Edit Video button.
- You are redirected to the Video Details page. Here write 0:00 at the first part of the timecode, and then continue with the time of the key part of the video you want to add the Timestamp to in 2:40 format. You can add more Timestamp as well and then click on the Save button.

- Reload the video page and you will see auto-generated Timestamp Links at the specific time you provided in the description.
Note: You need to add at least three timestamps which are 10 seconds or longer in order to add timestamps successfully.
Conclusion
As much as possible YouTubers want to make videos short and to the point. However, if a video needs to be longer, you can still help users navigate through to find what is important to them by adding Timestamp to YouTube link or Timestamp the YouTube descriptions. This can help your viewers jump straight to the interesting part in the video, rather than viewing the entire video saving their time and boost user experience.
Richard Bennett
Richard Bennett is a writer and a lover of all things video.
Follow @Richard Bennett
Richard Bennett
Mar 27, 2024• Proven solutions
It is a well-known fact that internet users have a short interest span, about just eight seconds. This attention span applies to all internet platforms including YouTube. YouTube is the second largest and most visited search engine after Google. It provides users with information through engaging and eye-catchy videos. However, certain videos are longer where only a particular section of the video holds the important information. Viewers tend to skip the long videos and if you do not want this to happen to you, you can link to that specific part on your video adding value for your channel viewers with a link known as the YouTube Timestamp link.
When you have a Timestamp link on your video, you can help your viewers directly reach the specific time in the video. This helps avoid the viewers from losing interest or to search for the key part in your video themselves.
Here in this article, we will explain Timestamp links, how to add Timestamp to YouTube video links, and what are the benefits of Timestamp.
- Part 1: YouTube Timestamp Links Introduction
- Part 2: Adding a Timestamp to YouTube Video Link on Desktop
- Part 3: How to Share Specific Parts of YouTube Video
- part 4: Getting YouTube Timestamp Link on Mobile
- Part 5: FAQ About YouTube Timestamps
Part 1: What is YouTube Timestamp Links
In this fast-paced world where viewers have limited time at hand, YouTube Timestamp links are extremely helpful. These links are anchor text or video hyperlinks found either in the description beneath the video or at the video link end.
The Timestamps links allow you to put a link to a key moment in your YouTube video allowing the viewers and subscribers to view the video at the precise time specified. Your YouTube video maybe half an hour long or maybe your users do not have the time now or forget to later watch your video, but when you add Timestamp to the YouTube link, you provide them ways to get to the content quickly enhancing the user experience.
In addition to this, you can even provide a reference in minutes and hours where necessary. The YouTube Timestamp link acts as a guide that directs viewers to the part of the video, which is most relevant to them without having to watch the entire video.
Part 2: How to Add a Timestamp to YouTube Video Link on Desktop?
In the following section, I will show you how to add timestamp to YouTube video link in several ways.
Use YouTube’s Share Feature
Using YouTube’s share feature is the simplest way to add Timestamp to YouTube videos. Here are easy steps to follow to do this.
- Open the YouTube video on your desktop that you want to share.
- Play the video or navigate the timeline and stop at the key moment you wish to apply the timestamp to.
- Now click on the Share button, a pop-up will appear. Under the URL, you will see a small box indicating Start at. The Timestamp is generated automatically, but you can adjust it.
- Copy the updated URL with Timestamp to share the video or click on the social sharing icons to do so.
- When your viewers click on this URL, the video will begin at the specified Timestamp.
Use the Browser URL to add Timestamp manually
You can add Timestamp manually as well. Follow the step-by-step guide below to add a Timestamp manually.
- Open your YouTube video in a browser on your desktop and then find the URL in the browser’s address bar.
- Enter the specific time you want the viewers to watch the video from at the end of the video URL.
You can add time manually in two ways depending on the URL.
?t=As or
&t=As
“youtu.be/” Format
If your YouTube video link is a youtu.be format, then just add ?t=As at the end of the video link. The A denotes the seconds at which you want the viewer to watch your video. The time can also be specified in minutes and seconds and when you want to do that just add ?t=AmBs. For instance, ?t=2m40s.
“youtube.com/” Format
When your YouTube video link has a youtube.com format, the adjustment starts with an ampersand. &t=As or &t=AmBs is what you can use. If you are looking to add the Timestamp at 2m40s, just add “&t=2m40s at the end of the video URL.
Whenever anybody uses the URL with Timestamp, the video will start from the specified time.
However, when adding a Timestamp manually, always leave include whole numbers. For example, if the time starts at 4m, use 4 and not 04.
Copy video URL at current time
You can use YouTube’s built-in feature to share the key parts of your YouTube video. Follow the steps here.
- Visit YouTube and open the video you want to add Timestamp link to.
- Play the video or navigate the timeline to reach the specific part you like to use in Timestamp.
- Now either press Ctrl + click or right-click anywhere on the video. A pop-up opens where you can see various texts, click on the Copy video URL at current time and share the link.
- Anyone who clicks on this link will be instantly transported to the exact segment of your YouTube video.
Part 3: How to Share Specific Parts of Videos with Vibby and Get YouTube Link with Timestamp
The above-mentioned methods to add and send YouTube link with timestamp are quick and easy, but they have a few limitations. If you need more control and share highlighted parts of YouTube video without cutting the video, you need to use a third-party tool known as Vibby.
Vibby allows you to not only share specific parts of videos from YouTube but other platforms as well like Vimeo and Twitch. With the tool, you can clip multiple sections of the video and share them with others.
- To get started, signup either with mail, Google, Twitter, Facebook, or Twitch account.
- Once signed in, go to Create vib at the top left corner and then paste the URL of the YouTube video you would like to share and then click on the Start button.
- Your video will load in the Vibby editor, now click on Highlight the parts to share.
- Here you will see the Start highlight button, jump 5-sec option, option to switch between HD and SD video quality, and volume control button. Navigate to the part you want to share and click on Start highlight.
- When you reach the end of the part, click on Finish highlight. Repeat the process to highlight multiple parts of the video. All the highlighted parts will appear in a list on the right side of the screen.
- Add a description to each part and format it, you have the option to preview before hitting the Save vib button.
- Name the vib and assign a category and then publish it to Vibby or make it a private vib.
- You get a dedicated link to your vib with the ability to embed it on your website or blog.
In this way, you can share the highlights of the YouTube video or Vimeo video easily.
Part 4: How to Get YouTube Timestamp Link on iPhone and Android?
Linking to specific YouTube Timestamp Link is straightforward on both iPhone and Android.
- Go to YouTube and select the video you want to share.
- Move through the progress bar of the video to reach the key part and click on the Share button.
- A pop-up menu appears, highlight the URL and click on the Copy button.
- Paste the URL and manually add the Timestamp using the steps mentioned in add a Timestamp manually.
Part 5: Is Timestamp Beneficial for your Video?
Timestamping your YouTube videos may decrease the watch time, but it enhances the user experience, and they want to see more of your videos. Apart from this, adding Timestamps to your videos make your videos discoverable through Google search. YouTube and Google will reward you for the videos in form of a high search engine ranking.
Bonus: How to Add YouTube Timestamp Link in YouTube Video Description
Adding a YouTube Timestamp link in your video description is easy. Here are the steps to do so.
- Go to your YouTube channel and select the video you want to add Timestamp to and then navigate to the description below it.
- Edit the description by clicking on the Edit Video button.
- You are redirected to the Video Details page. Here write 0:00 at the first part of the timecode, and then continue with the time of the key part of the video you want to add the Timestamp to in 2:40 format. You can add more Timestamp as well and then click on the Save button.
- Reload the video page and you will see auto-generated Timestamp Links at the specific time you provided in the description.
Note: You need to add at least three timestamps which are 10 seconds or longer in order to add timestamps successfully.
Conclusion
As much as possible YouTubers want to make videos short and to the point. However, if a video needs to be longer, you can still help users navigate through to find what is important to them by adding Timestamp to YouTube link or Timestamp the YouTube descriptions. This can help your viewers jump straight to the interesting part in the video, rather than viewing the entire video saving their time and boost user experience.
Richard Bennett
Richard Bennett is a writer and a lover of all things video.
Follow @Richard Bennett
Cutting-Edge Computers: Notebook Recommendations for Editors
The Best Laptops for Video Editing
Richard Bennett
Oct 26, 2023• Proven solutions
This article lists the 3 best laptops for video editing in 2018.
Whether you’re an industry professional or an avid YouTuber, you know how important it is to produce quality videos consistently.
The quality of the videos you create will depend on your creativity, the editing software you use, and the hardware that software is installed on. And as you probably know, it can be tough to work fast and get good results when your hardware or laptop isn’t strong enough to power your software properly and allow you to work at the pace you want.
The best laptops for video editing in 2018 have three things in common. First, they have top-of-the-line display technology for color accuracy, color depth, and clarity. Next, they have discrete (dedicated) Graphic Processing Units (GPUs) with accompanying RAM to enable them to handle video processing fast without compromising other system functions. And finally, they have Intel core i7 CPU processors and Solid-State Drives (SSD) for faster overall performance.
THE TOP 3 LAPTOPS FOR EDITING VIDEO IN 2018
The top 3 laptops below are quite impressive. They have the right mix of power and function that video editing requires.
1.MACBOOK PRO WITH TOUCH BAR
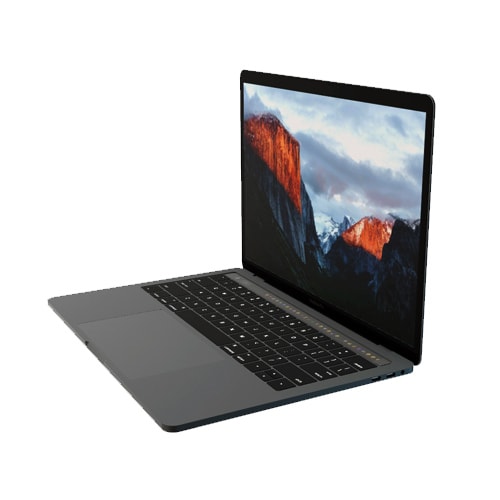
PRICE: $1500 - $1800
SYSTEM SPECS:
CPU: Intel Core i7 Processor
GRAPHICS: Radeon Pro 555 with 2GB memory – 560 with 4GB memory
RAM: 16GB
SCREEN: 15.4” Retina Display
RES: 2880 x 1800px
STORAGE: 128 – 256GB SSD
PROS
- OLED Touch Bar
- Thunderbolt 3 ports
- Large Trackpad
CONS:
- No other input ports available besides Thunderbolt 3
- Expensive
The MacBook Pro with Touch Bar is the best video editing laptop produced by Apple. It has a wide 15.4” screen with thin bezels, and its proprietary OLED Touch bar amps up its flexibility and functionality considerably. The Touch Bar is set-up to show different shortcuts for different apps. It works quite well with Photoshop and will show thumbnails, filter options, a color picker, and more while you’re editing videos or stills.
Working with large 4K video files is much easier with the MacBook Pro. It’s fitted with Thunderbolt 3 Ports which have the highest data and video bandwidth available for USB-C connections. With these Thunderbolt ports, you can also use high-speed and high-power peripherals without a hitch. This laptop also has an extra-wide touchpad or Trackpad (as Apple calls it) which expands your physical working surface while also making it easier to do detailed video editing.
Unfortunately, if you need a variety of ports like most videographers, working with the MacBook Pro could be a challenge as it only has Thunderbolt 3 ports. If this is the laptop you prefer, you’ll need to buy additional connection hardware to work with different input devices. And while this laptop impresses in many ways, it’s also quite expensive. There are certainly other laptops on the market which can give you similar performance at a lower cost.
2. DELL XPS 15
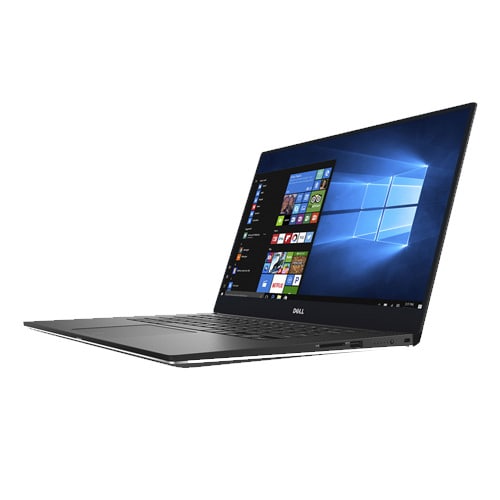
PRICE: $999 - $1300
SYSTEM SPECS:
CPU: Intel Core i7 Processor
GRAPHICS: NVIDIA GeForce GTX 1050
RAM: 8 - 16GB
SCREEN: 15.6”
RES: FHD - 4k UHD 3840 x 2160px
STORAGE: 256GB – 1TB SSD
PROS
- 4k InfinityEdge display
- Good battery life
- Has multiple input ports
CONS:
- Webcam is oddly positioned
The Dell XPS 15 is one laptop that hits the sweet spot for many videographers. It’s considered the closest competitor to the MacBook Pro reviewed above. In fact, many would argue that it tops the MacBook Pro when it comes to speed, color accuracy, and color depth. Its 15.6” screen has very thin bezels for minimal distraction and immersive work experience. At 4K resolution and displaying a wide range of the sRGB gamut, video editing with the Dell XPS 15 promises to be both smooth and enjoyable.
The Dell XPS 15 is certainly more affordable, while still delivering excellent graphics performance. It features an Intel i7 processor and the NVIDIA GeForce GTX 1050 graphics processor. This makes it remarkably fast for video editing, as well as energy-efficient. People who work with different input devices will also like that this laptop has legacy adapters (USB, HDMI, ethernet) alongside a USB type C port.
The biggest downside to the Dell XPS 15 laptop is its oddly positioned webcam. It feels awkward and can be an inconvenience to use since you’ll have to adjust your position significantly while making video calls or recording for your YouTube channel.
3. MICROSOFT SURFACE BOOK 2
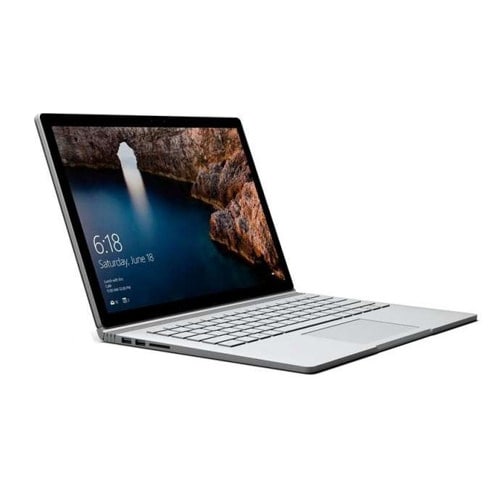
PRICE: $1499 - $2499
SYSTEM SPECS:
CPU: Intel Core i7 Processor
GRAPHICS: Intel HD 620 or Nvidia GTX 1050 / GTX 1060
RAM: 16GB
SCREEN: 15.0”
RES: 3240 x 2160px
STORAGE: 256GB, 512GB – 1TB SSD
PROS
- Detachable screen
- Has multiple input ports (USB Type-A, USB Type-C, SD card reader)
- Works with a Stylus
CONS:
- Expensive
- Fulcrum hinge
The Microsoft Surface Book 2 is a laptop and a tablet thanks to its detachable screen. At a resolution of 3240 x 2160px, its screen is nearly 4k and can handle Full HD and HD footage with ease. Add to this its capacity to show a considerable portion of the sRGB gamut and its easy-to-use stylus and you can see why this 2-in-1 combo from Microsoft is one of the top 3 laptops for video editing in 2018.
Surface Book 2 also has the right combination of power and storage capacity that video editing requires. It boasts a state-of-the-art NVIDIA graphics processor and an Intel i7 processor for a smooth workflow no matter the size or level of detail involved in your video editing project.
On the downside, this laptop is undoubtedly very expensive. Compared to the function and power you can get from the DELL XPS 15, it’s hard to justify paying nearly $2500 for the Surface Book 2. Its detachable screen, supported by a fulcrum hinge, also comes at a price. It makes the laptop a bit bulky at one end when it’s folded. This in turn can make day-to-day handling a bit more tricky than it has to be.
CONCLUSION
If you’re searching for a good laptop to help you improve the quality of your videos in 2018, look no further than these 3. They have all the power, function, and storage capacity you need to handle any project with ease. Just be mindful of your budget and consider which extras are worth the expense. Go for the MacBook Pro with Touch Bar if customizing your workflow is a priority. Opt for the Dell XPS 15 if you want the best combination of display quality and graphics processing. Finally, consider the Surface Book 2 if you need the flexibility of a 2-in-1 device.
What do you think is the best laptop for video editing?
Equip Your Laptop with the Best Video Editing Software


Richard Bennett
Richard Bennett is a writer and a lover of all things video.
Follow @Richard Bennett
Richard Bennett
Oct 26, 2023• Proven solutions
This article lists the 3 best laptops for video editing in 2018.
Whether you’re an industry professional or an avid YouTuber, you know how important it is to produce quality videos consistently.
The quality of the videos you create will depend on your creativity, the editing software you use, and the hardware that software is installed on. And as you probably know, it can be tough to work fast and get good results when your hardware or laptop isn’t strong enough to power your software properly and allow you to work at the pace you want.
The best laptops for video editing in 2018 have three things in common. First, they have top-of-the-line display technology for color accuracy, color depth, and clarity. Next, they have discrete (dedicated) Graphic Processing Units (GPUs) with accompanying RAM to enable them to handle video processing fast without compromising other system functions. And finally, they have Intel core i7 CPU processors and Solid-State Drives (SSD) for faster overall performance.
THE TOP 3 LAPTOPS FOR EDITING VIDEO IN 2018
The top 3 laptops below are quite impressive. They have the right mix of power and function that video editing requires.
1.MACBOOK PRO WITH TOUCH BAR
PRICE: $1500 - $1800
SYSTEM SPECS:
CPU: Intel Core i7 Processor
GRAPHICS: Radeon Pro 555 with 2GB memory – 560 with 4GB memory
RAM: 16GB
SCREEN: 15.4” Retina Display
RES: 2880 x 1800px
STORAGE: 128 – 256GB SSD
PROS
- OLED Touch Bar
- Thunderbolt 3 ports
- Large Trackpad
CONS:
- No other input ports available besides Thunderbolt 3
- Expensive
The MacBook Pro with Touch Bar is the best video editing laptop produced by Apple. It has a wide 15.4” screen with thin bezels, and its proprietary OLED Touch bar amps up its flexibility and functionality considerably. The Touch Bar is set-up to show different shortcuts for different apps. It works quite well with Photoshop and will show thumbnails, filter options, a color picker, and more while you’re editing videos or stills.
Working with large 4K video files is much easier with the MacBook Pro. It’s fitted with Thunderbolt 3 Ports which have the highest data and video bandwidth available for USB-C connections. With these Thunderbolt ports, you can also use high-speed and high-power peripherals without a hitch. This laptop also has an extra-wide touchpad or Trackpad (as Apple calls it) which expands your physical working surface while also making it easier to do detailed video editing.
Unfortunately, if you need a variety of ports like most videographers, working with the MacBook Pro could be a challenge as it only has Thunderbolt 3 ports. If this is the laptop you prefer, you’ll need to buy additional connection hardware to work with different input devices. And while this laptop impresses in many ways, it’s also quite expensive. There are certainly other laptops on the market which can give you similar performance at a lower cost.
2. DELL XPS 15
PRICE: $999 - $1300
SYSTEM SPECS:
CPU: Intel Core i7 Processor
GRAPHICS: NVIDIA GeForce GTX 1050
RAM: 8 - 16GB
SCREEN: 15.6”
RES: FHD - 4k UHD 3840 x 2160px
STORAGE: 256GB – 1TB SSD
PROS
- 4k InfinityEdge display
- Good battery life
- Has multiple input ports
CONS:
- Webcam is oddly positioned
The Dell XPS 15 is one laptop that hits the sweet spot for many videographers. It’s considered the closest competitor to the MacBook Pro reviewed above. In fact, many would argue that it tops the MacBook Pro when it comes to speed, color accuracy, and color depth. Its 15.6” screen has very thin bezels for minimal distraction and immersive work experience. At 4K resolution and displaying a wide range of the sRGB gamut, video editing with the Dell XPS 15 promises to be both smooth and enjoyable.
The Dell XPS 15 is certainly more affordable, while still delivering excellent graphics performance. It features an Intel i7 processor and the NVIDIA GeForce GTX 1050 graphics processor. This makes it remarkably fast for video editing, as well as energy-efficient. People who work with different input devices will also like that this laptop has legacy adapters (USB, HDMI, ethernet) alongside a USB type C port.
The biggest downside to the Dell XPS 15 laptop is its oddly positioned webcam. It feels awkward and can be an inconvenience to use since you’ll have to adjust your position significantly while making video calls or recording for your YouTube channel.
3. MICROSOFT SURFACE BOOK 2
PRICE: $1499 - $2499
SYSTEM SPECS:
CPU: Intel Core i7 Processor
GRAPHICS: Intel HD 620 or Nvidia GTX 1050 / GTX 1060
RAM: 16GB
SCREEN: 15.0”
RES: 3240 x 2160px
STORAGE: 256GB, 512GB – 1TB SSD
PROS
- Detachable screen
- Has multiple input ports (USB Type-A, USB Type-C, SD card reader)
- Works with a Stylus
CONS:
- Expensive
- Fulcrum hinge
The Microsoft Surface Book 2 is a laptop and a tablet thanks to its detachable screen. At a resolution of 3240 x 2160px, its screen is nearly 4k and can handle Full HD and HD footage with ease. Add to this its capacity to show a considerable portion of the sRGB gamut and its easy-to-use stylus and you can see why this 2-in-1 combo from Microsoft is one of the top 3 laptops for video editing in 2018.
Surface Book 2 also has the right combination of power and storage capacity that video editing requires. It boasts a state-of-the-art NVIDIA graphics processor and an Intel i7 processor for a smooth workflow no matter the size or level of detail involved in your video editing project.
On the downside, this laptop is undoubtedly very expensive. Compared to the function and power you can get from the DELL XPS 15, it’s hard to justify paying nearly $2500 for the Surface Book 2. Its detachable screen, supported by a fulcrum hinge, also comes at a price. It makes the laptop a bit bulky at one end when it’s folded. This in turn can make day-to-day handling a bit more tricky than it has to be.
CONCLUSION
If you’re searching for a good laptop to help you improve the quality of your videos in 2018, look no further than these 3. They have all the power, function, and storage capacity you need to handle any project with ease. Just be mindful of your budget and consider which extras are worth the expense. Go for the MacBook Pro with Touch Bar if customizing your workflow is a priority. Opt for the Dell XPS 15 if you want the best combination of display quality and graphics processing. Finally, consider the Surface Book 2 if you need the flexibility of a 2-in-1 device.
What do you think is the best laptop for video editing?
Equip Your Laptop with the Best Video Editing Software
Richard Bennett
Richard Bennett is a writer and a lover of all things video.
Follow @Richard Bennett
Also read:
- [New] Tips & Tricks to Add Tags to YouTube Video
- Free Tips Embedding Moving Images in Written Content
- [New] Cutting-Edge Techniques for Setting the Optimal Size of Your YouTube Videos
- Turn Any YouTube Experience Into a Fun, Animated GIF on Devices
- Time Travel for Video Views YouTube Upside-Down Guide
- [Updated] Direct Streaming From Apple Devices to YouTube
- In 2024, Broadview Networks Navigating MCN Choices
- 2024 Approved Captivating YT Cover Art for Maximum Traffic
- Elevate Video Consumption Constructing an Ideal 'Watch Later' List on YouTube
- [Updated] Access Exclusive Video Artwork – Free, Flawless, and Fast
- In 2024, Configure YouTube's Audience Options with Ease
- [Updated] Captivate Audiences with Imaginative Thumbnails
- Become a Freelance Transcriber Tips and Tricks for YouTube Content for 2024
- [New] Embrace Authenticity Your Style Journey Begins Here
- Total Disconnect From YouTube Shorts Made Simple
- In 2024, Customizable MCB Visuals for YouTube Banners
- Beginner's Blueprint for Viral Video SEO
- Perfect Your Clips Step-by-Step YouTube Editing Tips
- Cut to Perfection Top Video Editors for YouTubers
- 2024 Approved Audience Accessibility Enhancement Adding Subtitles and Closed Captions on YouTube
- [New] Comprehensive Guide to Crafting Engaging YouTube Outros
- In 2024, Elevate Your Video Game Select Top 20 Thumbnail Fonts
- Dive Into Design Get a Complimentary Set of 50 Banner Pieces!
- The Ultimate Steps for Creating Collab Videos with YouTubers
- Comedy Central The Best Laughter-Inducing Channels Online
- In 2024, Pixel Perfection Radeon Redux Review
- How to Sign .fodt file Online with DigiSigner
- Strategies to Enhance GoPro's Electric Efficiency
- Elevate Your Vlogging Skills with Pro GoPro Tips
- Updated In 2024, 6 Stellar Audio Converters to Simplify Your Workflow
- In 2024, Essential Skills Setting Up Call Transcriptions in Google Voice
- [Updated] 2024 Approved Straightforward Steps Upside-Down Video Rotation Using VLC
- Bricked Your Realme 12 Pro 5G? Heres A Full Solution | Dr.fone
- [New] In 2024, The Ultimate Checklist for Zoom Recording
- [New] In 2024, Snap Tales with Flair Unearth over 120 Ingenious Titles for Your Unique Snapchat Chronicles
- 2024 Approved FrameFlick Recorder Reflection
- Best 3 Lava Blaze Pro 5G Emulator for Mac to Run Your Wanted Android Apps | Dr.fone
- Updated 2024 Approved 26 Cool Anime Girl Names and Their Meanings
- The Essential Guide to Custom Voices How to Alter Game Character Sounds in Free Fire (No Cost!)
- How to retrieve erased messages from Oppo A1x 5G
- In 2024, How to Unlock iPhone 6s Plus Passcode without Computer? | Dr.fone
- [New] 2024 Approved Social Syncopation The Freshest TikTok Dances
- In 2024, 5 Ways to Transfer Music from Asus ROG Phone 7 Ultimate to Other Android Devices Easily | Dr.fone
- Instant Solutions to Banish Background Noise Swiftly From Audio Files for 2024
- Updated Unlock Cinematic Storytelling How to Apply the Ken Burns Effect in Final Cut Pro
- [Updated] 2024 Approved Making History Shine Again Instagram Effects for Your Archive
- Ultimate Guide on Oppo A56s 5G FRP Bypass
- Authentication Error Occurred on Itel P55+? Here Are 10 Proven Fixes | Dr.fone
- Title: "2024 Approved Adding Visual Time Indicators to Your YouTube Links"
- Author: Kevin
- Created at : 2024-06-18 20:20:38
- Updated at : 2024-06-19 20:20:38
- Link: https://youtube-videos.techidaily.com/2024-approved-adding-visual-time-indicators-to-your-youtube-links/
- License: This work is licensed under CC BY-NC-SA 4.0.
