"2024 Approved Achieving Million-Sub Milestone The YouTube Guide"
Achieving Million-Sub Milestone: The YouTube Guide
Case Study: How to Grow on YouTube to Have Millions of Subs


Shanoon Cox
Oct 26, 2023• Proven solutions
You’ve probably heard of stories about individuals who managed to find financial success on YouTube. If your dream is to make money on YouTube it’s important to remember that regular people are doing it.
Jesse Ridgway is the owner of the vlog McJuggerNuggets , which has grown to over 3.4 million subscribers. He makes enough money to live off of YouTube alone. Here is a case study of how he made his first $10,000 on YouTube:
Case Study of McJuggerNuggets
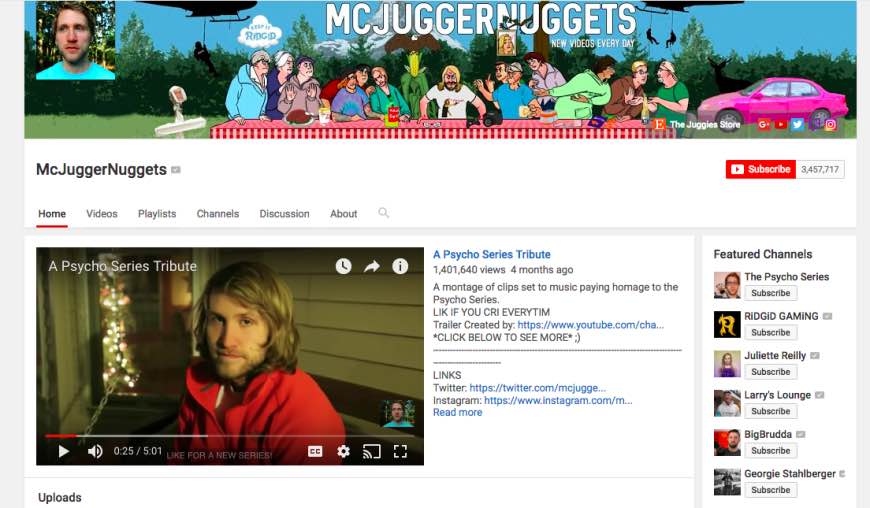
Jesse was one of the earliest YouTubers. He started his channel on December 9, 2006. Jesse never guessed that he would make enough money to live off of the videos he was creating. Here are some of the ways that he monetized his channel:
AdSense
Monetization of videos through AdSense is one of the easiest ways that you can start to profit off your videos. Registering for a Google AdSense can earn you between $0.30 and $2.00 per thousand ad impressions (an impression is a click, not a view). How much you make per ad impression depends on a lot of things, including the time of year. There are good months for advertising revenue and bad months. December is usually the hottest month for making money through AdSense because of the holiday shopping season. Some of the other months where you can see huge profits include September for back-to-school, June, and March.
More popular channels get higher paying ads, and it is harder to earn ad revenue in popular vlogging genres (i.e. gaming) than in more obscure niches.
Target the Right Demographic
Some of the largest YouTuber success stories are creators who primarily target younger audiences. Others target men or women specifically. Think about who you want your audience to be and make videos that will appeal to them.
Multichannel Networks
Once you hit a certain level of subscribership and views you will start getting invited to MCMs. In some cases, multichannel network promotions could entitle you to discounts on merchandise and products. Be careful: a multichannel network will always want you to sign a contract, and they will take over your AdSense account.
Social Blade
This site will provide details about your subscription count, which of your videos has the best watch time, and more. It will give you a good impression of what you should be including in your videos and how you can make more money from your channel.
Uploading Your Videos at the Right Time
Uploading videos at the right time will make sure that you are on the front page of recently uploaded videos when people are let out of school or taking a break from work. This will earn you lots of views. Set an upload time for all of your videos each day and stick to that schedule.
Check out Webinars
Looking into webinars and videos of what other popular YouTube experts have done will help you model their success.
Collaborate with Other YouTubers
When you create a collab video you and your partner are each introduced to each other’s subscribers.
Keep Quality Up
Putting time and effort into every upload will ensure that you won’t lose subscribers or viewers because you got a bit lazy.
Do Follow-Up Videos
If you have a particular video that has a lot of views, you may want to consider creating follow-up videos. This can be a great way to generate lots of views.
Complete Regular Research
Regular research into your target market will help you to create the trendiest new content.
Don’t Get Discouraged
Timing and luck are definitely two of the biggest factors in becoming a success on YouTube. If you are willing to keep working and don’t get discouraged you will eventually earn profits.
Edit Your Videos with High-Quality Video Editor


.png) Kanto Player Professional
Kanto Player Professional
Shanoon Cox
Shanoon Cox is a writer and a lover of all things video.
Follow @Shanoon Cox
Shanoon Cox
Oct 26, 2023• Proven solutions
You’ve probably heard of stories about individuals who managed to find financial success on YouTube. If your dream is to make money on YouTube it’s important to remember that regular people are doing it.
Jesse Ridgway is the owner of the vlog McJuggerNuggets , which has grown to over 3.4 million subscribers. He makes enough money to live off of YouTube alone. Here is a case study of how he made his first $10,000 on YouTube:
 Jet Profiler for MySQL, Enterprise Version: Jet Profiler for MySQL is real-time query performance and diagnostics tool for the MySQL database server. Its detailed query information, graphical interface and ease of use makes this a great tool for finding performance bottlenecks in your MySQL databases.
 Case Study of McJuggerNuggets
Jesse was one of the earliest YouTubers. He started his channel on December 9, 2006. Jesse never guessed that he would make enough money to live off of the videos he was creating. Here are some of the ways that he monetized his channel:
AdSense
Monetization of videos through AdSense is one of the easiest ways that you can start to profit off your videos. Registering for a Google AdSense can earn you between $0.30 and $2.00 per thousand ad impressions (an impression is a click, not a view). How much you make per ad impression depends on a lot of things, including the time of year. There are good months for advertising revenue and bad months. December is usually the hottest month for making money through AdSense because of the holiday shopping season. Some of the other months where you can see huge profits include September for back-to-school, June, and March.
More popular channels get higher paying ads, and it is harder to earn ad revenue in popular vlogging genres (i.e. gaming) than in more obscure niches.
Target the Right Demographic
Some of the largest YouTuber success stories are creators who primarily target younger audiences. Others target men or women specifically. Think about who you want your audience to be and make videos that will appeal to them.
Multichannel Networks
Once you hit a certain level of subscribership and views you will start getting invited to MCMs. In some cases, multichannel network promotions could entitle you to discounts on merchandise and products. Be careful: a multichannel network will always want you to sign a contract, and they will take over your AdSense account.
Social Blade
This site will provide details about your subscription count, which of your videos has the best watch time, and more. It will give you a good impression of what you should be including in your videos and how you can make more money from your channel.
Uploading Your Videos at the Right Time
Uploading videos at the right time will make sure that you are on the front page of recently uploaded videos when people are let out of school or taking a break from work. This will earn you lots of views. Set an upload time for all of your videos each day and stick to that schedule.
Check out Webinars
Looking into webinars and videos of what other popular YouTube experts have done will help you model their success.
Collaborate with Other YouTubers
When you create a collab video you and your partner are each introduced to each other’s subscribers.
Keep Quality Up
Putting time and effort into every upload will ensure that you won’t lose subscribers or viewers because you got a bit lazy.
Do Follow-Up Videos
If you have a particular video that has a lot of views, you may want to consider creating follow-up videos. This can be a great way to generate lots of views.
Complete Regular Research
Regular research into your target market will help you to create the trendiest new content.
Don’t Get Discouraged
Timing and luck are definitely two of the biggest factors in becoming a success on YouTube. If you are willing to keep working and don’t get discouraged you will eventually earn profits.
Edit Your Videos with High-Quality Video Editor
Shanoon Cox
Shanoon Cox is a writer and a lover of all things video.
Follow @Shanoon Cox
Shanoon Cox
Oct 26, 2023• Proven solutions
You’ve probably heard of stories about individuals who managed to find financial success on YouTube. If your dream is to make money on YouTube it’s important to remember that regular people are doing it.
Jesse Ridgway is the owner of the vlog McJuggerNuggets , which has grown to over 3.4 million subscribers. He makes enough money to live off of YouTube alone. Here is a case study of how he made his first $10,000 on YouTube:
Case Study of McJuggerNuggets
 Glary Utilities PRO - Premium all-in-one utility to clean, speed up, maintain and protect your PC
Jesse was one of the earliest YouTubers. He started his channel on December 9, 2006. Jesse never guessed that he would make enough money to live off of the videos he was creating. Here are some of the ways that he monetized his channel:
AdSense
Monetization of videos through AdSense is one of the easiest ways that you can start to profit off your videos. Registering for a Google AdSense can earn you between $0.30 and $2.00 per thousand ad impressions (an impression is a click, not a view). How much you make per ad impression depends on a lot of things, including the time of year. There are good months for advertising revenue and bad months. December is usually the hottest month for making money through AdSense because of the holiday shopping season. Some of the other months where you can see huge profits include September for back-to-school, June, and March.
More popular channels get higher paying ads, and it is harder to earn ad revenue in popular vlogging genres (i.e. gaming) than in more obscure niches.
Target the Right Demographic
Some of the largest YouTuber success stories are creators who primarily target younger audiences. Others target men or women specifically. Think about who you want your audience to be and make videos that will appeal to them.
Multichannel Networks
Once you hit a certain level of subscribership and views you will start getting invited to MCMs. In some cases, multichannel network promotions could entitle you to discounts on merchandise and products. Be careful: a multichannel network will always want you to sign a contract, and they will take over your AdSense account.
Social Blade
This site will provide details about your subscription count, which of your videos has the best watch time, and more. It will give you a good impression of what you should be including in your videos and how you can make more money from your channel.
Uploading Your Videos at the Right Time
Uploading videos at the right time will make sure that you are on the front page of recently uploaded videos when people are let out of school or taking a break from work. This will earn you lots of views. Set an upload time for all of your videos each day and stick to that schedule.
Check out Webinars
Looking into webinars and videos of what other popular YouTube experts have done will help you model their success.
Collaborate with Other YouTubers
When you create a collab video you and your partner are each introduced to each other’s subscribers.
Keep Quality Up
Putting time and effort into every upload will ensure that you won’t lose subscribers or viewers because you got a bit lazy.
Do Follow-Up Videos
If you have a particular video that has a lot of views, you may want to consider creating follow-up videos. This can be a great way to generate lots of views.
Complete Regular Research
Regular research into your target market will help you to create the trendiest new content.
Don’t Get Discouraged
Timing and luck are definitely two of the biggest factors in becoming a success on YouTube. If you are willing to keep working and don’t get discouraged you will eventually earn profits.

Edit Your Videos with High-Quality Video Editor
Shanoon Cox
Shanoon Cox is a writer and a lover of all things video.
Follow @Shanoon Cox
Capturing Top-Notch Audio Without Microphone Dependency
How to Record Good Audio Without a Microphone?

Richard Bennett
Oct 26, 2023• Proven solutions
Audio quality is more important than video quality on YouTube. You’ve probably heard that before – viewers might forgive sub-par video quality if they’re interested in what you’re saying, but if it’s hard to understand what you’re saying they’ll click away.
Getting an external mic (even a $10 one-off Amazon ) is one of the best ways to improve your videos. That said, maybe your budget is $0. Or, maybe you just don’t happen to have a mic now and don’t want to wait to make videos. It could even be that you just don’t want to bother with an external mic.
Luckily, there are a lot of easy, free, things you can do to protect the quality of your audio recording even if you’re not using an external mic. Here are a few tips:
- 1. Keep Your Camera Close
- 2. Shoot Somewhere Quiet
- 3. Pick a Good Room
- 4. Protect your Built-In Mic from Wind
- 5. Use a Free Audio App
- 6. Do a Sound Check
1. Keep Your Camera Close (like, really close)
The biggest problem with the mic built into any camera or phone is just that, since it’s with the camera, it’s usually too far away from you. Built-in mics can record decent audio up close, but usually, your camera will be set up farther away from you than an external mic would be.
For example, your camera’s mic might be just as good as a clip-on LAV, but that LAV is right by your mouth and the camera is a couple of big steps away.
Moving your camera/smartphone physically closer to you will make it hard to include anything besides your head and shoulders in your shot, but it will get you significantly better audio.
2.Shoot Somewhere Quiet
The best way to limit the amount of background noise you pick up in your sound recording is to shoot somewhere where there’s no background noise. That probably seems really basic, but it’s something a lot of people just don’t do. It’s easy to default to recording in your home office, even though it’s right next to the kitchen where your family is bustling around, or in your bedroom even though there’s a busy street right outside your window.
Sometimes the best thing you can do for your audio is simply to scout out a quiet room in your house where the sound recording conditions are better. Speaking of recording conditions…
3. Pick a Good Room
There’s more that goes into picking a good room than how quiet it is. If you try to record in a room that’s too big your voice might sound to distant, and if you try to record in a room that’s too small your audio will be too echo-y. You need a room that’s just right.
You should also pay attention to what’s in the room you’re recording in. Avoid hard, reflective, surfaces like appliances and mirrors which your voice will bounce off of. The same conditions that make you sound great when you sing in the shower will – like recording in a small space -make your voiceover unpleasantly echo-y.
Look for a room that has a lot of soft things in it, like beds and sofas.
4. Protect your Built-In Mic from Wind
If you shoot outside, then the wind passing over your built-in mic will do terrible things to your audio. You can do a lot to counter-act this problem by physically blocking the wind.
There are a few ways to do this. If you’re doing hand-held shots you can partially cover your camera or phone’s mic with your finger. You don’t want to completely cover it/press down or your audio will be muffled. What you’re trying to do is create a barrier blocking out the wind.
On movie sets, they block out wind by covering the microphones with big fuzzy things called ‘dead cats’. You can also block out wind noise by attaching something fuzzy to your microphone. If your camera’s built-in mic is on front of it then you just need something big and fluffy you can loop around the lens. You can use a piece of a boa, a fuzzy novelty scrunchie – you can even murder a fuzzy stuffed animal! Do you have an old coat with a fuzz around the hood? That fuzz would do nicely.
The pompom used in this video cost $2, but you might already have something that would work!
If your built-in mic is on top of your camera you can get something called a ‘micromuff’. A micromuff is essentially a circular or rectangular piece of velcro with long strands of fluff on top. It’s open in the middle so it doesn’t actually cover your mic, but the surrounding fuzz blocks out the wind.

You use the adhesive backing to attach the base velcro to your camera. The other side of the velcro has your fluff attached to the back.
The only thing about a micromuff is that it costs about $30, and if you’re going to spend $30 on audio equipment then you could just buy yourself an inexpensive LAV mic. I only bring up the micromuff because it’s a very simple design you can probably DIY – you just need velcro with adhesive backing and any of the fluff-sources we just discussed.
5. Use a Free Audio App
If you’re recording on a smartphone, you can download a free app that will let you make adjustments to your audio as you record it. With the right app, you can adjust your gain (volume is how you control ‘output’ audio, and gain is for ‘input’ audio. By turning up your gain, you can make your mic more sensitive), tempo, and more. A lot of the time, your audio recording app will also let you edit your audio afterward.
Even if you’re not recording video from your smartphone, it might be a good idea to use your phone as your mic and record a separate audio file. You’ll be able to use an app to fine-tune your recording, and you can set your phone up closer to you the way you would an external mic while keeping your camera back a bit farther.
Free audio apps: Hi-Q MP3 Voice Recorder (Android), RecForge II (Android), Smart Voice Recorder (Android), Audio Memos (iOS), and Recorder Plus (iOS).
6. Do a Sound Check
Once you think you’ve got good audio set up – test it! You don’t want to do a whole video and find out when you play it back that your audio doesn’t sound good.
Do you have any of your own audio tips to pass on? Leave them in the comments!
This topic was suggested by RS Beauty over in the forums. Thanks for the idea!
Polish Your YouTube Videos with Filmora
As one of the most widely used video editing software in YouTube video editing, Filmora allows you to record voiceover and edit the recorded audio with mixer, equalizer and provides lots of templates and effects with an intuitive interface, which saves much time. Download the free trial version and get started now.
Richard Bennett
Richard Bennett is a writer and a lover of all things video.
Follow @Richard Bennett
Richard Bennett
Oct 26, 2023• Proven solutions
Audio quality is more important than video quality on YouTube. You’ve probably heard that before – viewers might forgive sub-par video quality if they’re interested in what you’re saying, but if it’s hard to understand what you’re saying they’ll click away.
Getting an external mic (even a $10 one-off Amazon ) is one of the best ways to improve your videos. That said, maybe your budget is $0. Or, maybe you just don’t happen to have a mic now and don’t want to wait to make videos. It could even be that you just don’t want to bother with an external mic.
Luckily, there are a lot of easy, free, things you can do to protect the quality of your audio recording even if you’re not using an external mic. Here are a few tips:
- 1. Keep Your Camera Close
- 2. Shoot Somewhere Quiet
- 3. Pick a Good Room
- 4. Protect your Built-In Mic from Wind
- 5. Use a Free Audio App
- 6. Do a Sound Check

1. Keep Your Camera Close (like, really close)
The biggest problem with the mic built into any camera or phone is just that, since it’s with the camera, it’s usually too far away from you. Built-in mics can record decent audio up close, but usually, your camera will be set up farther away from you than an external mic would be.
For example, your camera’s mic might be just as good as a clip-on LAV, but that LAV is right by your mouth and the camera is a couple of big steps away.
Moving your camera/smartphone physically closer to you will make it hard to include anything besides your head and shoulders in your shot, but it will get you significantly better audio.
2.Shoot Somewhere Quiet
The best way to limit the amount of background noise you pick up in your sound recording is to shoot somewhere where there’s no background noise. That probably seems really basic, but it’s something a lot of people just don’t do. It’s easy to default to recording in your home office, even though it’s right next to the kitchen where your family is bustling around, or in your bedroom even though there’s a busy street right outside your window.
Sometimes the best thing you can do for your audio is simply to scout out a quiet room in your house where the sound recording conditions are better. Speaking of recording conditions…
3. Pick a Good Room
There’s more that goes into picking a good room than how quiet it is. If you try to record in a room that’s too big your voice might sound to distant, and if you try to record in a room that’s too small your audio will be too echo-y. You need a room that’s just right.
You should also pay attention to what’s in the room you’re recording in. Avoid hard, reflective, surfaces like appliances and mirrors which your voice will bounce off of. The same conditions that make you sound great when you sing in the shower will – like recording in a small space -make your voiceover unpleasantly echo-y.
Look for a room that has a lot of soft things in it, like beds and sofas.
4. Protect your Built-In Mic from Wind
If you shoot outside, then the wind passing over your built-in mic will do terrible things to your audio. You can do a lot to counter-act this problem by physically blocking the wind.
There are a few ways to do this. If you’re doing hand-held shots you can partially cover your camera or phone’s mic with your finger. You don’t want to completely cover it/press down or your audio will be muffled. What you’re trying to do is create a barrier blocking out the wind.
On movie sets, they block out wind by covering the microphones with big fuzzy things called ‘dead cats’. You can also block out wind noise by attaching something fuzzy to your microphone. If your camera’s built-in mic is on front of it then you just need something big and fluffy you can loop around the lens. You can use a piece of a boa, a fuzzy novelty scrunchie – you can even murder a fuzzy stuffed animal! Do you have an old coat with a fuzz around the hood? That fuzz would do nicely.
The pompom used in this video cost $2, but you might already have something that would work!
If your built-in mic is on top of your camera you can get something called a ‘micromuff’. A micromuff is essentially a circular or rectangular piece of velcro with long strands of fluff on top. It’s open in the middle so it doesn’t actually cover your mic, but the surrounding fuzz blocks out the wind.
You use the adhesive backing to attach the base velcro to your camera. The other side of the velcro has your fluff attached to the back.
The only thing about a micromuff is that it costs about $30, and if you’re going to spend $30 on audio equipment then you could just buy yourself an inexpensive LAV mic. I only bring up the micromuff because it’s a very simple design you can probably DIY – you just need velcro with adhesive backing and any of the fluff-sources we just discussed.
 Project Manager - Asset Browser for 3Ds Max
5. Use a Free Audio App
If you’re recording on a smartphone, you can download a free app that will let you make adjustments to your audio as you record it. With the right app, you can adjust your gain (volume is how you control ‘output’ audio, and gain is for ‘input’ audio. By turning up your gain, you can make your mic more sensitive), tempo, and more. A lot of the time, your audio recording app will also let you edit your audio afterward.
Even if you’re not recording video from your smartphone, it might be a good idea to use your phone as your mic and record a separate audio file. You’ll be able to use an app to fine-tune your recording, and you can set your phone up closer to you the way you would an external mic while keeping your camera back a bit farther.
Free audio apps: Hi-Q MP3 Voice Recorder (Android), RecForge II (Android), Smart Voice Recorder (Android), Audio Memos (iOS), and Recorder Plus (iOS).
6. Do a Sound Check
Once you think you’ve got good audio set up – test it! You don’t want to do a whole video and find out when you play it back that your audio doesn’t sound good.
Do you have any of your own audio tips to pass on? Leave them in the comments!
This topic was suggested by RS Beauty over in the forums. Thanks for the idea!
Polish Your YouTube Videos with Filmora
As one of the most widely used video editing software in YouTube video editing, Filmora allows you to record voiceover and edit the recorded audio with mixer, equalizer and provides lots of templates and effects with an intuitive interface, which saves much time. Download the free trial version and get started now.

Richard Bennett
Richard Bennett is a writer and a lover of all things video.
Follow @Richard Bennett
Richard Bennett
Oct 26, 2023• Proven solutions
Audio quality is more important than video quality on YouTube. You’ve probably heard that before – viewers might forgive sub-par video quality if they’re interested in what you’re saying, but if it’s hard to understand what you’re saying they’ll click away.
Getting an external mic (even a $10 one-off Amazon ) is one of the best ways to improve your videos. That said, maybe your budget is $0. Or, maybe you just don’t happen to have a mic now and don’t want to wait to make videos. It could even be that you just don’t want to bother with an external mic.
Luckily, there are a lot of easy, free, things you can do to protect the quality of your audio recording even if you’re not using an external mic. Here are a few tips:
- 1. Keep Your Camera Close
- 2. Shoot Somewhere Quiet
- 3. Pick a Good Room
- 4. Protect your Built-In Mic from Wind
- 5. Use a Free Audio App
- 6. Do a Sound Check
1. Keep Your Camera Close (like, really close)
The biggest problem with the mic built into any camera or phone is just that, since it’s with the camera, it’s usually too far away from you. Built-in mics can record decent audio up close, but usually, your camera will be set up farther away from you than an external mic would be.
For example, your camera’s mic might be just as good as a clip-on LAV, but that LAV is right by your mouth and the camera is a couple of big steps away.
Moving your camera/smartphone physically closer to you will make it hard to include anything besides your head and shoulders in your shot, but it will get you significantly better audio.
2.Shoot Somewhere Quiet
The best way to limit the amount of background noise you pick up in your sound recording is to shoot somewhere where there’s no background noise. That probably seems really basic, but it’s something a lot of people just don’t do. It’s easy to default to recording in your home office, even though it’s right next to the kitchen where your family is bustling around, or in your bedroom even though there’s a busy street right outside your window.
Sometimes the best thing you can do for your audio is simply to scout out a quiet room in your house where the sound recording conditions are better. Speaking of recording conditions…

3. Pick a Good Room
There’s more that goes into picking a good room than how quiet it is. If you try to record in a room that’s too big your voice might sound to distant, and if you try to record in a room that’s too small your audio will be too echo-y. You need a room that’s just right.
You should also pay attention to what’s in the room you’re recording in. Avoid hard, reflective, surfaces like appliances and mirrors which your voice will bounce off of. The same conditions that make you sound great when you sing in the shower will – like recording in a small space -make your voiceover unpleasantly echo-y.
Look for a room that has a lot of soft things in it, like beds and sofas.
4. Protect your Built-In Mic from Wind
If you shoot outside, then the wind passing over your built-in mic will do terrible things to your audio. You can do a lot to counter-act this problem by physically blocking the wind.
There are a few ways to do this. If you’re doing hand-held shots you can partially cover your camera or phone’s mic with your finger. You don’t want to completely cover it/press down or your audio will be muffled. What you’re trying to do is create a barrier blocking out the wind.
On movie sets, they block out wind by covering the microphones with big fuzzy things called ‘dead cats’. You can also block out wind noise by attaching something fuzzy to your microphone. If your camera’s built-in mic is on front of it then you just need something big and fluffy you can loop around the lens. You can use a piece of a boa, a fuzzy novelty scrunchie – you can even murder a fuzzy stuffed animal! Do you have an old coat with a fuzz around the hood? That fuzz would do nicely.
The pompom used in this video cost $2, but you might already have something that would work!
If your built-in mic is on top of your camera you can get something called a ‘micromuff’. A micromuff is essentially a circular or rectangular piece of velcro with long strands of fluff on top. It’s open in the middle so it doesn’t actually cover your mic, but the surrounding fuzz blocks out the wind.
 PCDJ Karaoki is the complete professional karaoke software designed for KJs and karaoke venues. Karaoki includes an advanced automatic singer rotation list with singer history, key control, news ticker, next singers screen, a song book exporter and printer, a jukebox background music player and many other features designed so you can host karaoke shows faster and easier!
You use the adhesive backing to attach the base velcro to your camera. The other side of the velcro has your fluff attached to the back.
The only thing about a micromuff is that it costs about $30, and if you’re going to spend $30 on audio equipment then you could just buy yourself an inexpensive LAV mic. I only bring up the micromuff because it’s a very simple design you can probably DIY – you just need velcro with adhesive backing and any of the fluff-sources we just discussed.
5. Use a Free Audio App
If you’re recording on a smartphone, you can download a free app that will let you make adjustments to your audio as you record it. With the right app, you can adjust your gain (volume is how you control ‘output’ audio, and gain is for ‘input’ audio. By turning up your gain, you can make your mic more sensitive), tempo, and more. A lot of the time, your audio recording app will also let you edit your audio afterward.
Even if you’re not recording video from your smartphone, it might be a good idea to use your phone as your mic and record a separate audio file. You’ll be able to use an app to fine-tune your recording, and you can set your phone up closer to you the way you would an external mic while keeping your camera back a bit farther.
Free audio apps: Hi-Q MP3 Voice Recorder (Android), RecForge II (Android), Smart Voice Recorder (Android), Audio Memos (iOS), and Recorder Plus (iOS).

6. Do a Sound Check
Once you think you’ve got good audio set up – test it! You don’t want to do a whole video and find out when you play it back that your audio doesn’t sound good.
Do you have any of your own audio tips to pass on? Leave them in the comments!
This topic was suggested by RS Beauty over in the forums. Thanks for the idea!
Parental Control Software
### Polish Your YouTube Videos with FilmoraAs one of the most widely used video editing software in YouTube video editing, Filmora allows you to record voiceover and edit the recorded audio with mixer, equalizer and provides lots of templates and effects with an intuitive interface, which saves much time. Download the free trial version and get started now.

Richard Bennett
Richard Bennett is a writer and a lover of all things video.
Follow @Richard Bennett
Richard Bennett
Oct 26, 2023• Proven solutions
Audio quality is more important than video quality on YouTube. You’ve probably heard that before – viewers might forgive sub-par video quality if they’re interested in what you’re saying, but if it’s hard to understand what you’re saying they’ll click away.
Getting an external mic (even a $10 one-off Amazon ) is one of the best ways to improve your videos. That said, maybe your budget is $0. Or, maybe you just don’t happen to have a mic now and don’t want to wait to make videos. It could even be that you just don’t want to bother with an external mic.
Luckily, there are a lot of easy, free, things you can do to protect the quality of your audio recording even if you’re not using an external mic. Here are a few tips:
- 1. Keep Your Camera Close
- 2. Shoot Somewhere Quiet
- 3. Pick a Good Room
- 4. Protect your Built-In Mic from Wind
- 5. Use a Free Audio App
- 6. Do a Sound Check
1. Keep Your Camera Close (like, really close)
The biggest problem with the mic built into any camera or phone is just that, since it’s with the camera, it’s usually too far away from you. Built-in mics can record decent audio up close, but usually, your camera will be set up farther away from you than an external mic would be.
For example, your camera’s mic might be just as good as a clip-on LAV, but that LAV is right by your mouth and the camera is a couple of big steps away.
Moving your camera/smartphone physically closer to you will make it hard to include anything besides your head and shoulders in your shot, but it will get you significantly better audio.
2.Shoot Somewhere Quiet
The best way to limit the amount of background noise you pick up in your sound recording is to shoot somewhere where there’s no background noise. That probably seems really basic, but it’s something a lot of people just don’t do. It’s easy to default to recording in your home office, even though it’s right next to the kitchen where your family is bustling around, or in your bedroom even though there’s a busy street right outside your window.
Sometimes the best thing you can do for your audio is simply to scout out a quiet room in your house where the sound recording conditions are better. Speaking of recording conditions…
3. Pick a Good Room
There’s more that goes into picking a good room than how quiet it is. If you try to record in a room that’s too big your voice might sound to distant, and if you try to record in a room that’s too small your audio will be too echo-y. You need a room that’s just right.
You should also pay attention to what’s in the room you’re recording in. Avoid hard, reflective, surfaces like appliances and mirrors which your voice will bounce off of. The same conditions that make you sound great when you sing in the shower will – like recording in a small space -make your voiceover unpleasantly echo-y.
Look for a room that has a lot of soft things in it, like beds and sofas.
4. Protect your Built-In Mic from Wind
If you shoot outside, then the wind passing over your built-in mic will do terrible things to your audio. You can do a lot to counter-act this problem by physically blocking the wind.
There are a few ways to do this. If you’re doing hand-held shots you can partially cover your camera or phone’s mic with your finger. You don’t want to completely cover it/press down or your audio will be muffled. What you’re trying to do is create a barrier blocking out the wind.
On movie sets, they block out wind by covering the microphones with big fuzzy things called ‘dead cats’. You can also block out wind noise by attaching something fuzzy to your microphone. If your camera’s built-in mic is on front of it then you just need something big and fluffy you can loop around the lens. You can use a piece of a boa, a fuzzy novelty scrunchie – you can even murder a fuzzy stuffed animal! Do you have an old coat with a fuzz around the hood? That fuzz would do nicely.
The pompom used in this video cost $2, but you might already have something that would work!
If your built-in mic is on top of your camera you can get something called a ‘micromuff’. A micromuff is essentially a circular or rectangular piece of velcro with long strands of fluff on top. It’s open in the middle so it doesn’t actually cover your mic, but the surrounding fuzz blocks out the wind.
You use the adhesive backing to attach the base velcro to your camera. The other side of the velcro has your fluff attached to the back.
The only thing about a micromuff is that it costs about $30, and if you’re going to spend $30 on audio equipment then you could just buy yourself an inexpensive LAV mic. I only bring up the micromuff because it’s a very simple design you can probably DIY – you just need velcro with adhesive backing and any of the fluff-sources we just discussed.
5. Use a Free Audio App
If you’re recording on a smartphone, you can download a free app that will let you make adjustments to your audio as you record it. With the right app, you can adjust your gain (volume is how you control ‘output’ audio, and gain is for ‘input’ audio. By turning up your gain, you can make your mic more sensitive), tempo, and more. A lot of the time, your audio recording app will also let you edit your audio afterward.
Even if you’re not recording video from your smartphone, it might be a good idea to use your phone as your mic and record a separate audio file. You’ll be able to use an app to fine-tune your recording, and you can set your phone up closer to you the way you would an external mic while keeping your camera back a bit farther.
Free audio apps: Hi-Q MP3 Voice Recorder (Android), RecForge II (Android), Smart Voice Recorder (Android), Audio Memos (iOS), and Recorder Plus (iOS).
6. Do a Sound Check
Once you think you’ve got good audio set up – test it! You don’t want to do a whole video and find out when you play it back that your audio doesn’t sound good.
Do you have any of your own audio tips to pass on? Leave them in the comments!
This topic was suggested by RS Beauty over in the forums. Thanks for the idea!
Polish Your YouTube Videos with Filmora
As one of the most widely used video editing software in YouTube video editing, Filmora allows you to record voiceover and edit the recorded audio with mixer, equalizer and provides lots of templates and effects with an intuitive interface, which saves much time. Download the free trial version and get started now.
 Screensaver Factory, Create stunning professional screensavers within minutes. Create screensavers for yourself, for marketing or unlimited royalty-free commercial distribution. Make screensavers from images, video and swf flash, add background music and smooth sprite and transition effects. Screensaver Factory is very easy to use, and it enables you to make self-installing screensaver files and CDs for easy setup and distribution. Screensaver Factory is the most advanced software of its kind.
Richard Bennett
Richard Bennett is a writer and a lover of all things video.
Follow @Richard Bennett
- Title: 2024 Approved Achieving Million-Sub Milestone The YouTube Guide
- Author: Kevin
- Created at : 2024-08-03 03:38:03
- Updated at : 2024-08-04 03:38:03
- Link: https://youtube-videos.techidaily.com/2024-approved-achieving-million-sub-milestone-the-youtube-guide/
- License: This work is licensed under CC BY-NC-SA 4.0.