
:max_bytes(150000):strip_icc()/004-how-to-see-everyone-on-google-meet-5088410-3eeb6cb239b84b20a4eb9c000cf45dd7.jpg)
"2024 Approved 17 Best Lights and Lighting Equipment for YouTube Videos"
The Leading 17 Lights & Stands Reviewed
17 Best Lights and Lighting Equipment for YouTube Videos

Richard Bennett
Mar 27, 2024• Proven solutions
Great lighting is important if you want people to watch your YouTube videos from start to finish. Viewers want to be able to see you clearly and will click away if they cannot. Natural light works great, and it’s cheap, so if it is possible you might want to consider vlogging outside. Of course, not every type of vlog is suited to the outdoors.
Unfortunately, it is unlikely you will be able to get good quality light from the lamps and ceiling lights in your home. Floor lamps can be useful for filling shadows or backlighting but are not usually powerful enough to use as your main light. Natural light is, so one way you can get around needing a lot of lighting equipment is to use a window as your main light. This is not always possible, though. If you are going to vlog from inside your house then there is a good chance you will need to invest in some lighting equipment.
- Part 1: Best Types of Lightning Equipment for YouTube Videos
- Part 2: What Should Good Lighting Equipment Feature?
- Part 3: Best Lights and Lighting Equipment for YouTube Video Shooting
Part 1: Best Types of Lightning Equipment for YouTube Videos
Every video no matter how long or short depends on light, more than anything else. The natural light sources are often not powerful enough to light a scene you’re trying to capture, so to avoid having to deal with underexposed footage, the best solution is to use artificial lighting. Even if you want the light in your video to be completely natural, you still have to figure out a way to get rid of shadows, which brings us back to different types of lighting equipment that can be used to increase the quality of the footage you’re producing.
1. Softbox Lights
Shooting videos with only natural light will put a lot of challenges in front of you, and the best way to overcome them is to use softbox lights. These natural light emulators mimic the natural light by using diffusion panels to make the light look softer and less artificial.
Softbox lights enable you to direct light to the exact spot in the shot, and they make lighting subjects and particular parts of a scene much easier. Softboxes are available in all shapes and sizes at very reasonable prices, and they are a standard part of the equipment used for the production of YouTube videos.
2. Umbrella Lights
The newcomers to the world of YouTube video production are going to love using these lights. The umbrella lights provide a much broader source of light than the softbox lights and they are frequently used to light the entire scene. You can also add extra light on the video’s subject if you’re looking to get a more balanced shot.
They are portable and quite handy if you often shoot in different locations since you can easily pack and carry them to wherever you plan on shooting your next YouTube video.
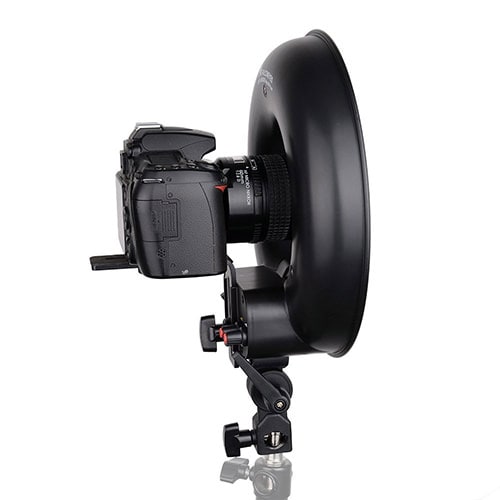
3. Ring Lights
Although they are most frequently used for fashion and beauty videos, ring lights are a great option whenever you need to make sure that the subjects of the video are perfectly lit. These circular lights have an amount in the center, so the camera’s point of view is identical to the direction from which the light is coming.
Ring lights are powerful enough to provide light for an entire scene, and they also work nicely as a catch or fill light. Some of the most popular YouTubers like Casy Neistat or PewDiePie use ring lights in their videos.
Part 2: What Should Good Lighting Equipment Feature?
Now that you know which types of lights are commonly used on YouTube video sets, you can start looking at models that best fit your demands. There are thousands of different studio lights on the market, but only the best offer features that make the light setup process easier and faster. So before buying your lighting equipment, you should make sure that it has the following features.
1. Adjustable Beam Spread
The equipment you use should allow you to control how wide the light is spreading. This is particularly useful when you want to light just one subject in the shot while keeping the rest in the dark. Lights with an adjustable beam spread to give you versatility and enable you to adapt to a wider range of scenes.
2. The Height of the Light Stand
Most lighting kits include stands, but not all stands allow you to change the height at which the light is positioned. This can largely limit your options on the set, which is why you need to check if the stand is adjustable. You’ll also want to do a background check on the stand’s durability, because low-quality stands may cause damage to the lights and other equipment.
3. Portability
How portable your lighting equipment should be is directly related to the genre of YouTube videos you want to produce. If you are planning on shooting in studio conditions, then portability is not such an important factor, but if you want to shoot at a different location every day then portability becomes something you simply must consider.
4. Accessories
Most lightning kits include a number of handy accessories that help you achieve better results. Reflectors, barn doors, diffusers, scrims, and mounting accessories are all commonly featured in high-quality lighting kits, and you shouldn’t buy a kit that doesn’t offer at least some of the accessories we mentioned here.
5. All About Reflectors/Diffusers
White reflectors are used to simply bounce light. Silver reflectors make light a bit colder-looking, and gold reflectors give things a slightly warmer, more glamourous, look. Black and translucent ‘reflectors’ are not really for bouncing light. The black reflector blocks light, which is useful if you are trying to focus your main light so it is only lighting you and not everything behind you. The translucent reflector is actually a diffuser. Diffusers are usually set up between you and your main light to soften it and make it easier on your eyes.
Reflectors are used to bounce light towards your subject. They are great for filling shadows created by your main light. This reflector is five reflectors in one: silver, gold, black, white, and translucent.
Part 3: Best Lights and Lighting Equipment for YouTube Videos
Consumer-level camera sensors are nowhere close to being as sensitive to light as our eyes. So a scene that may look sufficiently lit to our eyes may be too dark for the camera. When you’re shooting video indoors, you’ll need additional lighting equipment. Here are some of the top seventeen best lighting equipment for YouTubers.
List of the Top 5 Best On-Camera LED Lights
What is an On-Camera LED Light?
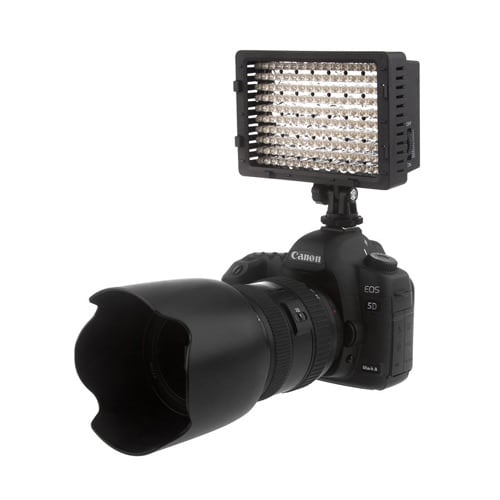
On-Camera LED lights are LED lights that can be mounted directly onto your camera’s hot/cold shoe (the little bracket on the top of a lot of DSLR cameras). On-camera LED lights are great for on-the-go YouTubers and YouTubers short on recording space because these lights are small and portable.
1. Julius Studio 160 LED Light with 4 Color Filters
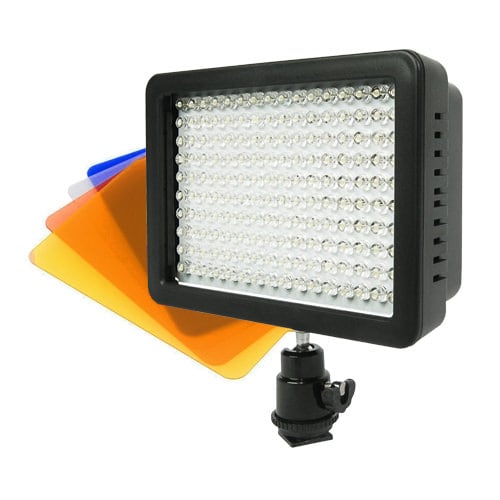
The Julius Studio 160 LED light not only can be mounted on any digital camera that has a hot/cold shoe but it can also be mounted on light stands so you can keep the same light setting even if you are moving the camera around. This lighting equipment also comes with four color filters so that you can control the color temperature of your light.
2. Viltrox L116B highest RA CRI95 LED Light Panel
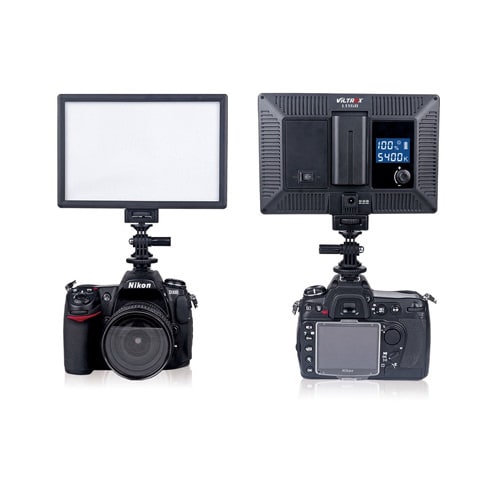
The VILTROX L116B LED light panel is a powerful piece of on-camera lighting equipment. As you can see from the back view of this light panel, you can see how much battery you have left as well as digitally set the color temperature of your light. It also features PWM light adjustment technology that reduces power consumption. As this equipment comes with an AC adapter, you can choose to use this outdoors or indoors.
3. Chromo Inc CI55000230 Macro Ring 48 LED Power Light
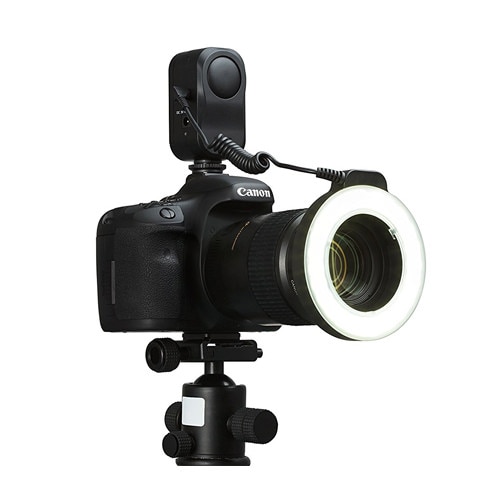
If you’re looking for an on-camera ring light, Chromo Inc’s macro ring light is a great option. This ring light mounts onto the lens of your SLR camera and its power source (two AA batteries) attaches to your camera’s hot/cold shoe. Get that nice-looking ring light reflection in your eyes as you film with this portable ring light!
4. Neewer CN-216 216PCS LED Dimmable Ultra High Power Panel
The Neewer 216 PCS LED dimmable light panel is powerful lighting equipment at a cheap price. You can adjust the color temperature of this light from 3200K up 5400K. This piece of equipment is only battery-powered, but you do have the option to either use six AA batteries or specific Sony NP series batteries, or Panasonic CGR-D16S rechargeable batteries.
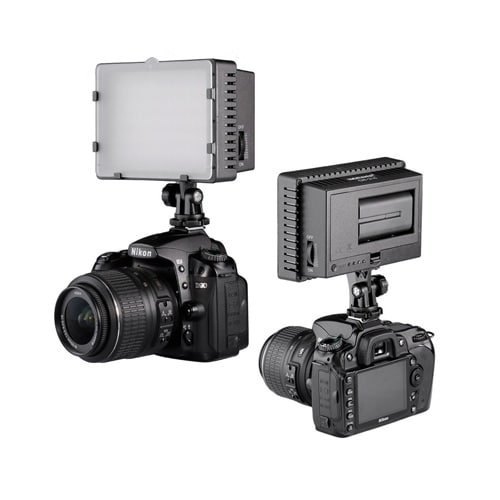
5. Neewer 160 LED CN-160 Dimmable Ultra High Power Panel
This light is Neewer’s cheaper version of the CN-216. Instead of having 216 LED light bulbs, this light has 160 LED light bulbs. Other than the number of light bulbs, the two light panels are pretty much the same.
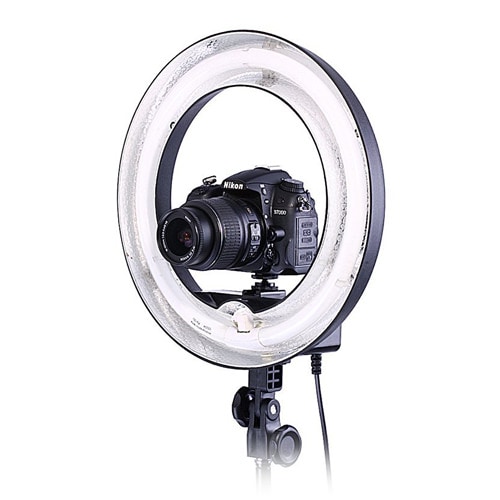
List of the Top 5 Best LED Ring Lights
LED ring lights are called ring lights because of their ring-like shape. The opening in the ring allows you to position your camera right in the center of this lighting equipment. These lights are great if you don’t have a lot of space.
1. Diva Ring Light Super Nova
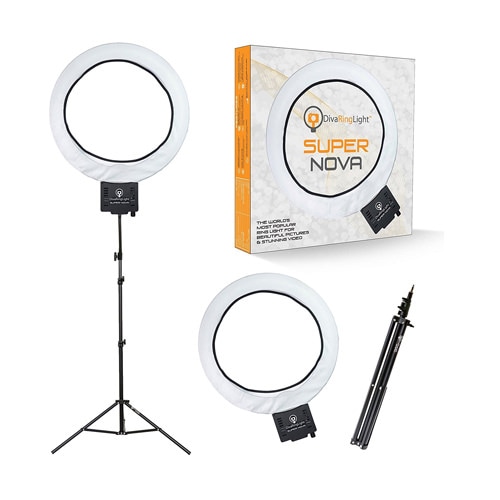
The Diva ring light is a great ring light for divas, make-up artists, and anyone else wanting to look good right in front of the camera! This LED ring light has a dimming knob so that you can adjust the brightness of your light. It also comes with a cloth for you to diffuse your light (so that your light will be softer) and a gooseneck and z-bracket attachment if you want to use your camera and ring light with just one tripod.
2. Prismatic Halo Ring Light
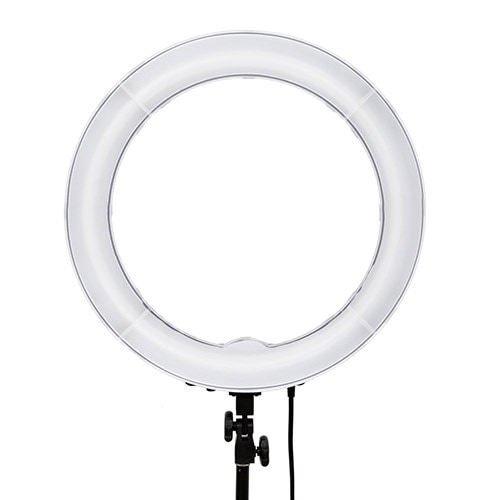
The Prismatic Halo ring light is another great ring light option. It comes with a canvas travel bag, making it easier to store away or take around with you. The 110-120 VAC, 5400K light bulb produces light that can be dimmed as well. The Prismatic Halo Ring kit doesn’t include a light stand.
3. Neewer Dimmable 18” Ring Light
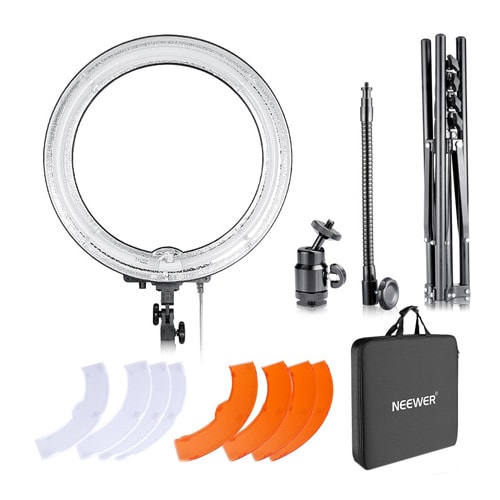
The 18-inch light ring uses fluorescent light. In addition, this kit includes a 59-inch light stand as well as white and orange filters and a hot shoe adapter that extends the capabilities of this affordable LED ring light kit.
4. FalconEyes DVR-300
With 300 pcs LED and 150 yellow color and 150 white-color lights, FalconEyes DVR-300 is one of the best ring lights currently available on the market. It also features two control dials that enable you to adjust the color of the light the device produces and a white diffuser that makes the light softer.
5. Neewer 14″ Ring Light
The 10-inch inner rim diameter may seem small when compared with larger ring lights that offer more room to operate. The Neewer Camera Ring Light is undimmable and has 50W power. The ring light uses an AC adapter, which makes it difficult to use when filming outside of a studio.
List of the Top 2 Best Softbox Video Lights
A softbox is commonly used by photographers and videographers to simulate natural light. This effect is achieved with the aid of a diffusion panel that is placed around the light source that produces continuous light. Softboxes are often less expensive than other professional lighting equipment which makes them a great option if you are working on a budget.
1. StudioFX 2400 Watt Softbox
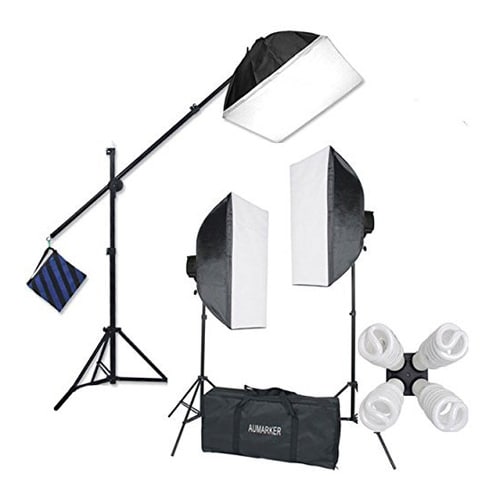
This lighting system contains two 16x24-inch softboxes and an overhead hair light boom softbox. The stands for all three softboxes are included in the kit. Each light head is capable of holding up to four bulbs.
2. Fancierstudio 2400 Watt Professional Lighting Kit
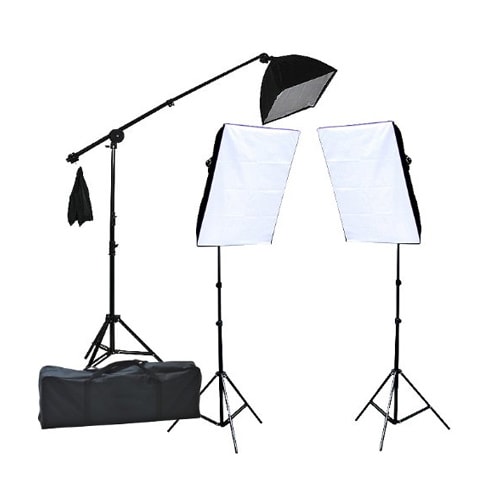
This is a standard light setup you want to use when recording interviews, product reviews, or vlogs. It contains two 16x24-inch and one 16x16-inch softbox light that all have their own stands. Each lighthead can hold four 5500K fluorescent or daylight bulbs that are perfectly suited for work in studio conditions.
List of the Top 5 Best Umbrella Video Lights
Unlike ring lights or softboxes that provide directional light, the umbrella video lights basically bounce the light off a reflecting surface onto a subject and enable you to get a more balanced light in your videos. They are often combined with other lighting equipment to create natural scenes without hard shadows.
1. LimoStudio 700W Photography Softbox Light Lighting Kit
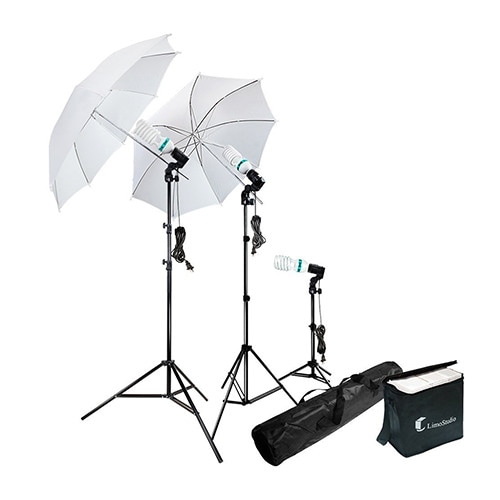
In addition to three lamps (two white umbrellas with 86-inch light stands and one 28-inch light stand), this kit also comes with three 45W CFL bulbs. The lamps can be tilted upward or downward, so you can find the best light position for your shot. The 9-foot cords can be used with standard 110/120V USA sockets.
2. Neewer 8.5ft x 10ft Background With 600W Umbrella Kit
Besides featuring two umbrellas and two softboxes, this kit also includes a 6x9 feet background that is perfectly suited for video production in a home-based studio. This umbrella kit uses 45W bulbs that generate natural light and have an approximate color value of 5500K. However, both umbrellas and softboxes can hold just one bulb.
3. Emart 600W Studio Photography Photo/Video Portrait Kit
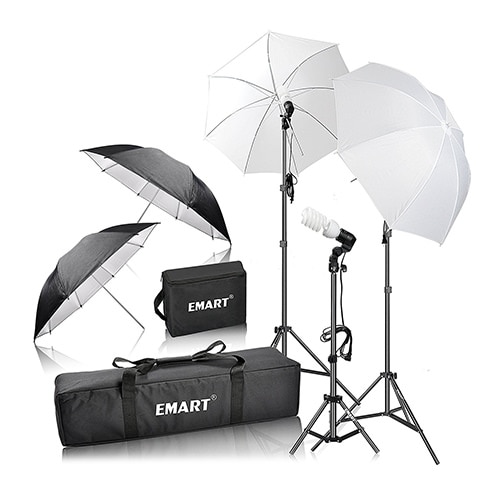
Chances are that you won’t need much more than what this photo/video kit has to offer. Emart’s 600W kit includes two white and two black/silver 33-inch umbrellas as well as two 83-inch light stands and a smaller 33-inch light stand. The heavy-duty carry case can store the entire kit.
4. LINCO 600W Photography/Video Continuous Lighting Kit
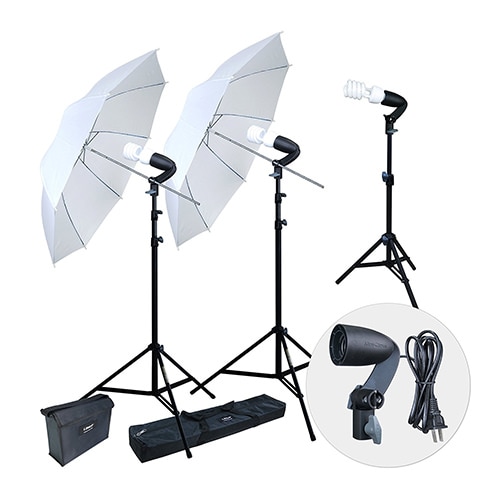
The Linco 600W continuous lighting kit contains two white translucent umbrellas that generate soft light, which is quite useful if you want to get even skin tones in your videos. The kit has three lamps that use 5500K 40W bulbs and light stands you can easily carry to any filming location.
5. Emart 1575W Umbrella Lighting Kit With Translucent White & Black/Silver & Black/Gold
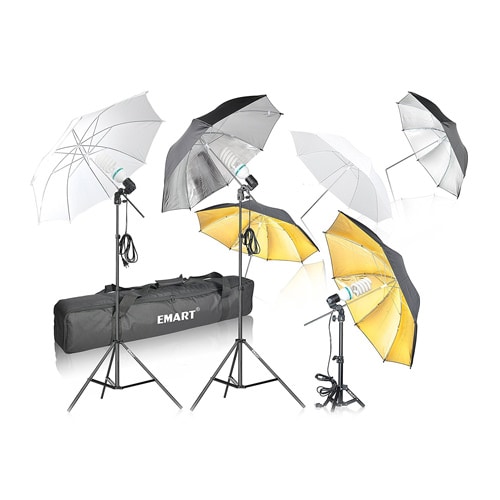
The greatest advantage of this Emart 1575 W Lightning kit is the three pairs of 33-inch diameter translucent/white, black/silver, and black/gold umbrellas. The 105W daylight bulbs provide enough light to work even under the most difficult light conditions, while the lightweight stands enable you to use this kit outside of your studio.
Besides the best lighting equipment, we have also summarized some tips and tricks for lighting , you should check it as well. If you find the video lighting isn’t good after recording the video, you can still improve it by adjusting brightness in post-production. Wondershare Filmora video editor features the Auto enhance feature, which can adjust the video color and brightness with one click. You can download the free trial to try it out.


Richard Bennett
Richard Bennett is a writer and a lover of all things video.
Follow @Richard Bennett
Richard Bennett
Mar 27, 2024• Proven solutions
Great lighting is important if you want people to watch your YouTube videos from start to finish. Viewers want to be able to see you clearly and will click away if they cannot. Natural light works great, and it’s cheap, so if it is possible you might want to consider vlogging outside. Of course, not every type of vlog is suited to the outdoors.
Unfortunately, it is unlikely you will be able to get good quality light from the lamps and ceiling lights in your home. Floor lamps can be useful for filling shadows or backlighting but are not usually powerful enough to use as your main light. Natural light is, so one way you can get around needing a lot of lighting equipment is to use a window as your main light. This is not always possible, though. If you are going to vlog from inside your house then there is a good chance you will need to invest in some lighting equipment.
- Part 1: Best Types of Lightning Equipment for YouTube Videos
- Part 2: What Should Good Lighting Equipment Feature?
- Part 3: Best Lights and Lighting Equipment for YouTube Video Shooting
Part 1: Best Types of Lightning Equipment for YouTube Videos
Every video no matter how long or short depends on light, more than anything else. The natural light sources are often not powerful enough to light a scene you’re trying to capture, so to avoid having to deal with underexposed footage, the best solution is to use artificial lighting. Even if you want the light in your video to be completely natural, you still have to figure out a way to get rid of shadows, which brings us back to different types of lighting equipment that can be used to increase the quality of the footage you’re producing.
1. Softbox Lights
Shooting videos with only natural light will put a lot of challenges in front of you, and the best way to overcome them is to use softbox lights. These natural light emulators mimic the natural light by using diffusion panels to make the light look softer and less artificial.
Softbox lights enable you to direct light to the exact spot in the shot, and they make lighting subjects and particular parts of a scene much easier. Softboxes are available in all shapes and sizes at very reasonable prices, and they are a standard part of the equipment used for the production of YouTube videos.
2. Umbrella Lights
The newcomers to the world of YouTube video production are going to love using these lights. The umbrella lights provide a much broader source of light than the softbox lights and they are frequently used to light the entire scene. You can also add extra light on the video’s subject if you’re looking to get a more balanced shot.
They are portable and quite handy if you often shoot in different locations since you can easily pack and carry them to wherever you plan on shooting your next YouTube video.
3. Ring Lights
Although they are most frequently used for fashion and beauty videos, ring lights are a great option whenever you need to make sure that the subjects of the video are perfectly lit. These circular lights have an amount in the center, so the camera’s point of view is identical to the direction from which the light is coming.
Ring lights are powerful enough to provide light for an entire scene, and they also work nicely as a catch or fill light. Some of the most popular YouTubers like Casy Neistat or PewDiePie use ring lights in their videos.
Part 2: What Should Good Lighting Equipment Feature?
Now that you know which types of lights are commonly used on YouTube video sets, you can start looking at models that best fit your demands. There are thousands of different studio lights on the market, but only the best offer features that make the light setup process easier and faster. So before buying your lighting equipment, you should make sure that it has the following features.
1. Adjustable Beam Spread
The equipment you use should allow you to control how wide the light is spreading. This is particularly useful when you want to light just one subject in the shot while keeping the rest in the dark. Lights with an adjustable beam spread to give you versatility and enable you to adapt to a wider range of scenes.
2. The Height of the Light Stand
Most lighting kits include stands, but not all stands allow you to change the height at which the light is positioned. This can largely limit your options on the set, which is why you need to check if the stand is adjustable. You’ll also want to do a background check on the stand’s durability, because low-quality stands may cause damage to the lights and other equipment.
3. Portability
How portable your lighting equipment should be is directly related to the genre of YouTube videos you want to produce. If you are planning on shooting in studio conditions, then portability is not such an important factor, but if you want to shoot at a different location every day then portability becomes something you simply must consider.
4. Accessories
Most lightning kits include a number of handy accessories that help you achieve better results. Reflectors, barn doors, diffusers, scrims, and mounting accessories are all commonly featured in high-quality lighting kits, and you shouldn’t buy a kit that doesn’t offer at least some of the accessories we mentioned here.
5. All About Reflectors/Diffusers
White reflectors are used to simply bounce light. Silver reflectors make light a bit colder-looking, and gold reflectors give things a slightly warmer, more glamourous, look. Black and translucent ‘reflectors’ are not really for bouncing light. The black reflector blocks light, which is useful if you are trying to focus your main light so it is only lighting you and not everything behind you. The translucent reflector is actually a diffuser. Diffusers are usually set up between you and your main light to soften it and make it easier on your eyes.
Reflectors are used to bounce light towards your subject. They are great for filling shadows created by your main light. This reflector is five reflectors in one: silver, gold, black, white, and translucent.
Part 3: Best Lights and Lighting Equipment for YouTube Videos
Consumer-level camera sensors are nowhere close to being as sensitive to light as our eyes. So a scene that may look sufficiently lit to our eyes may be too dark for the camera. When you’re shooting video indoors, you’ll need additional lighting equipment. Here are some of the top seventeen best lighting equipment for YouTubers.
List of the Top 5 Best On-Camera LED Lights
What is an On-Camera LED Light?
On-Camera LED lights are LED lights that can be mounted directly onto your camera’s hot/cold shoe (the little bracket on the top of a lot of DSLR cameras). On-camera LED lights are great for on-the-go YouTubers and YouTubers short on recording space because these lights are small and portable.
1. Julius Studio 160 LED Light with 4 Color Filters
The Julius Studio 160 LED light not only can be mounted on any digital camera that has a hot/cold shoe but it can also be mounted on light stands so you can keep the same light setting even if you are moving the camera around. This lighting equipment also comes with four color filters so that you can control the color temperature of your light.
2. Viltrox L116B highest RA CRI95 LED Light Panel
The VILTROX L116B LED light panel is a powerful piece of on-camera lighting equipment. As you can see from the back view of this light panel, you can see how much battery you have left as well as digitally set the color temperature of your light. It also features PWM light adjustment technology that reduces power consumption. As this equipment comes with an AC adapter, you can choose to use this outdoors or indoors.
3. Chromo Inc CI55000230 Macro Ring 48 LED Power Light
If you’re looking for an on-camera ring light, Chromo Inc’s macro ring light is a great option. This ring light mounts onto the lens of your SLR camera and its power source (two AA batteries) attaches to your camera’s hot/cold shoe. Get that nice-looking ring light reflection in your eyes as you film with this portable ring light!
4. Neewer CN-216 216PCS LED Dimmable Ultra High Power Panel
The Neewer 216 PCS LED dimmable light panel is powerful lighting equipment at a cheap price. You can adjust the color temperature of this light from 3200K up 5400K. This piece of equipment is only battery-powered, but you do have the option to either use six AA batteries or specific Sony NP series batteries, or Panasonic CGR-D16S rechargeable batteries.
5. Neewer 160 LED CN-160 Dimmable Ultra High Power Panel
This light is Neewer’s cheaper version of the CN-216. Instead of having 216 LED light bulbs, this light has 160 LED light bulbs. Other than the number of light bulbs, the two light panels are pretty much the same.
List of the Top 5 Best LED Ring Lights
LED ring lights are called ring lights because of their ring-like shape. The opening in the ring allows you to position your camera right in the center of this lighting equipment. These lights are great if you don’t have a lot of space.
1. Diva Ring Light Super Nova
The Diva ring light is a great ring light for divas, make-up artists, and anyone else wanting to look good right in front of the camera! This LED ring light has a dimming knob so that you can adjust the brightness of your light. It also comes with a cloth for you to diffuse your light (so that your light will be softer) and a gooseneck and z-bracket attachment if you want to use your camera and ring light with just one tripod.
2. Prismatic Halo Ring Light
The Prismatic Halo ring light is another great ring light option. It comes with a canvas travel bag, making it easier to store away or take around with you. The 110-120 VAC, 5400K light bulb produces light that can be dimmed as well. The Prismatic Halo Ring kit doesn’t include a light stand.
3. Neewer Dimmable 18” Ring Light
The 18-inch light ring uses fluorescent light. In addition, this kit includes a 59-inch light stand as well as white and orange filters and a hot shoe adapter that extends the capabilities of this affordable LED ring light kit.
4. FalconEyes DVR-300
With 300 pcs LED and 150 yellow color and 150 white-color lights, FalconEyes DVR-300 is one of the best ring lights currently available on the market. It also features two control dials that enable you to adjust the color of the light the device produces and a white diffuser that makes the light softer.
5. Neewer 14″ Ring Light
The 10-inch inner rim diameter may seem small when compared with larger ring lights that offer more room to operate. The Neewer Camera Ring Light is undimmable and has 50W power. The ring light uses an AC adapter, which makes it difficult to use when filming outside of a studio.
List of the Top 2 Best Softbox Video Lights
A softbox is commonly used by photographers and videographers to simulate natural light. This effect is achieved with the aid of a diffusion panel that is placed around the light source that produces continuous light. Softboxes are often less expensive than other professional lighting equipment which makes them a great option if you are working on a budget.
1. StudioFX 2400 Watt Softbox
This lighting system contains two 16x24-inch softboxes and an overhead hair light boom softbox. The stands for all three softboxes are included in the kit. Each light head is capable of holding up to four bulbs.
2. Fancierstudio 2400 Watt Professional Lighting Kit
This is a standard light setup you want to use when recording interviews, product reviews, or vlogs. It contains two 16x24-inch and one 16x16-inch softbox light that all have their own stands. Each lighthead can hold four 5500K fluorescent or daylight bulbs that are perfectly suited for work in studio conditions.
List of the Top 5 Best Umbrella Video Lights
Unlike ring lights or softboxes that provide directional light, the umbrella video lights basically bounce the light off a reflecting surface onto a subject and enable you to get a more balanced light in your videos. They are often combined with other lighting equipment to create natural scenes without hard shadows.
1. LimoStudio 700W Photography Softbox Light Lighting Kit
In addition to three lamps (two white umbrellas with 86-inch light stands and one 28-inch light stand), this kit also comes with three 45W CFL bulbs. The lamps can be tilted upward or downward, so you can find the best light position for your shot. The 9-foot cords can be used with standard 110/120V USA sockets.
2. Neewer 8.5ft x 10ft Background With 600W Umbrella Kit
Besides featuring two umbrellas and two softboxes, this kit also includes a 6x9 feet background that is perfectly suited for video production in a home-based studio. This umbrella kit uses 45W bulbs that generate natural light and have an approximate color value of 5500K. However, both umbrellas and softboxes can hold just one bulb.
3. Emart 600W Studio Photography Photo/Video Portrait Kit
Chances are that you won’t need much more than what this photo/video kit has to offer. Emart’s 600W kit includes two white and two black/silver 33-inch umbrellas as well as two 83-inch light stands and a smaller 33-inch light stand. The heavy-duty carry case can store the entire kit.
4. LINCO 600W Photography/Video Continuous Lighting Kit
The Linco 600W continuous lighting kit contains two white translucent umbrellas that generate soft light, which is quite useful if you want to get even skin tones in your videos. The kit has three lamps that use 5500K 40W bulbs and light stands you can easily carry to any filming location.
5. Emart 1575W Umbrella Lighting Kit With Translucent White & Black/Silver & Black/Gold
The greatest advantage of this Emart 1575 W Lightning kit is the three pairs of 33-inch diameter translucent/white, black/silver, and black/gold umbrellas. The 105W daylight bulbs provide enough light to work even under the most difficult light conditions, while the lightweight stands enable you to use this kit outside of your studio.
Besides the best lighting equipment, we have also summarized some tips and tricks for lighting , you should check it as well. If you find the video lighting isn’t good after recording the video, you can still improve it by adjusting brightness in post-production. Wondershare Filmora video editor features the Auto enhance feature, which can adjust the video color and brightness with one click. You can download the free trial to try it out.
Richard Bennett
Richard Bennett is a writer and a lover of all things video.
Follow @Richard Bennett
Quick Record & Publish: Screen Images for Mac/PC and YouTube
10 Record Screen and Upload to YouTube Tools [PC, Mac, Online]
Richard Bennett
Mar 27, 2024• Proven solutions
Recording the screen, including the audio, can help you introduce your gaming flow, show how to perform a task on the computer, or create a presentation. You can also upload the screen record to YouTube for free. There are several solutions if you want to record your screen and upload it to YouTube. You can record the screen with some screen recording software on your Mac or your Windows PC or with some online screen recording software or the screen recording feature built-in YouTube itself. In this article, we will show you how to to record screens and upload to YouTube on Windows and Mac with some screen recorders , some of which are free to use, or freemium, which are built in your computer. Check it out now.
- Part 1: Record Screen and Upload to YouTube Directly on PC
- Part 2: Record Screen and Upload to YouTube Online
- Part 3: Record Screen and Upload it to YouTube on Mac
Recommended YouTube Screen Recorders to Record Screen and Upload to YouTube Directly [Windows & Mac]
The following YouTube screen recording software can be used on both Windows and Mac computers. You can record the entire screen or a particular portion of the screen, record your own voiceover or add music to the recorded video and then upload it to YouTube directly.
Using Wondershare Filmora
Filmora is an easy-to-use yet powerful enough video editing software which features the Recording tools. Using Filmora, you can record the desktop screen , audio and webcam simultaneously. But compared with Filmora, the highest frame rates that Filmora can capture at 1 second is 60FPS.

Launch Wondershare Filmora and choose Full Feature mode to begin a project. Go to the Record tab and choose Record PC Screen. There are three types of screen recording to choose from – Target Window, Full Screen and Custom. You can also choose to record computer system audio or record from microphone. Click the icons to turn them off or on accordingly. Click Settings to see if there’s anything you need to adjust before recording.
Download Mac Version ](https://tools.techidaily.com/wondershare/filmora/download/ )
The recorded footage will be loaded to the Media panel directly, you can then cut out imperfect frames, add some texts and titles, or apply transitions and filters to it. To upload the recorded screen video, click the Export in the main interface, and then switch to YouTube tab in the Export window.

Sign in your YouTube account and complete the video info accordingly and then click the Export button to upload the recorded video to YouTube directly.
If you are looking for more screen recorders which can run on Windows, Mac, Linux, Android, iOS or online for different purposes, you can check our picks of the best screen recorders for all platforms based on different purposes.
Part 1: How to Record Screen on Windows PC and Upload to YouTube Directly
1. Bandicam
To record screen using Bandicam, select “Screen Recording” and a green-edged rectangle window will appear. Adjust the rectangle window on the video then play the video.
Clicking the REC button will change the green-edged line of the rectangle window to red. Click the stop button to stop recording. To watch the recorded video, go to the “General” tab and click “Open.”
You can also upload your desired videos to YouTube from Bandicam by clicking the “Upload” button found under Bandicam’s “Output” tab.

2. Using Microsoft Expression Encoder 4
You can download Microsoft Expression Encoder 4 to record the screen of your device and upload it to YouTube. The software has a screen capture tool and encoder. Install the software as you would usually do. There’ll be 2 shortcuts in the start menu – Microsoft Expression Encoder 4 Screen Capture (used to capture the screen) and Microsoft Expression Encoder 4 (converts the screen into a video that can be uploaded to YouTube).
3. Using Ezvid
Ezvid can record screen and audio simultaneously. It can also capture the whole area of the screen, making it perfect for tutorial videos. Ezvid also has speech synthesis that translates text captions into artificial human language, so it can easily produce human sound with only a click of a button.
4. Using Smartpixel
Smartpixel is a screen recorder for Android and Windows. It has a user-friendly interface and different editing as well as recording functions. Smartpixel can export various video formats such as 3gp, MP4, wmv, avi and flv. It also allows you to upload videos to different online platforms like GoPlay and YouTube.
Part 2: How to Record Screen Online
1. Using YouTube
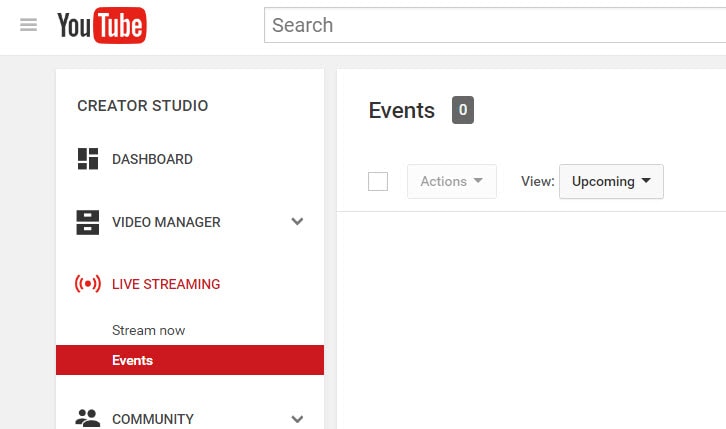
You can now also record desktop screen with the features in YouTube. To start recording the screen using YouTube, you just need to sign-in to the website using your Google Account. Click “Creator Studio”. Go to Live Streaming and choose “Events”. You’ll be directed to the “Create Event” page. Provide the title for your screencast video, set the video’s privacy to either Private or Unlisted.
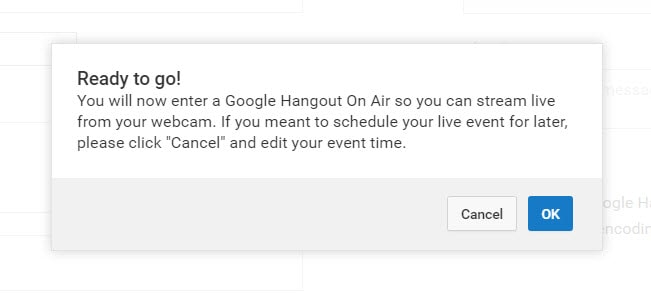
Click “Go Live Now” The Hangouts on Air page will open. Start the webcam from recording by clicking the camera icon. If you don’t want to record audio, you can just click the microphone icon.
Click “Screenshare” and choose a desktop window that you want to record for the screencast. Click “Start Screenshare” to share the screen then click the “Start Broadcast” button to begin recording the screen. When you’re done recording, just “Stop Broadcast” and go to the YouTube website. The new screencast video is stored in your YouTube video dashboard. You can share the video or download it to your Google Drive.
For more details, you can check How to record YouTube videos . If you’re looking for more online screen recorders for YouTube, you can check our picks of the 10 Best Free Online Screen Recorders .
2. Using FlexClip - Free Online Screen Recorder
FlexClip is a complete bundle of creativity. Why so? It is because it’s a web-based tool that helps you with image and video editing and post-production. It also offers a free online screen recording option.
FlexClip lets you record your webcam, screen, and audio with a simple click. Contrarily, you can also record simultaneous screens without a hitch! It can record almost anything that is being displayed on your computer screen. So be it gameplays, seminars, courses, presentations, or anything, you can always use this program to save your recording.
And once you’re done capturing the screen, FlexClip also allows you to edit your recording. You can add subtitles, highlights, overlays, and annotations to increase your video’s worth. So no wonder why FlexClip is one of the leading web-based software for free online screen capturing, especially if you want to make great YouTube videos.
The recording process is easy. All you need to do is visit the website and click the “Start Recording” button.
Then, choose your layout to start recording the screen and audio. When you’re finished, just hit the “Stop” button to end recording to edit the video in FlexClip’s built-in video editor. Lastly, download the screencast to upload it to your YouTube channel.
3. Using Apowersoft - Online Screen Recorder (Free)
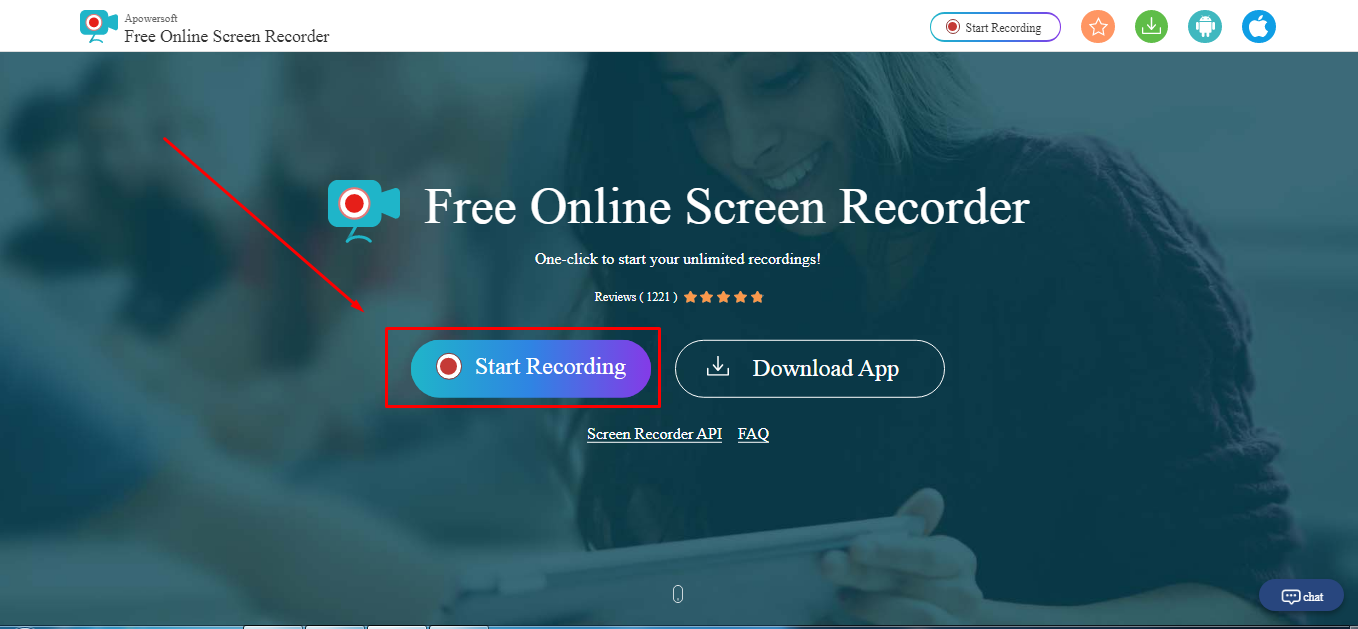
Apowersoft is a renowned company that creates digital products, including file compressors, watermark removers, and more. Since there’s a growing demand for screen recorders for YouTube, the Apowersoft creators have also launched a “Free Online Screen Recorder.” Yup! You’re reading the right name.
Apowersoft – Free Online Screen Recorder eases the screen recording process. While it’s an online tool, you can also download the app on your Mac or Windows OS.
It’s a free program with simple features, such as a screen and webcam recording with audio. So if your YouTube content doesn’t require overlays, subtitles, or other editing stuff, this software is ideal due to its simplicity.
You can click the “Start Recording” button to get started.
.
Then, select the screen you wish to record, and save the captured screen to your local disk or cloud so you can upload the videos later to your YouTube channel.
Part 3: How to Record Screen for YouTube with Free Screen Recorder on Mac
1. Using QuickTime Player
QuickTime Player can be used to record movies from your camera or the screen of your iPad, iPod touch or iPhone. It can also record your Mac’s screen or record audio from your microphone. To record the screen of your Pad, iPod touch or iPhone, you should use the movie-recording function. You can use it to record the screen for YouTube video, or you can also record the YouTube video and empower it with your creativity.
For more details of using QuickTime Player to record YouTube videos, check our guide: How to record videos with Quicktime.
2. Using Screen Flow
Screen Flow is our second pick for Mac. Although it’s paid software, you can still enjoy the blessings of this screen recorder through the trial version. It’s a very handy tool that allows Mac screen recording and all iOS devices, such as iPhones and iPad.
Okay! So what’s good about screen flow? Let’s uncover. Firstly, it’s an editor + screen recorder specifically made for YouTube. You can capture the screen and edit the footage before uploading it to your channel.
Secondly, this software allows you to record simultaneous screens and your webcam. Plus, you can also record your voice through its mic recording option.
Another great thing about Screen Flow is that it has numerous video filters and a customizable title library. It also permits you to save screen recordings on your Mac or directly share them to your YouTube channel, other social media accounts, websites, or cloud storage in a few clicks.
Here’s a video to help you get started with screen recording on your Mac using Screen Flow:
3. Using Vmaker
Vmaker is another authentic software to record screens for your YouTube videos. It’s a free program, but you can buy premium versions to unlock more features.
The tool is trusted by many software review websites, such as “crozdesk.” It is available on both Mac and Windows OS. However, it seems like this software performs well on Mac operating systems.
Vmaker allows you to record your screen, your favorite YouTube videos, and the audio – all together! You can record the entire Mac screen or a specific portion in HD quality. Moreover, the software allows you to pick resolutions up to 4K to record the media.
This program also offers editing features like adding subtitles, music, flip, blur, trim, and more to create an awesome video. All videos are saved to your cloud workspace once you finish recording. Then, you can share the recorded video screens on your YouTube.
The tool is ideal for making tutorials, courses, demos, and product review videos. All you need to do is download Vmaker on your Mac. Choose a webcam, screen, or both with audio for recording. Start recording in the highest quality. Edit your video and share it on your YouTube channel.
Conclusion
Above are some screen recorders that you can use to record YouTube videos or record the screen and webcam simultaneously to make a video and upload it it to YouTube. If you want to record a screen video and edit it further, you should try Wondershare Filmora video editor.
Download Mac Version ](https://tools.techidaily.com/wondershare/filmora/download/ )
FAQs
Q1. How do you record your screen on a Mac for YouTube?
There are some great tools for screen recording on Mac for YouTube. The most loved and enjoyed program is Filmora by Wondershare. It’s a professional tool for screen recording and video editing. Most importantly, it has a user-friendly interface and records your screen in high quality.
Another option is the Quick Time Player. This program also allows screen recording. Likewise, Screen Flow is also a great program for screen capturing for YouTube on Mac.
Q2. Can I screen-record and upload it to YouTube?
There are two ways to do it. First, you can download the free or paid screen recording software on your Windows or macOS. Second, you can look for online screen recorders like FlexClip or the built-in YouTube recorder and directly share the recorded video to your channel.
Some tools, like Apowersoft and Vmaker, save screen recordings to the cloud or local disk. And there’s no direct sharing of the recorded screens to your YouTube channel. So if you’re using such programs, you will need to sign in to your YouTube channel and upload the file from your computer hard drive.
Q3. How do I record my computer screen for 2022?
Some of the greatest video editing and screen recording tools like Filmora, Bandicam, and FlexClip allow you to record your computer screen. Depending on the software, you can directly share the video to your YouTube channel. Or, save the video on your computer and then upload it on your channel.
Richard Bennett
Richard Bennett is a writer and a lover of all things video.
Follow @Richard Bennett
Richard Bennett
Mar 27, 2024• Proven solutions
Recording the screen, including the audio, can help you introduce your gaming flow, show how to perform a task on the computer, or create a presentation. You can also upload the screen record to YouTube for free. There are several solutions if you want to record your screen and upload it to YouTube. You can record the screen with some screen recording software on your Mac or your Windows PC or with some online screen recording software or the screen recording feature built-in YouTube itself. In this article, we will show you how to to record screens and upload to YouTube on Windows and Mac with some screen recorders , some of which are free to use, or freemium, which are built in your computer. Check it out now.
- Part 1: Record Screen and Upload to YouTube Directly on PC
- Part 2: Record Screen and Upload to YouTube Online
- Part 3: Record Screen and Upload it to YouTube on Mac
Recommended YouTube Screen Recorders to Record Screen and Upload to YouTube Directly [Windows & Mac]
The following YouTube screen recording software can be used on both Windows and Mac computers. You can record the entire screen or a particular portion of the screen, record your own voiceover or add music to the recorded video and then upload it to YouTube directly.
Using Wondershare Filmora
Filmora is an easy-to-use yet powerful enough video editing software which features the Recording tools. Using Filmora, you can record the desktop screen , audio and webcam simultaneously. But compared with Filmora, the highest frame rates that Filmora can capture at 1 second is 60FPS.
Launch Wondershare Filmora and choose Full Feature mode to begin a project. Go to the Record tab and choose Record PC Screen. There are three types of screen recording to choose from – Target Window, Full Screen and Custom. You can also choose to record computer system audio or record from microphone. Click the icons to turn them off or on accordingly. Click Settings to see if there’s anything you need to adjust before recording.
Download Mac Version ](https://tools.techidaily.com/wondershare/filmora/download/ )
The recorded footage will be loaded to the Media panel directly, you can then cut out imperfect frames, add some texts and titles, or apply transitions and filters to it. To upload the recorded screen video, click the Export in the main interface, and then switch to YouTube tab in the Export window.
Sign in your YouTube account and complete the video info accordingly and then click the Export button to upload the recorded video to YouTube directly.
If you are looking for more screen recorders which can run on Windows, Mac, Linux, Android, iOS or online for different purposes, you can check our picks of the best screen recorders for all platforms based on different purposes.
Part 1: How to Record Screen on Windows PC and Upload to YouTube Directly
1. Bandicam
To record screen using Bandicam, select “Screen Recording” and a green-edged rectangle window will appear. Adjust the rectangle window on the video then play the video.
Clicking the REC button will change the green-edged line of the rectangle window to red. Click the stop button to stop recording. To watch the recorded video, go to the “General” tab and click “Open.”
You can also upload your desired videos to YouTube from Bandicam by clicking the “Upload” button found under Bandicam’s “Output” tab.
2. Using Microsoft Expression Encoder 4
You can download Microsoft Expression Encoder 4 to record the screen of your device and upload it to YouTube. The software has a screen capture tool and encoder. Install the software as you would usually do. There’ll be 2 shortcuts in the start menu – Microsoft Expression Encoder 4 Screen Capture (used to capture the screen) and Microsoft Expression Encoder 4 (converts the screen into a video that can be uploaded to YouTube).
3. Using Ezvid
Ezvid can record screen and audio simultaneously. It can also capture the whole area of the screen, making it perfect for tutorial videos. Ezvid also has speech synthesis that translates text captions into artificial human language, so it can easily produce human sound with only a click of a button.
4. Using Smartpixel
Smartpixel is a screen recorder for Android and Windows. It has a user-friendly interface and different editing as well as recording functions. Smartpixel can export various video formats such as 3gp, MP4, wmv, avi and flv. It also allows you to upload videos to different online platforms like GoPlay and YouTube.
Part 2: How to Record Screen Online
1. Using YouTube
You can now also record desktop screen with the features in YouTube. To start recording the screen using YouTube, you just need to sign-in to the website using your Google Account. Click “Creator Studio”. Go to Live Streaming and choose “Events”. You’ll be directed to the “Create Event” page. Provide the title for your screencast video, set the video’s privacy to either Private or Unlisted.
Click “Go Live Now” The Hangouts on Air page will open. Start the webcam from recording by clicking the camera icon. If you don’t want to record audio, you can just click the microphone icon.
Click “Screenshare” and choose a desktop window that you want to record for the screencast. Click “Start Screenshare” to share the screen then click the “Start Broadcast” button to begin recording the screen. When you’re done recording, just “Stop Broadcast” and go to the YouTube website. The new screencast video is stored in your YouTube video dashboard. You can share the video or download it to your Google Drive.
For more details, you can check How to record YouTube videos . If you’re looking for more online screen recorders for YouTube, you can check our picks of the 10 Best Free Online Screen Recorders .
2. Using FlexClip - Free Online Screen Recorder
FlexClip is a complete bundle of creativity. Why so? It is because it’s a web-based tool that helps you with image and video editing and post-production. It also offers a free online screen recording option.
FlexClip lets you record your webcam, screen, and audio with a simple click. Contrarily, you can also record simultaneous screens without a hitch! It can record almost anything that is being displayed on your computer screen. So be it gameplays, seminars, courses, presentations, or anything, you can always use this program to save your recording.
And once you’re done capturing the screen, FlexClip also allows you to edit your recording. You can add subtitles, highlights, overlays, and annotations to increase your video’s worth. So no wonder why FlexClip is one of the leading web-based software for free online screen capturing, especially if you want to make great YouTube videos.
The recording process is easy. All you need to do is visit the website and click the “Start Recording” button.
Then, choose your layout to start recording the screen and audio. When you’re finished, just hit the “Stop” button to end recording to edit the video in FlexClip’s built-in video editor. Lastly, download the screencast to upload it to your YouTube channel.
3. Using Apowersoft - Online Screen Recorder (Free)
Apowersoft is a renowned company that creates digital products, including file compressors, watermark removers, and more. Since there’s a growing demand for screen recorders for YouTube, the Apowersoft creators have also launched a “Free Online Screen Recorder.” Yup! You’re reading the right name.
Apowersoft – Free Online Screen Recorder eases the screen recording process. While it’s an online tool, you can also download the app on your Mac or Windows OS.
It’s a free program with simple features, such as a screen and webcam recording with audio. So if your YouTube content doesn’t require overlays, subtitles, or other editing stuff, this software is ideal due to its simplicity.
You can click the “Start Recording” button to get started.
.
Then, select the screen you wish to record, and save the captured screen to your local disk or cloud so you can upload the videos later to your YouTube channel.
Part 3: How to Record Screen for YouTube with Free Screen Recorder on Mac
1. Using QuickTime Player
QuickTime Player can be used to record movies from your camera or the screen of your iPad, iPod touch or iPhone. It can also record your Mac’s screen or record audio from your microphone. To record the screen of your Pad, iPod touch or iPhone, you should use the movie-recording function. You can use it to record the screen for YouTube video, or you can also record the YouTube video and empower it with your creativity.
For more details of using QuickTime Player to record YouTube videos, check our guide: How to record videos with Quicktime.
2. Using Screen Flow
Screen Flow is our second pick for Mac. Although it’s paid software, you can still enjoy the blessings of this screen recorder through the trial version. It’s a very handy tool that allows Mac screen recording and all iOS devices, such as iPhones and iPad.
Okay! So what’s good about screen flow? Let’s uncover. Firstly, it’s an editor + screen recorder specifically made for YouTube. You can capture the screen and edit the footage before uploading it to your channel.
Secondly, this software allows you to record simultaneous screens and your webcam. Plus, you can also record your voice through its mic recording option.
Another great thing about Screen Flow is that it has numerous video filters and a customizable title library. It also permits you to save screen recordings on your Mac or directly share them to your YouTube channel, other social media accounts, websites, or cloud storage in a few clicks.
Here’s a video to help you get started with screen recording on your Mac using Screen Flow:
3. Using Vmaker
Vmaker is another authentic software to record screens for your YouTube videos. It’s a free program, but you can buy premium versions to unlock more features.
The tool is trusted by many software review websites, such as “crozdesk.” It is available on both Mac and Windows OS. However, it seems like this software performs well on Mac operating systems.
Vmaker allows you to record your screen, your favorite YouTube videos, and the audio – all together! You can record the entire Mac screen or a specific portion in HD quality. Moreover, the software allows you to pick resolutions up to 4K to record the media.
This program also offers editing features like adding subtitles, music, flip, blur, trim, and more to create an awesome video. All videos are saved to your cloud workspace once you finish recording. Then, you can share the recorded video screens on your YouTube.
The tool is ideal for making tutorials, courses, demos, and product review videos. All you need to do is download Vmaker on your Mac. Choose a webcam, screen, or both with audio for recording. Start recording in the highest quality. Edit your video and share it on your YouTube channel.
Conclusion
Above are some screen recorders that you can use to record YouTube videos or record the screen and webcam simultaneously to make a video and upload it it to YouTube. If you want to record a screen video and edit it further, you should try Wondershare Filmora video editor.
Download Mac Version ](https://tools.techidaily.com/wondershare/filmora/download/ )
FAQs
Q1. How do you record your screen on a Mac for YouTube?
There are some great tools for screen recording on Mac for YouTube. The most loved and enjoyed program is Filmora by Wondershare. It’s a professional tool for screen recording and video editing. Most importantly, it has a user-friendly interface and records your screen in high quality.
Another option is the Quick Time Player. This program also allows screen recording. Likewise, Screen Flow is also a great program for screen capturing for YouTube on Mac.
Q2. Can I screen-record and upload it to YouTube?
There are two ways to do it. First, you can download the free or paid screen recording software on your Windows or macOS. Second, you can look for online screen recorders like FlexClip or the built-in YouTube recorder and directly share the recorded video to your channel.
Some tools, like Apowersoft and Vmaker, save screen recordings to the cloud or local disk. And there’s no direct sharing of the recorded screens to your YouTube channel. So if you’re using such programs, you will need to sign in to your YouTube channel and upload the file from your computer hard drive.
Q3. How do I record my computer screen for 2022?
Some of the greatest video editing and screen recording tools like Filmora, Bandicam, and FlexClip allow you to record your computer screen. Depending on the software, you can directly share the video to your YouTube channel. Or, save the video on your computer and then upload it on your channel.
Richard Bennett
Richard Bennett is a writer and a lover of all things video.
Follow @Richard Bennett
Also read:
- [New] Best Screen Reporter Toolkit for YouTube Streamers
- [New] Elevating Income with Mobile Video Monetization Techniques for YouTubers
- 2024 Approved Essential Football Info YouTube Trend Infographics
- In 2024, Essential Guide 9 Cost-Free Editing Tools for Creatives
- In 2024, Essential Tips for Editing Your Videos in YouTube Studio
- 2024 Approved Early Bird Winners Youtube's Quick Favorites
- The Do's and Don’ts of YouTube Promo Video Making
- [Updated] Breaking Down TSeries' Income Strategy on YouTube Platform
- 7 Ultimate Live Streaming Apps for iPhone and Android Users on YouTube for 2024
- Optimizing Your YouTube Video Presentation
- [New] Curated List DJ Video Sources at Your Fingertips
- Affordable & Accessible The Definitive Guide to 9 Budget-Friendly Editors for 2024
- Video Mastery Start Here - Essential SEO Gadgets
- Step Into Success Mastering Tagging for Engaging Content
- In 2024, Discover the Art of Curating Music on YouTube with Our Steps
- In 2024, Bridging the Audience Gap Successful Multi-Streaming Approaches on Youtube & Twitch
- 12 Ideal Video Cameras for Aspiring and Seasoned Vloggers
- Streaming Star Status - Buttons & Growth Accolades
- Cultivate Community Interest With Collaborative Lists
- In 2024, Decoding Best Practices Navigating Through Top 9 Free Logo Creators
- In 2024, Discover 8 Trusted Platforms for Online Video Advancement
- How Much Can You Earn on YouTube via Ad Revenue?
- [New] Engaging Video Credits The Best Fonts for Thumbnails
- The Art of Refining Published Videos on YouTube
- Best YouTube Ad Creators for 2024
- [Updated] Cost-Effective Engagement Separating Paid Likes From Natural Growth
- Epicurean Education Recipe Film-Making
- [Updated] Best Android Apps YouTube Video Downloads Compared
- Join YTP2024 Strategies for Thriving on YouTube
- Convert Audio Online MP3 to YouTube Live Upload Guide for 2024
- [New] Direct Streaming From Apple Devices to YouTube
- Micro-Moments of Fame Do YouTubes Shorts or TikToks Get the Edge?
- [Updated] Boosting Visibility The Art of Crafting YouTube Channel Backlinks
- Snapshots of Sound Characters Short Musical Roles
- Creating Automated YouTube Subscribe Links for 2024
- Keywords that Captivate Enhancing Your Video Content
- [New] Beyond Indexation Understanding YouTube's Unlisted Mechanism
- 2024 Approved Earning Stream Start Small, See Big on YouTube
- Navigating the Ins and Outs of YouTube Premium
- [Updated] Best Movie Swaps Top 7 Alternate Films
- Top 15 Video Vaults for Science Buffs Online
- Are There Better Alternatives to MAGIX Samplitude for Professional Sound Design, In 2024
- Updated 2024 Approved From YouTube to MP3 How to Choose a Safe and Efficient Converter
- [Updated] In 2024, Mastering Instagram Promotions Five Key Strategies for Influencers
- Top-Ranked Internet MP3 Trimmer & Merger Tool
- Updated In 2024, Transform Your Videos Top Mobile Video Editing Apps for iPhone and Android
- How to Remove Forgotten PIN Of Your Oppo Reno 10 Pro 5G
- New In 2024, Record Your Gameplay 3 Simple and Effective Ways
- Updated Identifying Sounds of Shattered Transparency for 2024
- [Updated] 2024 Approved Exploring Vimeo Digital Content Hub
- How to Repair Broken video files of Realme Narzo N55 on Windows??
- Maximizing TV Reach with FB Live Streaming for 2024
- Updated 2024 Approved Inside Clubhouse Dissecting Its Core Ethos, Features, and Significance in the Modern Era
- [New] In 2024, Advanced Steganography in Videos Hiding the Unseen
- The Updated Method to Bypass Xiaomi Redmi 12 FRP
- [New] Pro-Level 10 Video Editors to Boost W TikToks
- In 2024, Discover the Top 5 Online Tools for Merging MP4 Files Easily and Quickly. Streamline Your Video Editing Process and Create Seamless Videos with These User-Friendly Tools
- Title: "2024 Approved 17 Best Lights and Lighting Equipment for YouTube Videos"
- Author: Kevin
- Created at : 2024-05-25 14:15:24
- Updated at : 2024-05-26 14:15:24
- Link: https://youtube-videos.techidaily.com/2024-approved-17-best-lights-and-lighting-equipment-for-youtube-videos/
- License: This work is licensed under CC BY-NC-SA 4.0.
