
:max_bytes(150000):strip_icc():format(webp)/best-time-of-day-to-instagram-3485858-1-5bb3cc9046e0fb002612537d.jpg)
"12 Top-Tier Cameras That Will Transform Your Vlogging Experience for 2024"
12 Top-Tier Cameras That Will Transform Your Vlogging Experience
Best Cameras for Vlogging

Liza Brown
Jan 10, 2024• Proven solutions
It can be challenging to make a decision on purchasing a camera when there’s just so many on the market. Camera manufacturers are racing to update their product line with all the new camera technology advancements. To simplify your search for the ultimate vlogging camera, we’ve come up with a top twelve list.
If you’re looking for a specific type of vlogging camera, check out our other posts on vlogging cameras:
Top 11 Cheap Vlogging Cameras (2024)
7 Best DSLR Cameras For Vlogging (2024)
8 Best Mirrorless Cameras For Vlogging (2024)
12 Best Vlogging Cameras With A Flip Screen (2024)
WHAT TO LOOK FOR IN A VLOGGING CAMERA
1. Fully articulated screen (flip screen)
2. Good continual autofocus while recording video
3. Good focus priority through face recognition
4. Touch to focus
5. Good low-light performance
6. external mic jack, hot/cold shoe bracket
7. optical image stabilization
8. good battery life
Check out my full list of 10 Things To Look For In A Vlogging Camera to understand the importance of these camera features.
12 BEST VLOGGING CAMERAS (2024)
| Camera | Release Date | Camera Type | Flip Screen | Mic Port | Price | |
|---|---|---|---|---|---|---|
| CanonEOSM50 |  |
February2018 | Mirrorless | Fully Articulated | Yes | $- |
| PanasonicLumixDC-GH5S | 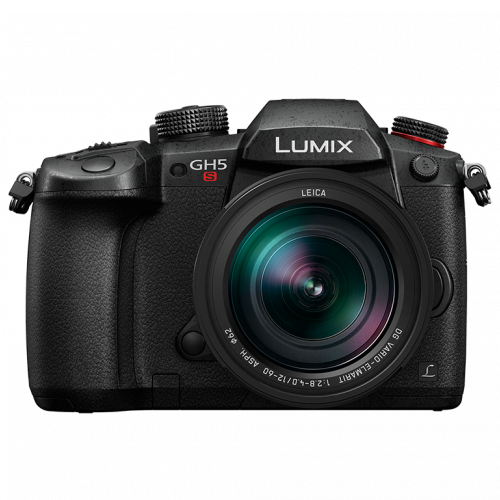 |
January2018 | Mirrorless | Fully Articulated | Yes | $$$ |
| SonyAlphaa7R III |  |
October2017 | Mirrorless | Tilting | Yes | $$$ |
| CanonEOSM100 | 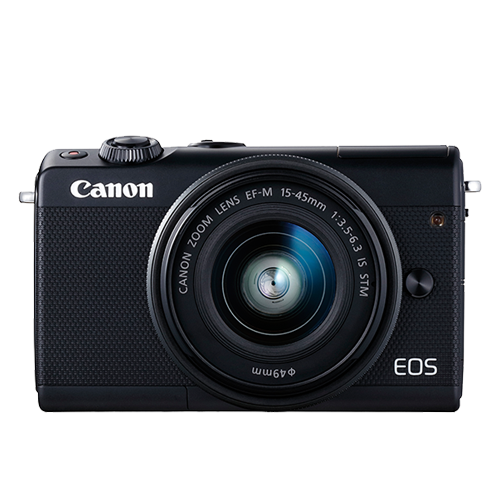 |
August2017 | Mirrorless | Flip Up | No | $ |
| CanonEOS6D Mark II | 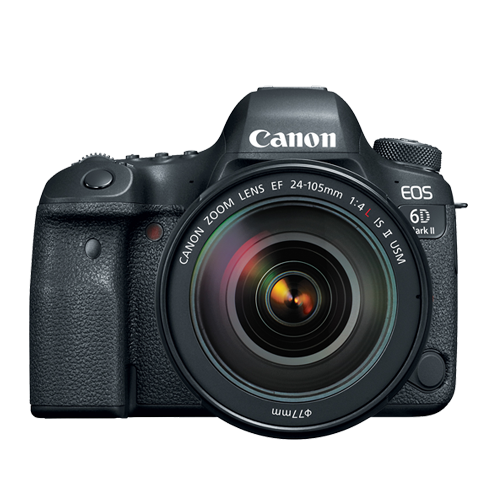 |
June2017 | Mid-size SLR | Fully Articulated | Yes | $$ |
| CanonEOS RebelSL2 | 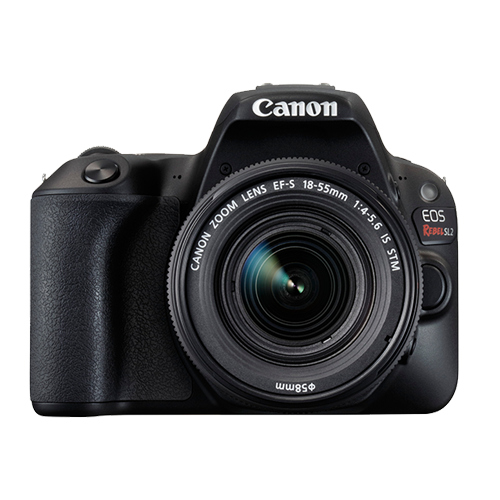 |
June2017 | Compact SLR | Fully Articulated | Yes | $ |
| CanonEOSM6 |  |
February2017 | Mirrorless | Flip Up | Yes | $ |
| SonyCyber-Shot DSCRX 100 V | 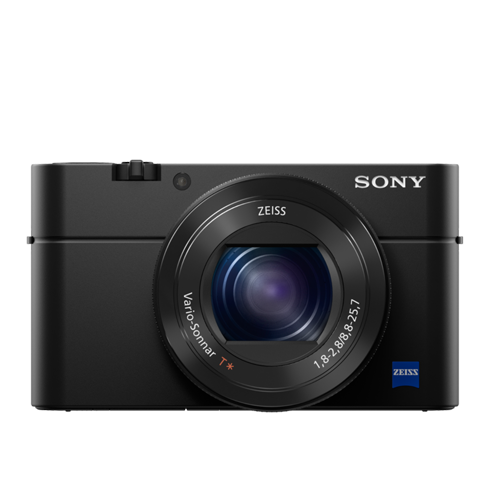 |
October2016 | Compact | Flip Up | No | $- |
| SonyAlphaa6500 |  |
October2016 | Mirrorless | Tilting | Yes | $$- |
| PanasonicLumix DMCLX10 | 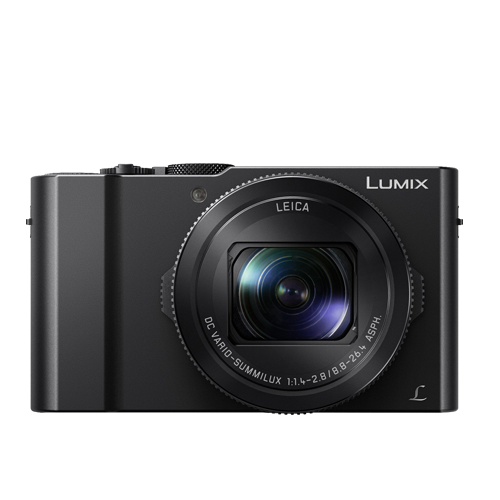 |
September2016 | Compact | Flip Up | No | $ |
| CanonEOS80D | 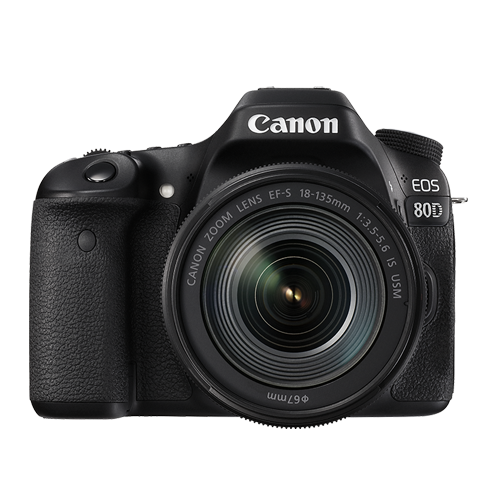 |
February2016 | Mid-size SLR | Fully Articulated | Yes | $$ |
| CanonPowerShotG7 X Mark II | 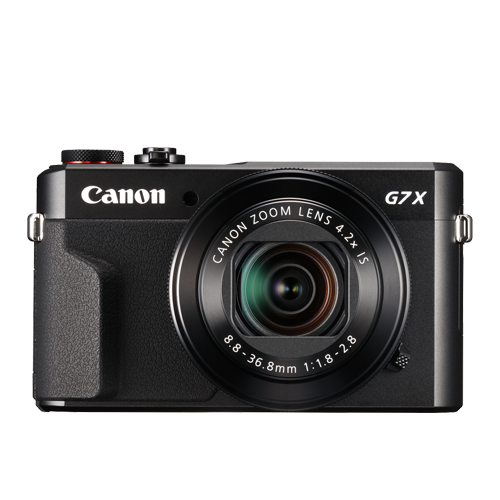 |
February2016 | Compact | Flip Up | No | $ |
At first, you can have a look at the below video.
What Gear Do Creators Actually Use | Vidcon 2023 | Sony vs Canon
|
Best daily vlogging camera: Sony Cyber-Shot DSC-RX 100 V You don’t have to be a filmmaking pro if you want to use a compact camera to record all sorts of videos. Sony’s Cyber-shot series is famous for its cutting-edge features and the DSC-RX 100 V model is not an exception. This camera is equipped with a 20.1 MP Exmor RS BSI CMOS Sensor that supports ISO sensitivities up to ISO 12800. You can record footage in UHD 4K at 30 or 24 fps, although with a five-minute limit, as well as Full HD videos at a maximum of 960 fps when recording in the HFR mode. The Sony Cyber-shot DSC-RX 100 V ships with a non-interchangeable Carl Zeiss Vario Sonnar T lens that performs well under low-light conditions and in broad daylight. The camera features a fast hybrid AF system with 315 phase-detection points and an anti-motion blur mode that allows you to keep the subjects of your vlogs in focus throughout your recording. DSC RX-100 V’s multi-functionality makes it one of the best cameras for daily vlogging, especially for vloggers who are planning on shooting vlogs in various locations. PROS - Light and easy to carry around - Produces high-res videos CONS - Short battery life - Lacking a touchscreen |
|---|---|
|
Best cheap vlogging camera: Canon EOS M100 Canon’s EOS M100 is small and powerful. This mirrorless camera produces full HD videos at 60 fps. It doesn’t, however, shoot 4K footage. The 24.2 MP APS-C CMOS sensor and the DIGIC 7 image processor ensure that your vlogs are always in focus and rich in detail. The Canon EOS M100 provides great ISO sensitivity options, offering ISO values as high as 25600, making it a great option for vloggers that often shoot their videos under difficult light conditions. The 3-inch touchscreen LCD lets you control focus points, navigate through the camera’s menu, or watch videos you’ve created. The screen can also be tilted in the upward direction to provide you a better preview of the shot you’re recording. The camera has a built-in Wi-Fi with NFC so you can transfer your videos seamlessly to a computer and have fun in the process. The Canon EOS M100 is currently one of the best entry-level cameras for daily vlogging on the market because it produces videos in great picture quality that you don’t have to spend a fortune for. PROS - Affordable - Great connectivity options CONS - Lacks advanced video recording features - No viewfinder |
|
Best entry-level mirrorless camera for vlogging: Canon EOS M100 The Canon EOS M100 wins this category as well in our books because it’s a powerful, feature-rich camera that’s also very affordable. In case you missed it, check out my review on the Canon EOS M100. |
|
Best mid-range mirrorless camera for vlogging: Canon EOS M50 The EOS M50 has been on the market for just a few months and it is already regarded as one of the best mirrorless cameras for vlogging. Its 24.1 MP APS-C CMOS sensor and DIGIC 8 Image Processor are improved versions of those in the Canon EOS M100 model. With the Canon EOS M50, you can crank up the ISO sensitivity to 51200. This camera uses the Canon EF lens mount, so you can choose the lens that best suits your needs. The Canon EOS M50 can capture UHD 4K videos at 23.98 fps, and it also lets you record 120 fps slow-motion videos at 720p. PROS - Has an external microphone port - Has a 2.36m-dot OLED electronic viewfinder CONS - No image stabilization - Battery life could be longer |
|
Best professional mirrorless camera for vlogging: Panasonic Lumix DC-GH5S The Panasonic’s GH series was made famous by the LUMIX DMC-GH4 model that will be remembered as the world’s first mirrorless interchangeable lens camera to offer the 4K video recording option. That’s why it comes as no surprise that the GH5S mirrorless micro four-thirds camera can record UHD 4K as well as DCI videos at 60 fps, and 150 Mbps. The full HD 1080p at 240 fps video recording option is also available if you want to capture slow-motion footage for your vlogs. The camera’s 10.28MP multi-aspect ratio MOS sensor enhances its low-light performance and produces high-quality videos even under very challenging lighting conditions. Recording the audio with an external microphone is one of the many advantages offered by the Lumix DC-GH5S, while the Advanced Depth-From-Focus technology is used to automatically focus the video in a fraction of a second. The GH5S’ touchscreen can be rotated in any direction, so you can clearly see your shot no matter where you are. There’s very little doubt that the GH5S is the best professional-level mirrorless camera for vlogging that will help you capture stunning vlogs. PROS - ISO sensitivity goes up to 204800 - High video bit rates CONS - Expensive - The camera body weighs about 1.5 lbs |
|
Best entry-level DSLR camera for vlogging: Canon EOS SL2 The Canon EOS Rebel SL2 is a great entry-level vlogging camera that delivers great power at a low price. The Canon EOS Rebel SL2 has a DIGIC 7 image processor and a 24.2 MP APS-C CMOS sensor that lets you extend the ISO value to 51200 and shoot your vlogs even under low light conditions. This camera can capture full HD 1080p videos at 60 fps, and it features a 9-point AF system and dual pixel CMOS AF technologies that provide precise and quick focusing even when there is not much light. The SL2 also has a microphone jack you can connect an external microphone too for better audio. PROS - Microphone jack - Wi-Fi connectivity CONS - No 4K video support - Optical image stabilizer could be better |
|
Best mid-range DSLR camera for vlogging: Canon EOS 80D The Canon EOS 80D is a feature-rich, mid-range DSLR camera great for vlogging. The 80D lets you capture full HD 1080p videos at 60 fps. It doesn’t provide support for 4K videos, though. The ISO on this camera can be set up to 25600. The 24.2 MP APS-C CMOS sensor and the DIGIC 6 image processor reduce the need for high ISO values, though, as they enable the camera to capture visually stunning footage even when the light in the shot is far from perfect. The 80D’s 45-point all cross phase detection autofocus system and its dual pixel CMOS AF system enable you to produce sharp images without having to pull-focus yourself. The various-angle 3-inch 1.04M-dot ClearView II LCD touchscreen display, as well as the pentaprism type intelligent viewfinder, let you compose shots effortlessly. PROS - Feature-rich - Continuous AF feature performs beautifully while recording high-res videos CONS - Just one SD card slot - PC sync connection features could be better |
|
Best professional DSLR camera for vlogging: Canon 6D Mark II The Canon EOS 6D Mark II is the best professional DSLR camera for vlogging. It is the only DSLR camera on the market (as of writing this review) that comes with a full-frame sensor along with a fully-articulated screen and a microphone jack. The camera’s 26.2 MP full-frame CMOS sensor can take in much more light, giving you the option to shoot with higher quality bokeh (unfocused areas appearing more blurry) and find focus much more quickly and accurately in more challenging lighting conditions. With this camera, you can shoot up to full HD 1080p videos at a maximum of 60 fps. Although the 6D Mark II comes with the same 45-point all cross-type autofocusing system as Canon’s crop sensor 80D camera, the 6D Mark II is equipped with the improved DIGIC 7 image processor unlike the 80D’s DIGIC 6 image processor. If you’re wanting to shoot your vlogs with a full-frame, The 6D Mark II is a great option. PROS - ISO sensitivity goes up to 102400 - Amazing touchscreen controls CONS - No 4K video recording option - No USB 3.0 |
Liza Brown
Liza Brown is a writer and a lover of all things video.
Follow @Liza Brown
Liza Brown
Jan 10, 2024• Proven solutions
It can be challenging to make a decision on purchasing a camera when there’s just so many on the market. Camera manufacturers are racing to update their product line with all the new camera technology advancements. To simplify your search for the ultimate vlogging camera, we’ve come up with a top twelve list.
If you’re looking for a specific type of vlogging camera, check out our other posts on vlogging cameras:
Top 11 Cheap Vlogging Cameras (2024)
7 Best DSLR Cameras For Vlogging (2024)
8 Best Mirrorless Cameras For Vlogging (2024)
12 Best Vlogging Cameras With A Flip Screen (2024)
WHAT TO LOOK FOR IN A VLOGGING CAMERA
1. Fully articulated screen (flip screen)
2. Good continual autofocus while recording video
3. Good focus priority through face recognition
4. Touch to focus
5. Good low-light performance
6. external mic jack, hot/cold shoe bracket
7. optical image stabilization
8. good battery life
Check out my full list of 10 Things To Look For In A Vlogging Camera to understand the importance of these camera features.
12 BEST VLOGGING CAMERAS (2024)
| Camera | Release Date | Camera Type | Flip Screen | Mic Port | Price | |
|---|---|---|---|---|---|---|
| CanonEOSM50 | |
February2018 | Mirrorless | Fully Articulated | Yes | $- |
| PanasonicLumixDC-GH5S | |
January2018 | Mirrorless | Fully Articulated | Yes | $$$ |
| SonyAlphaa7R III | |
October2017 | Mirrorless | Tilting | Yes | $$$ |
| CanonEOSM100 | |
August2017 | Mirrorless | Flip Up | No | $ |
| CanonEOS6D Mark II | |
June2017 | Mid-size SLR | Fully Articulated | Yes | $$ |
| CanonEOS RebelSL2 | |
June2017 | Compact SLR | Fully Articulated | Yes | $ |
| CanonEOSM6 | |
February2017 | Mirrorless | Flip Up | Yes | $ |
| SonyCyber-Shot DSCRX 100 V | |
October2016 | Compact | Flip Up | No | $- |
| SonyAlphaa6500 | |
October2016 | Mirrorless | Tilting | Yes | $$- |
| PanasonicLumix DMCLX10 | |
September2016 | Compact | Flip Up | No | $ |
| CanonEOS80D | |
February2016 | Mid-size SLR | Fully Articulated | Yes | $$ |
| CanonPowerShotG7 X Mark II | |
February2016 | Compact | Flip Up | No | $ |
At first, you can have a look at the below video.
What Gear Do Creators Actually Use | Vidcon 2023 | Sony vs Canon
|
Best daily vlogging camera: Sony Cyber-Shot DSC-RX 100 V You don’t have to be a filmmaking pro if you want to use a compact camera to record all sorts of videos. Sony’s Cyber-shot series is famous for its cutting-edge features and the DSC-RX 100 V model is not an exception. This camera is equipped with a 20.1 MP Exmor RS BSI CMOS Sensor that supports ISO sensitivities up to ISO 12800. You can record footage in UHD 4K at 30 or 24 fps, although with a five-minute limit, as well as Full HD videos at a maximum of 960 fps when recording in the HFR mode. The Sony Cyber-shot DSC-RX 100 V ships with a non-interchangeable Carl Zeiss Vario Sonnar T lens that performs well under low-light conditions and in broad daylight. The camera features a fast hybrid AF system with 315 phase-detection points and an anti-motion blur mode that allows you to keep the subjects of your vlogs in focus throughout your recording. DSC RX-100 V’s multi-functionality makes it one of the best cameras for daily vlogging, especially for vloggers who are planning on shooting vlogs in various locations. PROS - Light and easy to carry around - Produces high-res videos CONS - Short battery life - Lacking a touchscreen |
|---|---|
|
Best cheap vlogging camera: Canon EOS M100 Canon’s EOS M100 is small and powerful. This mirrorless camera produces full HD videos at 60 fps. It doesn’t, however, shoot 4K footage. The 24.2 MP APS-C CMOS sensor and the DIGIC 7 image processor ensure that your vlogs are always in focus and rich in detail. The Canon EOS M100 provides great ISO sensitivity options, offering ISO values as high as 25600, making it a great option for vloggers that often shoot their videos under difficult light conditions. The 3-inch touchscreen LCD lets you control focus points, navigate through the camera’s menu, or watch videos you’ve created. The screen can also be tilted in the upward direction to provide you a better preview of the shot you’re recording. The camera has a built-in Wi-Fi with NFC so you can transfer your videos seamlessly to a computer and have fun in the process. The Canon EOS M100 is currently one of the best entry-level cameras for daily vlogging on the market because it produces videos in great picture quality that you don’t have to spend a fortune for. PROS - Affordable - Great connectivity options CONS - Lacks advanced video recording features - No viewfinder |
|
Best entry-level mirrorless camera for vlogging: Canon EOS M100 The Canon EOS M100 wins this category as well in our books because it’s a powerful, feature-rich camera that’s also very affordable. In case you missed it, check out my review on the Canon EOS M100. |
|
Best mid-range mirrorless camera for vlogging: Canon EOS M50 The EOS M50 has been on the market for just a few months and it is already regarded as one of the best mirrorless cameras for vlogging. Its 24.1 MP APS-C CMOS sensor and DIGIC 8 Image Processor are improved versions of those in the Canon EOS M100 model. With the Canon EOS M50, you can crank up the ISO sensitivity to 51200. This camera uses the Canon EF lens mount, so you can choose the lens that best suits your needs. The Canon EOS M50 can capture UHD 4K videos at 23.98 fps, and it also lets you record 120 fps slow-motion videos at 720p. PROS - Has an external microphone port - Has a 2.36m-dot OLED electronic viewfinder CONS - No image stabilization - Battery life could be longer |
|
Best professional mirrorless camera for vlogging: Panasonic Lumix DC-GH5S The Panasonic’s GH series was made famous by the LUMIX DMC-GH4 model that will be remembered as the world’s first mirrorless interchangeable lens camera to offer the 4K video recording option. That’s why it comes as no surprise that the GH5S mirrorless micro four-thirds camera can record UHD 4K as well as DCI videos at 60 fps, and 150 Mbps. The full HD 1080p at 240 fps video recording option is also available if you want to capture slow-motion footage for your vlogs. The camera’s 10.28MP multi-aspect ratio MOS sensor enhances its low-light performance and produces high-quality videos even under very challenging lighting conditions. Recording the audio with an external microphone is one of the many advantages offered by the Lumix DC-GH5S, while the Advanced Depth-From-Focus technology is used to automatically focus the video in a fraction of a second. The GH5S’ touchscreen can be rotated in any direction, so you can clearly see your shot no matter where you are. There’s very little doubt that the GH5S is the best professional-level mirrorless camera for vlogging that will help you capture stunning vlogs. PROS - ISO sensitivity goes up to 204800 - High video bit rates CONS - Expensive - The camera body weighs about 1.5 lbs |
|
Best entry-level DSLR camera for vlogging: Canon EOS SL2 The Canon EOS Rebel SL2 is a great entry-level vlogging camera that delivers great power at a low price. The Canon EOS Rebel SL2 has a DIGIC 7 image processor and a 24.2 MP APS-C CMOS sensor that lets you extend the ISO value to 51200 and shoot your vlogs even under low light conditions. This camera can capture full HD 1080p videos at 60 fps, and it features a 9-point AF system and dual pixel CMOS AF technologies that provide precise and quick focusing even when there is not much light. The SL2 also has a microphone jack you can connect an external microphone too for better audio. PROS - Microphone jack - Wi-Fi connectivity CONS - No 4K video support - Optical image stabilizer could be better |
|
Best mid-range DSLR camera for vlogging: Canon EOS 80D The Canon EOS 80D is a feature-rich, mid-range DSLR camera great for vlogging. The 80D lets you capture full HD 1080p videos at 60 fps. It doesn’t provide support for 4K videos, though. The ISO on this camera can be set up to 25600. The 24.2 MP APS-C CMOS sensor and the DIGIC 6 image processor reduce the need for high ISO values, though, as they enable the camera to capture visually stunning footage even when the light in the shot is far from perfect. The 80D’s 45-point all cross phase detection autofocus system and its dual pixel CMOS AF system enable you to produce sharp images without having to pull-focus yourself. The various-angle 3-inch 1.04M-dot ClearView II LCD touchscreen display, as well as the pentaprism type intelligent viewfinder, let you compose shots effortlessly. PROS - Feature-rich - Continuous AF feature performs beautifully while recording high-res videos CONS - Just one SD card slot - PC sync connection features could be better |
|
Best professional DSLR camera for vlogging: Canon 6D Mark II The Canon EOS 6D Mark II is the best professional DSLR camera for vlogging. It is the only DSLR camera on the market (as of writing this review) that comes with a full-frame sensor along with a fully-articulated screen and a microphone jack. The camera’s 26.2 MP full-frame CMOS sensor can take in much more light, giving you the option to shoot with higher quality bokeh (unfocused areas appearing more blurry) and find focus much more quickly and accurately in more challenging lighting conditions. With this camera, you can shoot up to full HD 1080p videos at a maximum of 60 fps. Although the 6D Mark II comes with the same 45-point all cross-type autofocusing system as Canon’s crop sensor 80D camera, the 6D Mark II is equipped with the improved DIGIC 7 image processor unlike the 80D’s DIGIC 6 image processor. If you’re wanting to shoot your vlogs with a full-frame, The 6D Mark II is a great option. PROS - ISO sensitivity goes up to 102400 - Amazing touchscreen controls CONS - No 4K video recording option - No USB 3.0 |
Liza Brown
Liza Brown is a writer and a lover of all things video.
Follow @Liza Brown
The Editor’s Journey: Creating Impactful Videos for YouTube with PC
How to Edit Videos for YouTube on PC

Richard Bennett
Mar 27, 2024• Proven solutions
To create a successful YouTube video, you need to shoot the video and edit it on Windows or Mac. (You can find the whole processing of making a YouTube video if needed.) If you have always wanted to make your own videos and upload to YouTube to share, but you don’t know the best way to go about, then you shouldn’t miss this article. In the following part, I’ll share with you some best tools that you will need to edit YouTube videos and at the end of it, I’ll show you the detailed steps of how to edit YouTube videos with the video editor Filmora on computer.
- Part 1: Tools you need to edit YouTube videos on PC
- Part 2: Editing Videos for YouTube on PC [Detailed Steps]
Best Tools for Editing YouTube Videos on PC
Before editing, you need to choose a good enough video editor for YouTube video which can combine your footage clips seamlessly and export in high quality. To be honest, there are so many video editing software for YouTube available on the market and quite a number of tools used for editing YouTube videos on PC, some are paid while others are available for free. To save your time in picking the best one, we’ve listed some of the best tools for you to Edit YouTube videos.
Top 3 Recommended Video Editor Tools for Editing YouTube Videos on PC
The following are some of the most versatile video editor tools currently available for editing videos on PC
1. Wondershare Filmora – Best Video Editor for Beginners to Edit YouTube Videos
Filmora is an intuitive video editor with a wide range of advanced tools and video effects. We listed Filmora at the first spot because it is recommended by many users and reviewers as the best video editor for beginners and also provides sophisticated features.
 Download Mac Version ](https://tools.techidaily.com/wondershare/filmora/download/ )
Filmora is a simpler way for those who are serous with editing YouTube videos on PC and Mac and you don’t have to install any other editing tools. As an all in one video editor, Filmora gives you the power to edit audios and videos, record PC screen, edit audio and add custom colors and voice over with a lot of ease. The following are some of the specific benefits and features you will be entitled to when you use Wondershare Filmora to edit YouTube videos on PC and Mac. You can download the trial version to have a try and share with me about your opinion .
Why choose Wondershare Filmora
- Ability to record the screen of your PC together with the voice
- Edit all your audios with audio mixers and equalizers
- Has wonderful filters, overlays, and text effects
- Has a color turning tool to allow you correct white balances and much more
- Let you to upload videos directly to YouTube, Vimeo and Facebook
You may also like:How to Edit YouTube Videos on iPhone >>
2. Window Movie Maker –
Windows Movie Maker is a totally free video editor available for Windows7/8 users, so if you’re a YouTube beginner without no budget for video editing software, you can start with it. It is easy and intuitive to use, though it lacks some of the advanced functionalities needed for professional video editing. After being skilled in video editing, you may need some alternatives to Windows Movie Maker, in this case, check our picks of thebest free video editing software for Windows.

Windows Movie Maker Interface
3. Adobe Premiere Pro –
This is one of the professional video editors available for PC and it is not a free tool. It comes with advanced features and functionalities needed for professional video editing and for you to use it you will have to pay with about $19.99 - $74.99 per month.

Screenshot from Adobe Premiere Pro CC Release Video
Professional Screen Recorder Tools for YouTube Videos
If you are making a tutorial video, a software how-to video or a gameplay video on YouTube, you may also need a screen recording software to record what happening on your computer and show it with your viewers. In this case, we’ve picked some screen recording tools that you may need. Some of them both feature the video editing tools and screen recording tools.
1. Filmora scrn – A high quality screen recorder with editing features.
 -
- 
2. ScreenFlow –ScreenFlow has a free version you could use for high quality screen captures, but for you to get the most from it, you will have to upgrade to the paid versions.
For more information on screen recorders for Windows, kindly check our picks about best screen recorder for YouTub. .
Note: Filmora now also feature a more powerful recording features, so you can now record screen and audio and edit video in one place.
Professional Audio Editors for YouTube Videos Editing
1. Audacity
Audacity has an intuitive user interface, featuring a simple design without unnecessary features to clog things up. Its footprint is relatively small and it can run on PC nonstop. The only thing you won’t like about it is that you will only be able to get as far as bedroom recording with it.
2. WavePad
This audio editor has a fully customizable user interface that will work both for beginners as well as professionals. It is easy to use and will suffice most of your needs as far as editing YouTube videos on PC is concerned.
For more information about audio editing tools and tips, check out How to Add Audio to Video .
Professional Color Grading Tools for YouTube Videos
To adjust the brightness, white balance, tone or apply 3D LUT effects to your video, you can complete all of these in Filmora or use the following color correction software.
Adobe SpeedGrade
When you use this together with Premiere Pro, you will have the fastest color grading experience in the world. The only caveats to using it are that the tracking is not the best and the workflow when using it on Windows is not that streamlined either.
Looking for more professional color grading tools? Check Best Color Grading & Correction Software>>
Part 2: Editing videos for YouTube on PC [Detailed Steps]
Irrespective of the editing software you use, following the steps outlined below will make it is easy for you to edit videos for YouTube on PC. Assuming you already have made your mind on the editing software of choice, use the following steps to edit and export your completed work. To better demonstrate the steps of YouTube video editing, I’ll use Filmra9 video editor to edit YouTube Video.
1.Split or combine your video clips
Most of the editing programs you use will have a timeline view of your work where you can easily cut or drop your shots. Each of the shots taken is actually a separate file which you will have to combine with others to make the video. The split feature in Filmora can cut footage into parts and then you can move it to desired position or just delete the unnecessary part. You can choose any part of the video quickly with the Quick Trim feature in preview. Besides, Filmora supports almost all popular video and photo formats, so there will be no obstacle when you want to combine footage shot with different devices. You can add photos to video or audio to video.

To combine several footages into one, just place all clips in the video track in order. Form the timeline view, move the shots around, cut, trim or shorten them as you desire. You can also add transitions between shots so that your final production may have a professional look.
2. Crop, Rotate, Pan & Zoom
You can rotate the video at any angle at any direction and change the scale of video footage or other transform. If you want viewers to focus on some part of the frame, you can use try the Pan & Zoom feature.

Learn more about How to Zoom in Video After It’s Recorded or Saved?
3.Add texts, Music and other effects

Once the individual shots have been edited into a single video, it is now time for you to add the special effects. This is the time to add stuff such as texts, music and other special effect you may want to see on the video. If you are worried about doing this, just know that you don’t have to be a pro editor to do all these since most of the program will guide you through on how to add all the special effects.
4.Save and export
After you have done with adding all the special effects, choose the file format for saving your video then export it. YouTube accepts major file formats and these include MP4, AVI or WMA hence you will be okay when you use any of them.

Filmora also allows you to upload videos to YouTube platform directly since it will choose the format and frame rate or codec which suit best.
These are the basic steps you will use when you want to edit YouTube videos on PC. Just remember to use the right widescreen format and also render your files in either 1080i or 720p high definition.
YouTuber Jamie Keet from Teacher’s Tech channel has made a tutorial about how to edit videos on Filmora. This video is detailed and let us know if you think it is helpful in the comment below.

Richard Bennett
Richard Bennett is a writer and a lover of all things video.
Follow @Richard Bennett
Richard Bennett
Mar 27, 2024• Proven solutions
To create a successful YouTube video, you need to shoot the video and edit it on Windows or Mac. (You can find the whole processing of making a YouTube video if needed.) If you have always wanted to make your own videos and upload to YouTube to share, but you don’t know the best way to go about, then you shouldn’t miss this article. In the following part, I’ll share with you some best tools that you will need to edit YouTube videos and at the end of it, I’ll show you the detailed steps of how to edit YouTube videos with the video editor Filmora on computer.
- Part 1: Tools you need to edit YouTube videos on PC
- Part 2: Editing Videos for YouTube on PC [Detailed Steps]
Best Tools for Editing YouTube Videos on PC
Before editing, you need to choose a good enough video editor for YouTube video which can combine your footage clips seamlessly and export in high quality. To be honest, there are so many video editing software for YouTube available on the market and quite a number of tools used for editing YouTube videos on PC, some are paid while others are available for free. To save your time in picking the best one, we’ve listed some of the best tools for you to Edit YouTube videos.
Top 3 Recommended Video Editor Tools for Editing YouTube Videos on PC
The following are some of the most versatile video editor tools currently available for editing videos on PC
1. Wondershare Filmora – Best Video Editor for Beginners to Edit YouTube Videos
Filmora is an intuitive video editor with a wide range of advanced tools and video effects. We listed Filmora at the first spot because it is recommended by many users and reviewers as the best video editor for beginners and also provides sophisticated features.
Download Mac Version ](https://tools.techidaily.com/wondershare/filmora/download/ )
Filmora is a simpler way for those who are serous with editing YouTube videos on PC and Mac and you don’t have to install any other editing tools. As an all in one video editor, Filmora gives you the power to edit audios and videos, record PC screen, edit audio and add custom colors and voice over with a lot of ease. The following are some of the specific benefits and features you will be entitled to when you use Wondershare Filmora to edit YouTube videos on PC and Mac. You can download the trial version to have a try and share with me about your opinion .
Why choose Wondershare Filmora
- Ability to record the screen of your PC together with the voice
- Edit all your audios with audio mixers and equalizers
- Has wonderful filters, overlays, and text effects
- Has a color turning tool to allow you correct white balances and much more
- Let you to upload videos directly to YouTube, Vimeo and Facebook
You may also like:How to Edit YouTube Videos on iPhone >>
2. Window Movie Maker –
Windows Movie Maker is a totally free video editor available for Windows7/8 users, so if you’re a YouTube beginner without no budget for video editing software, you can start with it. It is easy and intuitive to use, though it lacks some of the advanced functionalities needed for professional video editing. After being skilled in video editing, you may need some alternatives to Windows Movie Maker, in this case, check our picks of thebest free video editing software for Windows.
Windows Movie Maker Interface
3. Adobe Premiere Pro –
This is one of the professional video editors available for PC and it is not a free tool. It comes with advanced features and functionalities needed for professional video editing and for you to use it you will have to pay with about $19.99 - $74.99 per month.
Screenshot from Adobe Premiere Pro CC Release Video
Professional Screen Recorder Tools for YouTube Videos
If you are making a tutorial video, a software how-to video or a gameplay video on YouTube, you may also need a screen recording software to record what happening on your computer and show it with your viewers. In this case, we’ve picked some screen recording tools that you may need. Some of them both feature the video editing tools and screen recording tools.
1. Filmora scrn – A high quality screen recorder with editing features.
-
2. ScreenFlow –ScreenFlow has a free version you could use for high quality screen captures, but for you to get the most from it, you will have to upgrade to the paid versions.
For more information on screen recorders for Windows, kindly check our picks about best screen recorder for YouTub. .
Note: Filmora now also feature a more powerful recording features, so you can now record screen and audio and edit video in one place.
Professional Audio Editors for YouTube Videos Editing
1. Audacity
Audacity has an intuitive user interface, featuring a simple design without unnecessary features to clog things up. Its footprint is relatively small and it can run on PC nonstop. The only thing you won’t like about it is that you will only be able to get as far as bedroom recording with it.
2. WavePad
This audio editor has a fully customizable user interface that will work both for beginners as well as professionals. It is easy to use and will suffice most of your needs as far as editing YouTube videos on PC is concerned.
For more information about audio editing tools and tips, check out How to Add Audio to Video .
Professional Color Grading Tools for YouTube Videos
To adjust the brightness, white balance, tone or apply 3D LUT effects to your video, you can complete all of these in Filmora or use the following color correction software.
Adobe SpeedGrade
When you use this together with Premiere Pro, you will have the fastest color grading experience in the world. The only caveats to using it are that the tracking is not the best and the workflow when using it on Windows is not that streamlined either.
Looking for more professional color grading tools? Check Best Color Grading & Correction Software>>
Part 2: Editing videos for YouTube on PC [Detailed Steps]
Irrespective of the editing software you use, following the steps outlined below will make it is easy for you to edit videos for YouTube on PC. Assuming you already have made your mind on the editing software of choice, use the following steps to edit and export your completed work. To better demonstrate the steps of YouTube video editing, I’ll use Filmra9 video editor to edit YouTube Video.
1.Split or combine your video clips
Most of the editing programs you use will have a timeline view of your work where you can easily cut or drop your shots. Each of the shots taken is actually a separate file which you will have to combine with others to make the video. The split feature in Filmora can cut footage into parts and then you can move it to desired position or just delete the unnecessary part. You can choose any part of the video quickly with the Quick Trim feature in preview. Besides, Filmora supports almost all popular video and photo formats, so there will be no obstacle when you want to combine footage shot with different devices. You can add photos to video or audio to video.
To combine several footages into one, just place all clips in the video track in order. Form the timeline view, move the shots around, cut, trim or shorten them as you desire. You can also add transitions between shots so that your final production may have a professional look.
2. Crop, Rotate, Pan & Zoom
You can rotate the video at any angle at any direction and change the scale of video footage or other transform. If you want viewers to focus on some part of the frame, you can use try the Pan & Zoom feature.
Learn more about How to Zoom in Video After It’s Recorded or Saved?
3.Add texts, Music and other effects
Once the individual shots have been edited into a single video, it is now time for you to add the special effects. This is the time to add stuff such as texts, music and other special effect you may want to see on the video. If you are worried about doing this, just know that you don’t have to be a pro editor to do all these since most of the program will guide you through on how to add all the special effects.
4.Save and export
After you have done with adding all the special effects, choose the file format for saving your video then export it. YouTube accepts major file formats and these include MP4, AVI or WMA hence you will be okay when you use any of them.
Filmora also allows you to upload videos to YouTube platform directly since it will choose the format and frame rate or codec which suit best.
These are the basic steps you will use when you want to edit YouTube videos on PC. Just remember to use the right widescreen format and also render your files in either 1080i or 720p high definition.
YouTuber Jamie Keet from Teacher’s Tech channel has made a tutorial about how to edit videos on Filmora. This video is detailed and let us know if you think it is helpful in the comment below.
Richard Bennett
Richard Bennett is a writer and a lover of all things video.
Follow @Richard Bennett
Also read:
- Beauty Behind the Screen Color Correction Insights
- [New] Balancing Act Proper Techniques for Stable Photos
- How to Link YouTube to TikTok? [Complete Guide]
- Mastering Mobile Media The Art of Filming with a Smartphone
- Capturing Life in Motion Top 9 Smartphone Props for Dynamic Cinematography
- 2024 Approved Decoding YouTube's Economics How to Quantify Watches and Earnings
- Mastering YouTube Notes & Alerts Implementation
- [Updated] Curate Content The 10 Best YouTube Video Length Tools
- [New] Curbing Common Mishaps YouTube Short Edition
- Unlock the Secret of YouTube-to-GIF Conversion - Begin Here!
- [Updated] Easy-to-Use Platforms for Free YouTube Thumbnail Extracting
- 2024 Approved Digital Deities Ranking Creators by Subscriber Growth
- 15 Best Free YouTube Introduction Tools for 2024
- Essential Insights Into YouTube's Content Policy Framework for 2024
- [New] Climbing to YouTube Zenith A Step-by-Step Guide to Creative Studio Mastery
- Creating Compelling Sports Content From the Ground Up for 2024
- 2024 Approved A Peek Into the Best Non-Youtube Sites for Videostreams
- Inside Look Comprehensive Analysis of V-Tubers
- In 2024, Channel Boosting Mastery Unveiling the Best 5 Video Marketing Strategies
- Navigating the Seamless Shift From iMovie to YouTube Broadcasts
- [Updated] Chuckle Chronicles Top YouTube Humorists' Masterpieces
- [New] Discovering Synergistic Partnerships on YouTube Platforms
- Embark on the Journey Defining & Developing Style and Niche
- Building Direct URLs for YouTube Channel Subscribers
- 2024 Approved Dodge Digital Watchers Accelerating View Count Growth
- Unravel iPhone Tricks for Repetitive Videos
- Captivate Audiences Unveiling Secrets for Striking YouTube Banners for 2024
- [Updated] Discovering the Best YouTube MP3 Transformers
- [New] Content Strategy Unleashed - Top 8 YouTube Ranks Explored
- In 2024, Educational History Vlogs - The Ultimate List
- Content Strategy Mastery - Selecting Top Rank Trackers Uncovered for 2024
- Avoid the Backtrack Blunder with These Tips for 2024
- The Essential Mac Tips for Creating Perfect Snaps
- [Updated] Capturing Still Shots From Video Using Photos App
- Updated 2024 Approved Compressor Essentials Optimizing Video Files in Final Cut Pro X
- A Comprehensive Guide to Incorporating Photo Capabilities in Meet for 2024
- Mastering Lock Screen Settings How to Enable and Disable on ZTE Nubia Flip 5G
- [New] How to Create a Google Meet Account for 2024
- [Updated] In 2024, Advanced Mac Image Compiler
- In 2024, Can I Bypass a Forgotten Phone Password Of Realme V30?
- In 2024, Comprehensive Guide to Enhancing Facecam Movie Quality
- [New] In 2024, A Step-by-Step Roadmap for Masterful Instagram Photos
- Focus on Action, Exclude Unwanted Surroundings
- In 2024, How to Track Vivo S17 Pro by Phone Number | Dr.fone
- [Updated] QuickTime Screen Recording with Audio Guide
- What Does Enter PUK Code Mean And Why Did The Sim Get PUK Blocked On Vivo X Flip Device
- Updated Pro Vs. Express Which Video Editing Software Reigns Supreme for 2024
- New In 2024, Revamp Your Sound Engineering Installing and Configuring Lame MP3 Encoder for Audacity
- [New] In 2024, Elevate Your FB Profile with These Ten Effective Tactics
- Title: "12 Top-Tier Cameras That Will Transform Your Vlogging Experience for 2024"
- Author: Kevin
- Created at : 2024-05-25 14:13:52
- Updated at : 2024-05-26 14:13:52
- Link: https://youtube-videos.techidaily.com/12-top-tier-cameras-that-will-transform-your-vlogging-experience-for-2024/
- License: This work is licensed under CC BY-NC-SA 4.0.
