
:max_bytes(150000):strip_icc()/HBOMax-026fc6ed11044c39bbf2ee96a4fd91ff.jpg)
12 Best Vlogging Cameras with a Flip Screen for 2024
Essential 12 Flipscreen Cam Titles for Optimal Vlogging
12 Best Vlogging Cameras with a Flip Screen

Richard Bennett
Nov 01, 2022• Proven solutions
A flip screen is a very important feature on a camera for vloggers. With a flip screen, you can preview whether or not your shot is composed the way you want it to be, all in real-time. Below is our top list and review of the twelve best vlogging cameras with a flip screen.
WHAT TO LOOK FOR IN A VLOGGING CAMERA
1. Fully articulated screen (flip screen)
2. Good continual autofocus while recording video
3. Good focus priority through face recognition
4. Touch to focus
5. Good low-light performance
6. external mic jack, hot/cold shoe bracket
7. optical image stabilization
8. good battery life
Check out my full list of 10 Things To Look For In A Vlogging Camera to understand the importance of these camera features.
THE 12 BEST VLOGGING CAMERAS WITH A FLIP SCREEN (2018)
| Camera | Release Date | Camera Type | Flip Screen Type | Mic Port | Price | |
|---|---|---|---|---|---|---|
| CanonEOSM50 | 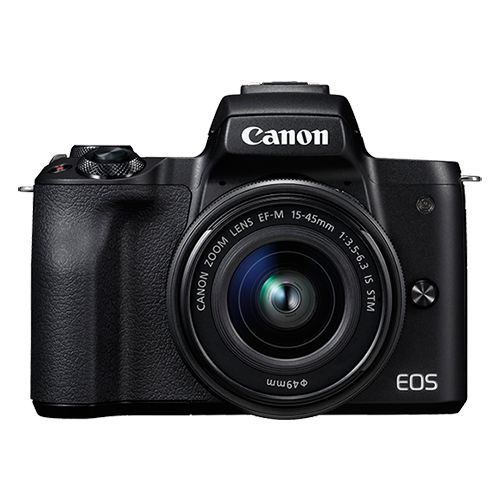 |
February2018 | Mirrorless | Fully Articulated | Yes | $- |
| PanasonicLumixDC-GH5S | 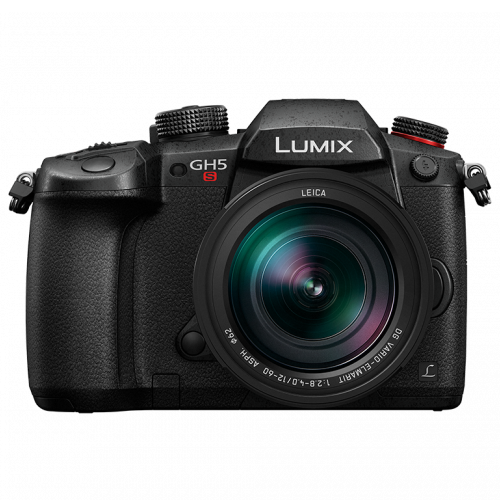 |
January2018 | Mirrorless | Fully Articulated | Yes | $$$ |
| CanonEOSM100 | 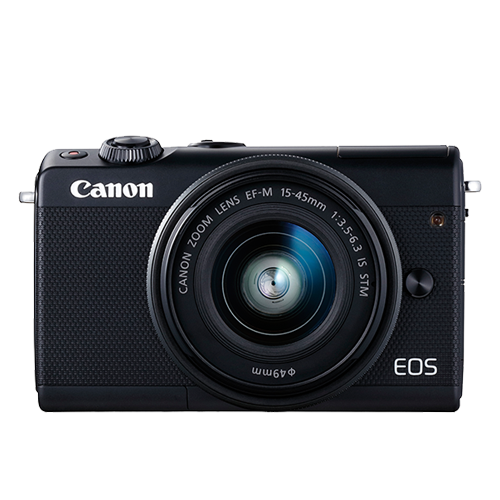 |
August2017 | Mirrorless | Flip Up | No | $ |
| CanonEOS6D Mark II | 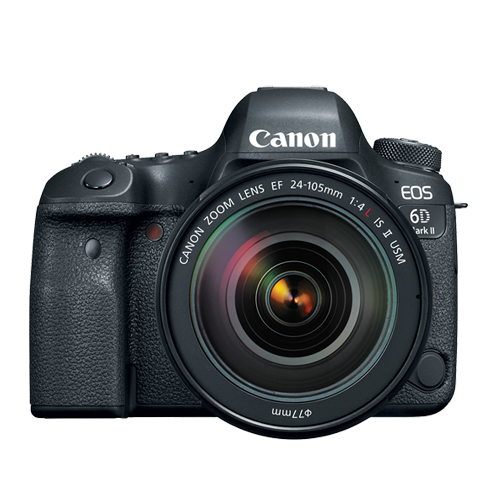 |
June2017 | Mid-size SLR | Fully Articulated | Yes | $$ |
| CanonEOS RebelSL2 |  |
June2017 | Compact SLR | Fully Articulated | Yes | $ |
| CanonEOS RebelT7i | 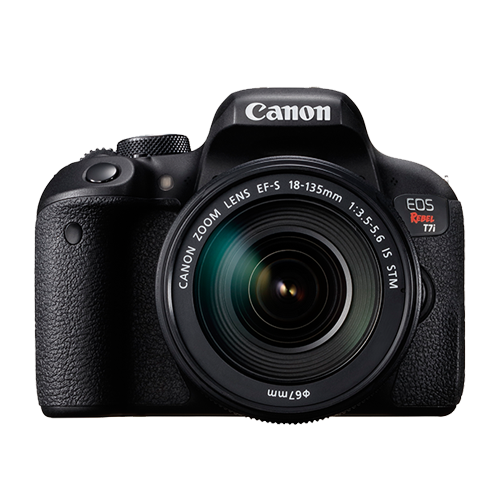 |
February2017 | Mid-size SLR | Fully Articulated | Yes | $- |
| CanonEOSM6 | 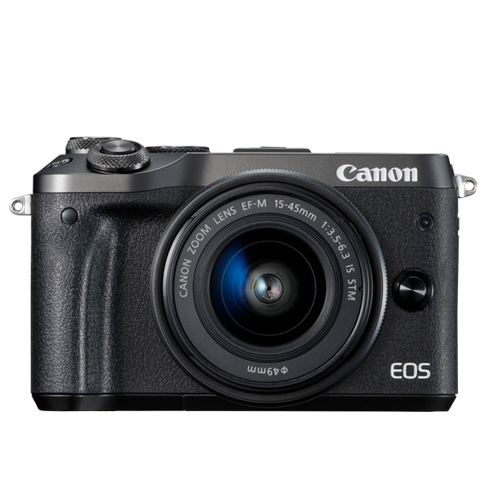 |
February2017 | Mirrorless | Flip Up | Yes | $ |
| NikonD5600 | 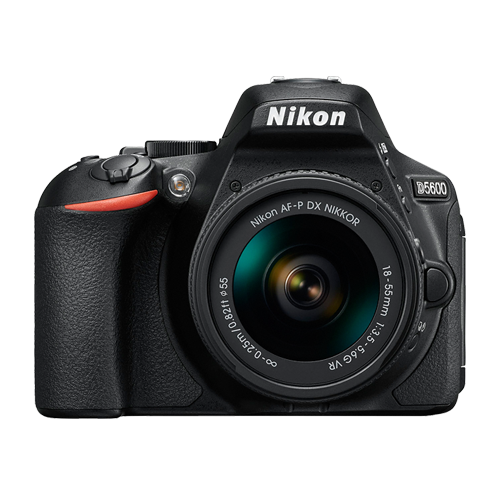 |
November2016 | Compact SLR | Fully Articulated | Yes | $- |
| SonyCyber-Shot DSCRX 100 V | 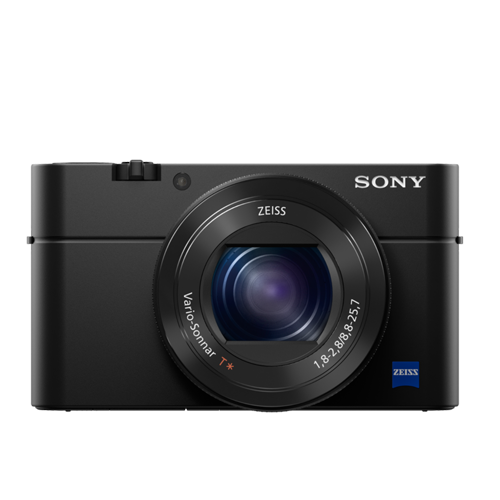 |
October2016 | Compact | Flip Up | No | $- |
| PanasonicLumixDMC-G85 | 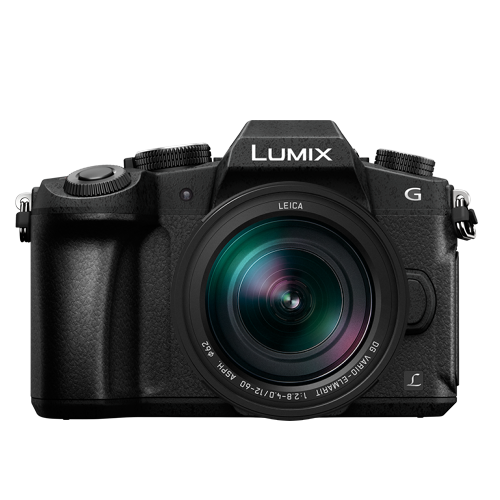 |
September2016 | Mirrorless | Flip Up | Yes | $- |
| CanonEOS80D | 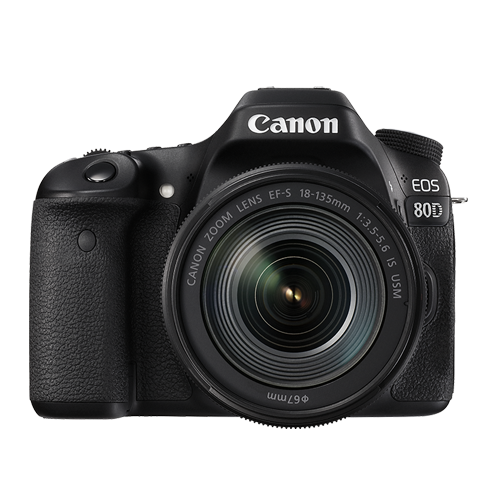 |
February2016 | Mid-size SLR | Fully Articulated | Yes | $$ |
| CanonPowerShotG7 X Mark II |  |
February2016 | Compact | Flip Up | No | $ |
|
Best daily vlogging camera with a flip screen: Sony Cyber-Shot DSC-RX 100 V If you want to use a compact camera with a flip screen, Sony’s Cyber-shot DSC-RX 100 V is an exceptional daily vlogging camera. This camera’s 20.1 MP Exmor RS BSI CMOS sensor with a maximum of 12800 in ISO sensitivity, can record footage in UHD 4K at 30 or 24 fps. The lens on this camera, a non-interchangeable Carl Zeiss Vario Sonnar T lens, performs well even under low-light conditions. With its fast hybrid AF system with 315 phase-detection points and an anti-motion blur mode, you can expect your shots to be accurately focused. The Sony RX 100 V packs so much power into such a small, portable camera, making it a great daily vlogging device. PROS - Light and easy to carry around - Produces high-res videos CONS - Short battery life - Lacking a touchscreen |
|---|---|
|
Best cheap vlogging camera with a flip screen: Canon EOS M100 The Canon EOS M100 is another great small vlogging camera with a flip screen. This mirrorless camera shoots up to full HD 1080p videos at 60 fps. Its 24.2 MP APS-C CMOS sensor and DIGIC 7 image processor will accurately lock the right focus and produce videos with rich detail. The camera’s ISO sensitivity goes as high as ISO 25600. Even in difficult light conditions, this camera will be able to capture a scene. You can control and navigate through the difficult functions of this camera using its 3-inch touchscreen LCD. This camera has a flip screen that flips upward so that you can see yourself while you vlog. With built-in Wi-Fi and NFC, you can also transfer your videos seamlessly to a computer without any cables. If you don’t want to spend a fortune but still want to produce videos with great picture quality, the Canon EOS M100 is the best entry-level camera for daily vlogging that’s currently on the market. PROS - Affordable - Great connectivity options CONS - Lacks advanced video recording features - No viewfinder |
|
Best entry-level mirrorless camera with a flip screen for vlogging: Canon EOS M100 The Canon EOS M100 is the best entry-level mirrorless camera with a flip screen for vlogging. In case you missed it, check out my review on the Canon EOS M100. |
|
Best mid-range mirrorless camera with a flip screen for vlogging: Canon EOS M50 The Canon EOS M50 is already regarded as one of the best mirrorless cameras for vlogging though it has only been on the market for just a few months. This mirrorless camera comes with the newer DIGIC 8 Image Processor that find a focus for your footage even better than the last generation’s image processor. You can crank up the ISO sensitivity to ISO 51200 with the Canon EOS M50. The Canon EOS M50 can shoot UHD 4K videos at 23.98 fps. You can also capture 720p slow-motion videos at 120 fps. PROS - Has an external microphone port - Has a 2.36m-dot OLED electronic viewfinder CONS - No image stabilization - Battery life could be longer |
|
Best professional mirrorless camera with a flip screen for vlogging: Panasonic Lumix DC-GH5S When Panasonic made its Lumix DC-GH5, it was a hybrid camera that performed equally well in both photo and video. In response to customers’ interest in a video-focused camera, Panasonic released the GH5S. This camera is equipped with a micro four-thirds sensor and can shoot UHD 4K and DCI videos at 60 fps, up to 150 Mbps. If you want to capture slow-motion footage, you can shoot full HD 1080p videos at 240 fps as well. With its 10.28MP multi-aspect ratio MOS sensor, you’ll be able to produce high-quality videos even under very challenging lighting conditions. In a fraction of a second, this camera can also automatically grab focus during your video with its advanced depth-from-focus technology. It is also equipped with a microphone jack so that you can record better audio while shooting with this camera. The GH5S has a fully articulated touchscreen so that you can compose your shot from any angle. PROS - ISO sensitivity goes up to 204800 - High video bit rates CONS - Expensive - The camera body weighs about 1.5 lbs |
|
Best entry-level DSLR camera with a flip screen for vlogging: Canon EOS SL2 If you’re looking for a low priced entry-level vlogging camera with a flip screen, the Canon EOS Rebel SL2 is the best option. You can precisely and quickly grab focus during video recording with its 9-point AF system and dual pixel CMOS AF technology. The camera powers these functions with its DIGIC 7 image processor. You can shoot up to full HD 1080p videos at 60 fps with its 24.2 MP APS-C CMOS sensor and crank the ISO up to ISO 51200 in case you need to shoot under low light conditions. If you want better audio for your vlogs, you can connect an external microphone to the SL2’s microphone jack. PROS - Microphone jack - Wi-Fi connectivity CONS - No 4K video support - Optical image stabilizer could be better |
|
Best mid-range DSLR camera with a flip screen for vlogging: Canon EOS 80D The 80D is the best camera to go with if you’re looking for a mid-range DLSR vlogging camera with a flip screen. It is equipped with a 24.2 MP APS-C CMOS sensor, comes with the DIGIC 6 image processor, and shoots up to full HD 1080p videos at 60 fps. For low lighting conditions, you can set the camera’s ISO to as high as ISO 25600. The 80D is great for autofocusing during video recording as it comes with a 45-point all cross phase detection autofocus system and a dual pixel CMOS AF system. PROS - Feature-rich - Continuous AF feature performs beautifully while recording high-res videos CONS - Just one SD card slot - PC sync connection features could be better |
|
Best professional DSLR camera with a flip screen for vlogging: Canon 6D Mark II The 6D Mark II is currently (at the time of writing this review) the only full-frame DSLR camera that comes with both a fully-articulated screen and a microphone jack. It is equipped with a 26.2 MP full-frame CMOS sensor, comes with the DIGIC 7 image processor, and shoots up to full HD 1080p videos at 60 fps. The 6D is also equipped with the same 45-point all cross-phase detection and dual pixel CMOS autofocusing system as the 80D. If you’re wanting to vlog with a full-frame camera, the 6D Mark II is the best option. PROS - ISO sensitivity goes up to 102400 - Amazing touchscreen controls CONS - No 4K video recording option - No USB 3.0 |
Want to compare even more cameras? Check out…
12 Best Vlogging Cameras (2018)
Top 11 Cheap Vlogging Cameras (2018)
7 Best DSLR Cameras For Vlogging (2018)
8 Best Mirrorless Cameras For Vlogging (2018)
Richard Bennett
Richard Bennett is a writer and a lover of all things video.
Follow @Richard Bennett
Richard Bennett
Nov 01, 2022• Proven solutions
A flip screen is a very important feature on a camera for vloggers. With a flip screen, you can preview whether or not your shot is composed the way you want it to be, all in real-time. Below is our top list and review of the twelve best vlogging cameras with a flip screen.
WHAT TO LOOK FOR IN A VLOGGING CAMERA
1. Fully articulated screen (flip screen)
2. Good continual autofocus while recording video
3. Good focus priority through face recognition
4. Touch to focus
5. Good low-light performance
6. external mic jack, hot/cold shoe bracket
7. optical image stabilization
8. good battery life
Check out my full list of 10 Things To Look For In A Vlogging Camera to understand the importance of these camera features.
THE 12 BEST VLOGGING CAMERAS WITH A FLIP SCREEN (2018)
| Camera | Release Date | Camera Type | Flip Screen Type | Mic Port | Price | |
|---|---|---|---|---|---|---|
| CanonEOSM50 | |
February2018 | Mirrorless | Fully Articulated | Yes | $- |
| PanasonicLumixDC-GH5S | |
January2018 | Mirrorless | Fully Articulated | Yes | $$$ |
| CanonEOSM100 | |
August2017 | Mirrorless | Flip Up | No | $ |
| CanonEOS6D Mark II | |
June2017 | Mid-size SLR | Fully Articulated | Yes | $$ |
| CanonEOS RebelSL2 | |
June2017 | Compact SLR | Fully Articulated | Yes | $ |
| CanonEOS RebelT7i | |
February2017 | Mid-size SLR | Fully Articulated | Yes | $- |
| CanonEOSM6 | |
February2017 | Mirrorless | Flip Up | Yes | $ |
| NikonD5600 | |
November2016 | Compact SLR | Fully Articulated | Yes | $- |
| SonyCyber-Shot DSCRX 100 V | |
October2016 | Compact | Flip Up | No | $- |
| PanasonicLumixDMC-G85 | |
September2016 | Mirrorless | Flip Up | Yes | $- |
| CanonEOS80D | |
February2016 | Mid-size SLR | Fully Articulated | Yes | $$ |
| CanonPowerShotG7 X Mark II | |
February2016 | Compact | Flip Up | No | $ |
|
Best daily vlogging camera with a flip screen: Sony Cyber-Shot DSC-RX 100 V If you want to use a compact camera with a flip screen, Sony’s Cyber-shot DSC-RX 100 V is an exceptional daily vlogging camera. This camera’s 20.1 MP Exmor RS BSI CMOS sensor with a maximum of 12800 in ISO sensitivity, can record footage in UHD 4K at 30 or 24 fps. The lens on this camera, a non-interchangeable Carl Zeiss Vario Sonnar T lens, performs well even under low-light conditions. With its fast hybrid AF system with 315 phase-detection points and an anti-motion blur mode, you can expect your shots to be accurately focused. The Sony RX 100 V packs so much power into such a small, portable camera, making it a great daily vlogging device. PROS - Light and easy to carry around - Produces high-res videos CONS - Short battery life - Lacking a touchscreen |
|---|---|
|
Best cheap vlogging camera with a flip screen: Canon EOS M100 The Canon EOS M100 is another great small vlogging camera with a flip screen. This mirrorless camera shoots up to full HD 1080p videos at 60 fps. Its 24.2 MP APS-C CMOS sensor and DIGIC 7 image processor will accurately lock the right focus and produce videos with rich detail. The camera’s ISO sensitivity goes as high as ISO 25600. Even in difficult light conditions, this camera will be able to capture a scene. You can control and navigate through the difficult functions of this camera using its 3-inch touchscreen LCD. This camera has a flip screen that flips upward so that you can see yourself while you vlog. With built-in Wi-Fi and NFC, you can also transfer your videos seamlessly to a computer without any cables. If you don’t want to spend a fortune but still want to produce videos with great picture quality, the Canon EOS M100 is the best entry-level camera for daily vlogging that’s currently on the market. PROS - Affordable - Great connectivity options CONS - Lacks advanced video recording features - No viewfinder |
|
Best entry-level mirrorless camera with a flip screen for vlogging: Canon EOS M100 The Canon EOS M100 is the best entry-level mirrorless camera with a flip screen for vlogging. In case you missed it, check out my review on the Canon EOS M100. |
|
Best mid-range mirrorless camera with a flip screen for vlogging: Canon EOS M50 The Canon EOS M50 is already regarded as one of the best mirrorless cameras for vlogging though it has only been on the market for just a few months. This mirrorless camera comes with the newer DIGIC 8 Image Processor that find a focus for your footage even better than the last generation’s image processor. You can crank up the ISO sensitivity to ISO 51200 with the Canon EOS M50. The Canon EOS M50 can shoot UHD 4K videos at 23.98 fps. You can also capture 720p slow-motion videos at 120 fps. PROS - Has an external microphone port - Has a 2.36m-dot OLED electronic viewfinder CONS - No image stabilization - Battery life could be longer |
|
Best professional mirrorless camera with a flip screen for vlogging: Panasonic Lumix DC-GH5S When Panasonic made its Lumix DC-GH5, it was a hybrid camera that performed equally well in both photo and video. In response to customers’ interest in a video-focused camera, Panasonic released the GH5S. This camera is equipped with a micro four-thirds sensor and can shoot UHD 4K and DCI videos at 60 fps, up to 150 Mbps. If you want to capture slow-motion footage, you can shoot full HD 1080p videos at 240 fps as well. With its 10.28MP multi-aspect ratio MOS sensor, you’ll be able to produce high-quality videos even under very challenging lighting conditions. In a fraction of a second, this camera can also automatically grab focus during your video with its advanced depth-from-focus technology. It is also equipped with a microphone jack so that you can record better audio while shooting with this camera. The GH5S has a fully articulated touchscreen so that you can compose your shot from any angle. PROS - ISO sensitivity goes up to 204800 - High video bit rates CONS - Expensive - The camera body weighs about 1.5 lbs |
|
Best entry-level DSLR camera with a flip screen for vlogging: Canon EOS SL2 If you’re looking for a low priced entry-level vlogging camera with a flip screen, the Canon EOS Rebel SL2 is the best option. You can precisely and quickly grab focus during video recording with its 9-point AF system and dual pixel CMOS AF technology. The camera powers these functions with its DIGIC 7 image processor. You can shoot up to full HD 1080p videos at 60 fps with its 24.2 MP APS-C CMOS sensor and crank the ISO up to ISO 51200 in case you need to shoot under low light conditions. If you want better audio for your vlogs, you can connect an external microphone to the SL2’s microphone jack. PROS - Microphone jack - Wi-Fi connectivity CONS - No 4K video support - Optical image stabilizer could be better |
|
Best mid-range DSLR camera with a flip screen for vlogging: Canon EOS 80D The 80D is the best camera to go with if you’re looking for a mid-range DLSR vlogging camera with a flip screen. It is equipped with a 24.2 MP APS-C CMOS sensor, comes with the DIGIC 6 image processor, and shoots up to full HD 1080p videos at 60 fps. For low lighting conditions, you can set the camera’s ISO to as high as ISO 25600. The 80D is great for autofocusing during video recording as it comes with a 45-point all cross phase detection autofocus system and a dual pixel CMOS AF system. PROS - Feature-rich - Continuous AF feature performs beautifully while recording high-res videos CONS - Just one SD card slot - PC sync connection features could be better |
|
Best professional DSLR camera with a flip screen for vlogging: Canon 6D Mark II The 6D Mark II is currently (at the time of writing this review) the only full-frame DSLR camera that comes with both a fully-articulated screen and a microphone jack. It is equipped with a 26.2 MP full-frame CMOS sensor, comes with the DIGIC 7 image processor, and shoots up to full HD 1080p videos at 60 fps. The 6D is also equipped with the same 45-point all cross-phase detection and dual pixel CMOS autofocusing system as the 80D. If you’re wanting to vlog with a full-frame camera, the 6D Mark II is the best option. PROS - ISO sensitivity goes up to 102400 - Amazing touchscreen controls CONS - No 4K video recording option - No USB 3.0 |
Want to compare even more cameras? Check out…
12 Best Vlogging Cameras (2018)
Top 11 Cheap Vlogging Cameras (2018)
7 Best DSLR Cameras For Vlogging (2018)
8 Best Mirrorless Cameras For Vlogging (2018)
Richard Bennett
Richard Bennett is a writer and a lover of all things video.
Follow @Richard Bennett
Unlock Slides’ Potential: Embedding Video From YouTube
Create High-Quality Video - Wondershare Filmora
An easy and powerful YouTube video editor
Numerous video and audio effects to choose from
Detailed tutorials provided by the official channel
Google Slide presentation is a powerful tool for creators to keep their audience engaged. This online platform lets you create and demonstrate your ideas. It will capture your viewers’ attention from the very beginning. It also doesn’t matter whatever learning style you engage. Adding YouTube videos to Google Slide will appeal to all levels of individuals.
More so, it is the best way to provide a break for both the audience and the creator. You can break Google Slide presentations with videos to offer some break. Viewers and the presenter get a breather in the process. The presenter can take a short break from speaking while the video plays. Let’s now dive into how to embed a YouTube video in Google Slides.

In this article
01 Why should we add a video to Google Slides?
02 How to add a YouTube video to Google Slide
03 How to choose the right video for your Slides?
Why should we add a video to Google Slides?
There is a great impact of adding video to Google Slides.
For attention
Videos will automatically awaken you, especially if your thoughts have started to sway during a presentation. A video has a direct way of showing creativity. The audience automatically connects the dots between the video and the presentation lines alike.
To stimulate discussion
A picture is worth a thousand words. There is a way that an added video will help the audience connect to the day’s topic. It will bring up several ideas and stir up discussion with the presenter.
Easy following
With videos embedded in Google Slide, viewers will find it easy to understand and digest. Videos automatically eliminate boredom and make any topic interesting.
How to add a YouTube video to Google Slide
Use these two methods to add a YouTube video to Google Slides. Via the Search and Direct link.
Method 1. Embed YouTube video to Google Slide by search and selection
Google has owned YouTube since the year 2006. You can, therefore, integrate Google’s products with YouTube easily.
Step 1. First, go to the slide where you want to embed your video.
Step 2. Then choose the “Insert” option from the menu bar and hit the “Video” option.

Step 3. It would be best if you now viewed the “YouTube” search bar to type in the video you want to embed. You can use keywords to search for the video in question and view instant search results.
Step 4. Then select the video you want to embed, and you’ll see it appear on the “Slide.”

Step 5. Format your video. Remember that the entire video will be embedded. You don’t necessarily need the whole video. It is time to select just a brief but relevant clip from the video to use. Then position your video to the right point using the axes from the exact starting point to the finished part you want the video to appear in.
Method 2. Embed YouTube video to Google Slide by direct link
You can engage this method if you want to include the entire video.
Step 1. Get the URL of the specific YouTube video that you want to use.

Step 2. Then go to your browser’s “Address bar” to copy the YouTube link.
Step 3. Next, open the “Presentation” slide to put your video to.
Step 4. Choose the “Insert” tab from the menu bar.
Step 5. Then hit on the “Video” option from the drop-down menu that appears.
Step 6. A new window will open automatically. Choose the “By URL” tab.
Step 7. Then paste the YouTube video URL in the “Paste YouTube URL Here” bar section.

Step 8. Wait for the video file to load and press the “Select” option. The video will immediately appear in the presentation slide. Just drag and drop the video in your preferred position.
Note: You can do a few edits inside the application. Set the timer when your video should start and when to stop. You can also adjust the video player size.
How to choose the right video for your Slides?
Not all videos will make an impact on your Google Slide. You need to use the best shot that adds value to your presentation. These guidelines will help you to settle on the best video.
Be Professional – choose the best video for your presentation. Remember that the video is part of the presentation and carries more weight. Settling for quality video will bring out the professionalism in you.
Relevant – how do you know that what you are showing your audience corresponds to the presentation piece? Ensure that the video you add has something to do with the Google Slide presentation topic. The two should naturally flow to make it easy to understand the whole concept.
Precise – your presentation is not about the video. The ideal length should not exceed 60 seconds. The longer the video, the greater the chance for your audience to lose track along the way.
Know every footage you are working with – this will help you pick the best shots for your presentation. So, learn every aspect of the video before settling down to use it.
Add new content – even though one content may suit several presentations, don’t rely on the same piece each time. Your audience will want to feel something fresh each time you are presenting. So, compose different videos for different scenarios to make that big impact.
Create an eye-catching video for your Slides with Filmora
The video quality matters when it comes to creating your Slides. The best video creator – Filmora – works in simple steps to give you an eye-catching video. It will create videos for all scenarios like marketing, tutorial, gaming, etc.
Key features of Filmora
- It offers you advanced video effects like filters, motion elements, etc
- You can multiply your fun with multiple screens with the Split Screen feature
- Easily change backgrounds using the Green Screen feature
- The speed control lets you fast forward or slow down a special moment
- Import your video clips to social media platforms
- You can also adjust the audio of your tracks using the Audio Mixer feature
Follow this guide to create a video for your slide with Filmora
Step 1. Launch Filmora
First, begin by downloading and installing Filmora on your computer device. Once installed, launch it and allow it to run. You can either create a new project or open an existing project to work on.
Step 2. Create a new project
Here, click on the “New Project” tab on the app’s welcome screen. The editor should load immediately. Then proceed to register the product. Just hit on the “Register” tab.
Step 3. Import video
Check the upper left corner of your screen to see the “Import” tab. Click on it and choose the “Import Media Files” option. Next, navigate to the location of your computer’s local list to select the clip or video you want to edit. Then, hit the “Import” button to add the video to the timeline for editing.
Step 4. Edit video
Drag and drop the raw footage to Filmora’s timeline to begin editing. Here, you can trim, add other video clips, merge, and add effects as you wish. Likewise, you can add opening titles, subtitles, and end credits to your video. More so, this tool offers different templates to use. Just drag and drop the templates you wish to use to a specific location on the timeline.
Step 5. Preview your file
Last but not least, you can preview your files. Click on the “Play” tab to start previewing your video clips. The main essence of this part is to allow you to make the necessary changes to your clips if there is a need.
Step 6. Export and Share
With Filmora, you can export your file to various social media platforms. But first, go to the “Output window” and select the video file format to use. This software supports several output formats to apply to any platform and device. Just click on the “Format” tab and choose the file format to use. Then also change the resolution and other parameters like frame rate and channel of your video in the “Settings” section. Finally, share your video to your YouTube channel and get ready to add the video to the Google Slide presentation.
For Win 7 or later (64-bit)
For macOS 10.12 or later
Conclusion
● You now know how to put a YouTube video in Google Slides the simple way. You can search for your YouTube videos or directly use the URL link. Whatever the case, remember that it’s the quality of your video that carries more weight. Thanks to the availability of third-party apps that you can use to create and improve the quality of your videos.
● Filmora is at your service to create high-resolution videos that you can export in any format to your YouTube channel. The tool is intuitive, and it won’t matter whether you haven’t tried it before. It is a perfect choice for both professionals and first-time users.
Google Slide presentation is a powerful tool for creators to keep their audience engaged. This online platform lets you create and demonstrate your ideas. It will capture your viewers’ attention from the very beginning. It also doesn’t matter whatever learning style you engage. Adding YouTube videos to Google Slide will appeal to all levels of individuals.
More so, it is the best way to provide a break for both the audience and the creator. You can break Google Slide presentations with videos to offer some break. Viewers and the presenter get a breather in the process. The presenter can take a short break from speaking while the video plays. Let’s now dive into how to embed a YouTube video in Google Slides.
In this article
01 Why should we add a video to Google Slides?
02 How to add a YouTube video to Google Slide
03 How to choose the right video for your Slides?
Why should we add a video to Google Slides?
There is a great impact of adding video to Google Slides.
For attention
Videos will automatically awaken you, especially if your thoughts have started to sway during a presentation. A video has a direct way of showing creativity. The audience automatically connects the dots between the video and the presentation lines alike.
To stimulate discussion
A picture is worth a thousand words. There is a way that an added video will help the audience connect to the day’s topic. It will bring up several ideas and stir up discussion with the presenter.
Easy following
With videos embedded in Google Slide, viewers will find it easy to understand and digest. Videos automatically eliminate boredom and make any topic interesting.
How to add a YouTube video to Google Slide
Use these two methods to add a YouTube video to Google Slides. Via the Search and Direct link.
Method 1. Embed YouTube video to Google Slide by search and selection
Google has owned YouTube since the year 2006. You can, therefore, integrate Google’s products with YouTube easily.
Step 1. First, go to the slide where you want to embed your video.
Step 2. Then choose the “Insert” option from the menu bar and hit the “Video” option.
Step 3. It would be best if you now viewed the “YouTube” search bar to type in the video you want to embed. You can use keywords to search for the video in question and view instant search results.
Step 4. Then select the video you want to embed, and you’ll see it appear on the “Slide.”
Step 5. Format your video. Remember that the entire video will be embedded. You don’t necessarily need the whole video. It is time to select just a brief but relevant clip from the video to use. Then position your video to the right point using the axes from the exact starting point to the finished part you want the video to appear in.
Method 2. Embed YouTube video to Google Slide by direct link
You can engage this method if you want to include the entire video.
Step 1. Get the URL of the specific YouTube video that you want to use.
Step 2. Then go to your browser’s “Address bar” to copy the YouTube link.
Step 3. Next, open the “Presentation” slide to put your video to.
Step 4. Choose the “Insert” tab from the menu bar.
Step 5. Then hit on the “Video” option from the drop-down menu that appears.
Step 6. A new window will open automatically. Choose the “By URL” tab.
Step 7. Then paste the YouTube video URL in the “Paste YouTube URL Here” bar section.
Step 8. Wait for the video file to load and press the “Select” option. The video will immediately appear in the presentation slide. Just drag and drop the video in your preferred position.
Note: You can do a few edits inside the application. Set the timer when your video should start and when to stop. You can also adjust the video player size.
How to choose the right video for your Slides?
Not all videos will make an impact on your Google Slide. You need to use the best shot that adds value to your presentation. These guidelines will help you to settle on the best video.
Be Professional – choose the best video for your presentation. Remember that the video is part of the presentation and carries more weight. Settling for quality video will bring out the professionalism in you.
Relevant – how do you know that what you are showing your audience corresponds to the presentation piece? Ensure that the video you add has something to do with the Google Slide presentation topic. The two should naturally flow to make it easy to understand the whole concept.
Precise – your presentation is not about the video. The ideal length should not exceed 60 seconds. The longer the video, the greater the chance for your audience to lose track along the way.
Know every footage you are working with – this will help you pick the best shots for your presentation. So, learn every aspect of the video before settling down to use it.
Add new content – even though one content may suit several presentations, don’t rely on the same piece each time. Your audience will want to feel something fresh each time you are presenting. So, compose different videos for different scenarios to make that big impact.
Create an eye-catching video for your Slides with Filmora
The video quality matters when it comes to creating your Slides. The best video creator – Filmora – works in simple steps to give you an eye-catching video. It will create videos for all scenarios like marketing, tutorial, gaming, etc.
Key features of Filmora
- It offers you advanced video effects like filters, motion elements, etc
- You can multiply your fun with multiple screens with the Split Screen feature
- Easily change backgrounds using the Green Screen feature
- The speed control lets you fast forward or slow down a special moment
- Import your video clips to social media platforms
- You can also adjust the audio of your tracks using the Audio Mixer feature
Follow this guide to create a video for your slide with Filmora
Step 1. Launch Filmora
First, begin by downloading and installing Filmora on your computer device. Once installed, launch it and allow it to run. You can either create a new project or open an existing project to work on.
Step 2. Create a new project
Here, click on the “New Project” tab on the app’s welcome screen. The editor should load immediately. Then proceed to register the product. Just hit on the “Register” tab.
Step 3. Import video
Check the upper left corner of your screen to see the “Import” tab. Click on it and choose the “Import Media Files” option. Next, navigate to the location of your computer’s local list to select the clip or video you want to edit. Then, hit the “Import” button to add the video to the timeline for editing.
Step 4. Edit video
Drag and drop the raw footage to Filmora’s timeline to begin editing. Here, you can trim, add other video clips, merge, and add effects as you wish. Likewise, you can add opening titles, subtitles, and end credits to your video. More so, this tool offers different templates to use. Just drag and drop the templates you wish to use to a specific location on the timeline.
Step 5. Preview your file
Last but not least, you can preview your files. Click on the “Play” tab to start previewing your video clips. The main essence of this part is to allow you to make the necessary changes to your clips if there is a need.
Step 6. Export and Share
With Filmora, you can export your file to various social media platforms. But first, go to the “Output window” and select the video file format to use. This software supports several output formats to apply to any platform and device. Just click on the “Format” tab and choose the file format to use. Then also change the resolution and other parameters like frame rate and channel of your video in the “Settings” section. Finally, share your video to your YouTube channel and get ready to add the video to the Google Slide presentation.
For Win 7 or later (64-bit)
For macOS 10.12 or later
Conclusion
● You now know how to put a YouTube video in Google Slides the simple way. You can search for your YouTube videos or directly use the URL link. Whatever the case, remember that it’s the quality of your video that carries more weight. Thanks to the availability of third-party apps that you can use to create and improve the quality of your videos.
● Filmora is at your service to create high-resolution videos that you can export in any format to your YouTube channel. The tool is intuitive, and it won’t matter whether you haven’t tried it before. It is a perfect choice for both professionals and first-time users.
Also read:
- In 2024, Captivating Content at Your Fingertips Download YouTube for iOS
- Access Exclusive Stock Images Through Vital 4 YouTube Sources
- Cutting-Edge Tech Meets Creativity Top 12 Camera Picks for Vloggers
- Flickering Fonts 2 Innovative Text Techniques
- [New] Avoid Monetization Mishaps Essential YouTube Checks
- In 2024, Aspect Ratios Unveiled A Complete YOUTUBE Manual
- Versatile Viewing Cycle and Catch Up with YouTube Videos on TV
- In 2024, Cinematic Composer Software
- In 2024, Essential Tactics for YouTube Advertising with Banners
- [New] DIY YouTube Music Collection A Comprehensive Online & App Method
- Elevate Engagement Youtube Insights for Timing
- 2024 Approved Capture Your Audience The Smartphone Guide to YouTube Thumbnails
- [New] Empowering Learning Through Educational Videos on YouTube
- 2024 Approved Brighten Up Techniques for Improving Video Lighting on YouTube
- Elevate Your Online Video Quality Mastery in FinalCut for YouTube for 2024
- Taking Photos Steadily on One Leg?
- Direct Transfer Path YouTube Content to Dailymotion Hub for 2024
- Drive Engagement Crafting an Animated Subscribe Button in Filmora's Step-by-Step Guide for 2024
- [New] Elevating Channels Strategies for Stardom on YouTube
- In 2024, Economical Embellishments FREE YouTube Template Packs
- [New] Adobe's Toolset Perfecting Your YouTube Uploads
- Cost-Effective Techniques for YouTube Intro Creation
- [New] Charting New Territory Strategies for YouTube Keyword Research
- Essential YouTube Yoga Channels for Fitness Enthusiasts
- [Updated] Climbing the YouTube Search Rankings Key SEO Strategies Unveiled
- [New] Behind the Mascara YouTube's Top Makeup Artists Unveiled
- [New] Enhancing YouTube Music Soundscape
- Effortlessly Move Twitch Livestreams to YouTube Channel for 2024
- Your YouTube URL, Your Way Easy Personalization Steps
- Deciphering Digital Marketing The Power of YouTube Keywords
- In 2024, PassFab iPhone X Backup Unlocker Top 4 Alternatives | Dr.fone
- Ensuring Smooth Streaming Solutions for FB Livestream Problems
- [Updated] IOS Recording Tools Guide
- In 2024, Easiest Guide How to Clone Google Pixel Fold Phone? | Dr.fone
- Complete Tutorial to Use GPS Joystick to Fake GPS Location On Honor X9b | Dr.fone
- [Updated] Brilliant Visuals Uncover the Magic in These 7 Grades
- [Updated] Finding Your Ideal Video Capture Solution Bandicam Vs Camtasia
- How To Fix Part of the Touch Screen Not Working on Infinix Note 30 5G | Dr.fone
- 2024 Approved Top 5 Chromebook Sniping Apps Essential Clients Reviewed
- [New] Amplify Your Insta Impact Essential 5 Lessons for Influencers & Real-Life Proofs
- Title: 12 Best Vlogging Cameras with a Flip Screen for 2024
- Author: Kevin
- Created at : 2024-05-25 14:13:47
- Updated at : 2024-05-26 14:13:47
- Link: https://youtube-videos.techidaily.com/12-best-vlogging-cameras-with-a-flip-screen-for-2024/
- License: This work is licensed under CC BY-NC-SA 4.0.
